How to Use ND Filters for Long Exposure Photography
In my last blog post, I discussed the use of long exposure photography to capture stunning landscape vistas. So let’s now discuss what you need to take truly successful long exposure images. I love long exposures to help tell the story of a location and create a sense of place. Neutral Density Filters (ND filters) are perhaps the single most important piece of equipment (other than the tripod) to capture landscape photos with slow shutter speed.
A Look at Neutral Density Filters
ND filters are simply very dark pieces of glass that are held in front of the lens during the exposure. They limit the amount of light hitting the sensor and allow for much longer shutter speeds. If you’ve ever tried to use a very long shutter speed during the day, you will recognize the value of being able to limit the amount of light coming into the camera.
These filters are typically available with names such as 3-stop or 10-stop, indicating the number of stops of light they reduce the exposure. Because you are aiming for a long shutter speed, you usually choose a low ISO and small aperture and then allow the ND filter to lengthen the shutter speed. You must consider the amount of ambient light and the desired shutter speed and effect when you are deciding which strength of ND filter to select.

Square Neutral Density Filters for Nature Photography
ND filters come in two types: square pieces of glass that slide into a holder that is clamped onto the front of the lens or the more traditional round screw-on filter, similar in style to a circular polarizing filter. I prefer the round filters because I find it easier to use in the field with less chance that I will drop it.
Some filters can produce a marked color cast, so it pays to do your homework and research the various available ND filter offerings. Don’t skimp on this purchase, because they will last for years with care and you will be rewarded with good results.
Using ND Filters to set your Shutter Speed
To make sense of all this, let’s look at an example image and discuss how I decided to do a long exposure technique. I’ll then show you how I went about achieving the desired slow shutter speed.
This photograph is from autumn in the Smoky Mountains. Photographing the streams in the Smokies, especially when the leaves are colorful, is one of my favorite things to do. I hiked to the area below this bridge and waded into the water to get the composition I liked.

Landscape Photography using ND Filters
I prefer to photograph streams when the light is soft, either from overcast skies or at the beginning or end of the day. If there is a very misty rain, even better! A misty rain saturates the colors and makes the rocks wet and dark. This particular day was quite overcast and a light rain had just stopped, so I had even, low-intensity light. Look for that when you are trying out long exposure because you will naturally start with a longer shutter speed.
For this shot, my initial exposure settings were ISO 100 (lowest), f16 (smallest aperture without diffraction) – this yielded a shutter speed of 1/30 second. I shoot in manual mode, but you could easily do this using aperture priority mode.
My typical field workflow is to take a shot with this first exposure and check the results on the LCD. 1/30 was not a long enough shutter speed to give a nice smooth flow lines in the water. Because I was already using a small aperture and low ISO, I needed to reduce the light entering the camera to get the desired slower shutter. I placed a neutral density filter onto my lens which held back some of the light coming into the camera and gave me a longer shutter speed. By placing a 6-stop ND filter on my camera, I achieved the desired shutter speed of two seconds and got a nice blur to the water.
Notice the beautiful “fingers” of the flowing water over the rocks, made possible by the longer shutter speed. This effect is a matter of personal preference. Some folks like distinct fingers in the flow and some like what I call fluffy water. Because I prefer to have some texture in my water, I try different shutter speeds to make sure I get exactly what I want. Increasing or decreasing the shutter speed by a second makes a huge difference in the appearance of the water.
Experimenting with Shutter Speed
As is my usual workflow in the field, I raised my ISO by one stop and reduced my shutter speed one stop, leaving the ND filter in place. I then took another shot. I repeated this several times so that I had a variety of textures as the water tumbled over the rocks. By doing that, I’m sure to have several shots with different looks to the water and I can later pick my favorite on the larger computer screen.
When you are setting up a shot such as this one, know that you MUST do this type of shot on a still day. If the leaves in the trees are moving, they will blur during the long exposure and you will not be happy with the result. The cornerstone of a good long exposure image is that part of the scene is moving and part of the scene is still. It’s the contrast that makes the photograph so dynamic. Even a slight breeze would have blurred the leaves and I would have discarded the image. Be mindful of the conditions when you are selecting a long exposure technique. Go on an overcast, still day.
Challenges with using Neutral Density Filters
Color Casts

Green color cast with an ND Filter
As I mentioned above, one of the problems you may encounter with some ND filters is the addition of a significant color cast to you final image. Some ND filters are particularly prone to color casts, so be sure to explore all your options before deciding which filters to purchase. Here is an example of this color cast making the water appear much bluer/greener than it was to my eyes.
This is an unprocessed RAW file; I made no adjustments to the coloration. You can remove this color cast in Lightroom or Photoshop. However I find it difficult to get the color just right because I am not able to remember exactly how it originally looked. I am much happier if I use an ND filter that doesn’t give a heavy color cast. I get accurate color with less work.
If you already have ND filters that have a strong color cast, I suggest taking a reference shot before placing the filter on the lens. This way, you can later try to match colors between the two images.
Vignetting
Another issue with the use of ND filters is vignetting. This is often a problem when stacking multiple ND filters or stacking an ND filter with a circular polarizer. My bag usually has three ND filters: 3-stop, 6-stop, and 10-stop. While it’s true that you can stack the round filters and get by with just the 3- and 6-stop filters, you run the risk of significant vignetting when you screw filters together, especially on a wide angle lens. Your work is important enough to warrant having all three filters.

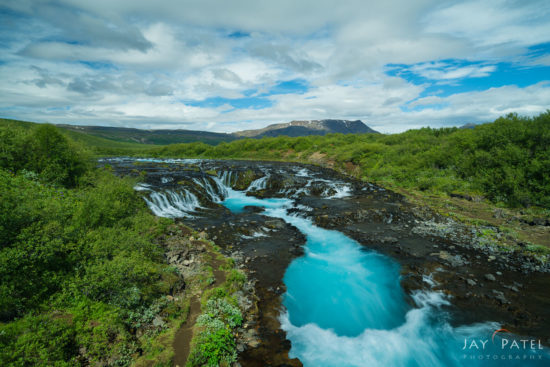
Landscape photography with a ND Filter & a Circular Polarizer – Bruarfoss, Iceland
If you are just beginning your journey into long exposure photography, I would start with a 6-stop filter. I find that I have the most flexibility with the 6-stop by adjusting my ISO up and down. If you are enjoying using longer shutter speeds, then you can invest in the other filters later.
Using ND Filters with a Circular Polarizer
I always have a circular polarizer with me when I’m doing landscape photography. The ability to reduce reflections on wet or shiny surfaces and remove glare cannot be replicated in post production. You cannot effectively mount a circular polarizer on your lens if you are using a Square ND filter. So, if you are planning to purchase a square ND filter kit, I recommend that you purchase a compatible circular polarizer. I use round, screw-on ND filters; I can just screw them onto the polarizer that is already on the lens.
Wind
The final consideration that I will stress when you are using ND filters is the issue caused by wind. I love to take a very long exposure shot when the clouds are moving in the sky. The blurring of the clouds can give a sense of drama to a relatively ho-hum location.
But, remember that the clouds are moving because of wind! So the grasses and trees in the foreground will also be moving due to the wind. They won’t be nearly as beautiful when they are blurred. You must train yourself to analyze the scene for moving and static elements. By doing this, you can capture stunning long exposure landscape photos. Here is a look at a location that presented this type of challenge:


Shutter Speed: 1/8s – Coquille Lighthouse in Bandon, Oregon

Long exposure photography with 3 & 6 Stop ND Filters – Coquille Lighthouse in Bandon, Oregon


After Post Processing – Coquille Lighthouse in Bandon, Oregon


This is an unprocessed RAW image of the Coquille Lighthouse in Bandon, Oregon. I found it to be a bit uninspiring when I visited. However, I noticed that the clouds were moving across the sky in a gentle breeze. This brought long exposure to mind.
I noticed that the same breeze that was sending the clouds along in the sky was also moving the grasses. So I took two images, this first shot above was at 1/8 second, which produced fairly sharp grass. In the second photo, I placed a 3-stop and a 6-stop ND filter on my lens. My resulting shutter speed was 60 seconds, which was just the right amount to give a nice blur to the clouds.
First, notice the vignetting that occurred because I was stacking filters. I managed this with some work in PS, but just remember to expect vignetting if you stack filters. Second, notice the blurry foreground. I anticipated and dealt with by this by taking an initial fast shutter speed image with an equivalent exposure. I then blended the two shots in PS and came away with my final image.
Landscape photographers aren’t always gifted with perfect light conditions that lend themselves to wall hangers. With the creative use of ND filters, it is possible to take an ordinary scene and make it visually appealing.
I hope this has inspired you to try out long exposure photography! It is a handy technique to have in your quiver to add a sense of motion and drama to a scene. So grab some ND filters and go outside and play. I’d enjoy seeing your images in the comments below.
About Author Jane Palmer
Jane Palmer divides her time between being a Nurse Anesthetist and a landscape and underwater photographer. A lifelong passion for nature and animals led her to spend more time outdoors with her camera, observing animal behavior and photographing them in action. She has been an avid underwater photographer for 10 years and recently began teaching photography. She often leads dive trips to exotic locations and assists divers who want to learn more about underwater photography. Jane currently lives in St. Louis MO with her husband, who loves scuba diving as well. Jane’s strong background in Lightroom and Photoshop allows her to help her underwater students get the most out of their images. So whether she is hiking in the Smokies or scuba diving in the Philippines, you can be sure Jane has her camera in hand to capture the beauty that nature provides for us.


