Black and White Photography Tips to Control Tonal Contrast
Black and white photography offers infinite ways to control the mood of a finished image. Don’t get me wrong, color can go a long way toward evoking feeling – but black and white photography allows me to get creative with careful control of tonal contrast. When I set out to create a black and white photo, I usually know what I’m looking for… but producing a finished product that matches my plan isn’t always easy.
I love playing with black and white photography presets in NIK Silver Efex. But I don’t usually just stick with the presets. Because I know what I want to create, I often start with a preset and then tweak it. Sometimes I use a second preset as well, blending the two using Photoshop layers and masks afterward. The following are some black and white photography examples where I have used Photoshop layers and masks to control the tonal contrast in my nature photos.
Black and White Photography on a Foggy Day
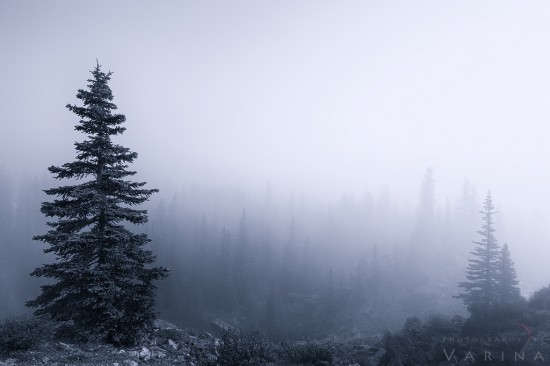
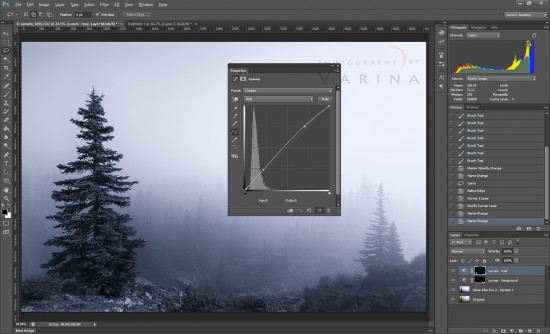
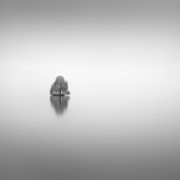
I took this shot early in the morning near Moraine Lake in Banff National Park (Alberta, Canada).
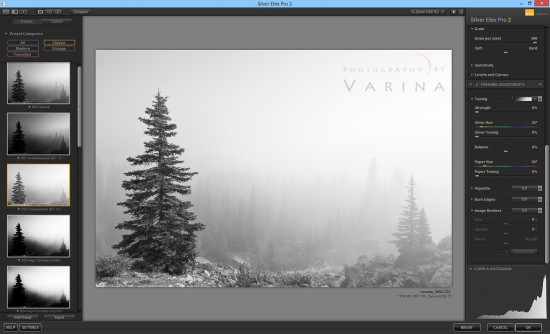
To achieve this look, I started with one of my favorite presets – Overexposed EV+1 – with some minor adjustments to slightly enhance the contrast. When I finished making adjustments, I clicked OK to open it in Photoshop, and the reopened my original color photo in Silver Efex. I planned to use this conversion for contrast and depth, but I also wanted a slight bluish tone for this foggy shot. Of course, I could have made more adjustments to settings within Silver Efex Pro itself, but I sometimes prefer to work in layers so I have as much leeway as possible as I work.
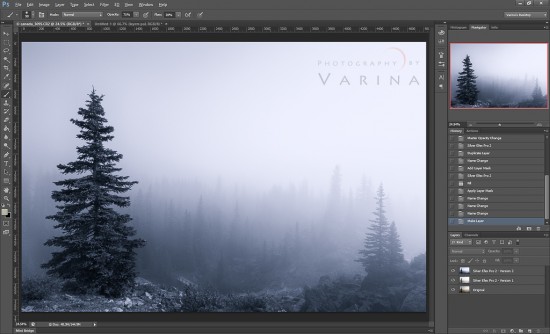
When I opened my original image in Silver Efex for the second time, I chose the Cool Tones 2 preset. I removed the border and enhanced the blue a little more. Then, I opened that version of my image in Photoshop as well. Doing so created a second layer on top of the first conversion. I wanted those strong blue tones from the top layer, and the contrast from the lower layer. So, I chose the Color mode option in the Layers palette. This is a quick and easy way to keep the color from the top layer, while letting the contrast from the lower layer take over.
The next step was a bit of targeted contrast adjustment. I brightened up the base of the tree, and darkened the foreground – being careful not to lose contrast there. I zoomed in to check the details. In this case, I needed to slightly reduce the noise for a smooth finished shot.
Adding Depth in Black and White Photography
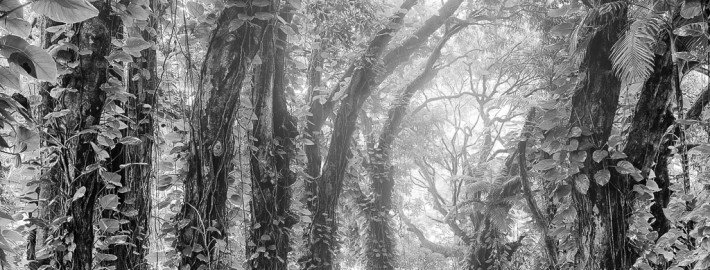
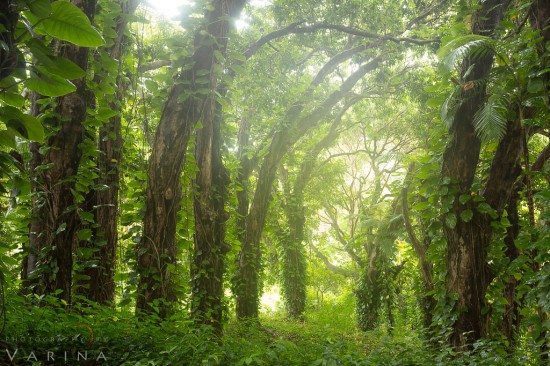
When I took this shot on the Big Island of Hawaii, I knew exactly what I wanted to do with it. Although the colors were rich and beautiful, I wanted to create a black and white version that would show off the soft contrast in the distance and the repeating curves in the trees.
When I want to convert to black and white, I often start by producing a finished color image. I want that full-color shot for comparison, for my archives, and in case someone asks for a color print.
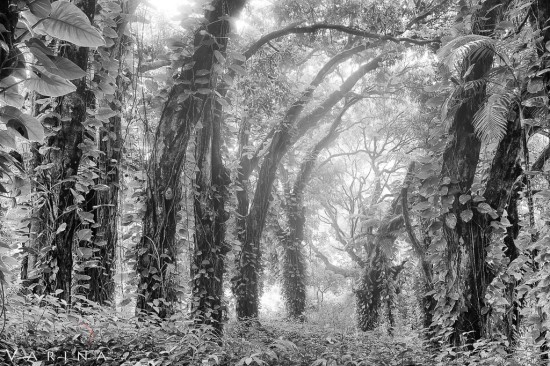
For this shot, I started by adjusting the color balance – just as I would for any other photograph – and went through my entire normal processing workflow. Once the color photo was finished, I saved it and then got back to work making adjustments for a black and white conversion. What stands out to you in the color version of the photo versus the black and white version? For me, the color version speaks of fresh, lush forest. The black and white version is a study of pattern and depth.
Before I get too far ahead of myself, I take a look at the finished color image and think about what I want to accomplish with my conversion. In this case, the image was about patterns and repetition. I wanted to make sure that the repeating patterns in the trees really stood out – so contrast was important. In addition, I wanted to highlight the beautiful softness of the light filtering through the mist.
I started by opening the image in Nik’s Silver Effex Pro. Selecting one of my favorite presets (024 Full Contrast and Structure), I made a few tweaks to the image. I reduced the midtone structure just a bit and then reduced the highlight tonality protection to make sure I kept the incredible glow on he leaves. Below, you can see what the Nik black and white conversion looked like (Image #1).
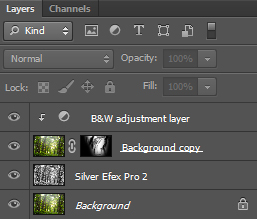
I loved the contrast in the finished conversion, but maybe you noticed that the mist seems to have gotten lost. No problem. To bring it back, I needed a second black and white layer – and a mask. I hid my Silver Efex layer (I didn’t delete it) and started again with the original color layer. This time, I used a simple Black and White adjustment layer. I converted the image to black and white again – this time, making sure I maintained the very soft contrast in the misty distance (Image #2).
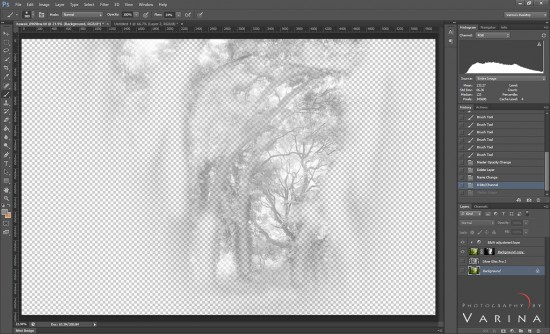
In Photoshop, I created a mask so that the Black and White adjustment layer would have an effect only where I wanted it. I used my Wacom stylus to draw a simple selection and feathered it pretty broadly – then created a mask from that selectiobn. I zoomed in close and made a few adjustments to the mask with the paintbrush tool to make sure I maintained a very natural look. I didn’t want tree trunks that were close to me to look hazy – just those in the distance – so blending the layers carefully was important. Here’s the black and white adjustment layer with the other layers turned off. You can see that the adjustments I made to this layer only show up where I wanted them.
You can see that I started with the background layer (the bottom layer) and then created a Silver Efex layer for contrast. Then, I duplicated the background layer and placed it on top of the others. I created a black and white adjustment layer and added a mask to the background copy layer. I was able to add depth to the finished image by controlling the tonal contrast in both the foreground and the background in my black and white photo.
Smooth Tonal Gradation in Black and White Photos
When I convert to black and white, I want a clean, noise-free image with smooth transitions between tones.
Here are a few tips for smooth conversions:
- I use Nik Silver Efex Pro, but you can use whatever software works best for you. Just make sure you have ultimate control. Silver Efex lets me adjust all the parameters individually so that I can deal with the specific needs of each photo. I often look through my favorite presets for inspiration and, when I find something I like, I consider that my starting point. If I’m not sure about changes I’ve made, I can just go back in “history” to compare.
- No matter what software you choose, use a light touch. Extreme adjustments for black and white photography can produce noise, artifacts, and banding. Your smooth tones will go right out the window.
- Bring out true black and true white for great contrast but don’t overdo it! Too little contrast, and you’ll end up with a dull and unappealing photo. Too much contrast, and you’ll lose details. A little bit of deep black and bright white go a long way. The trick is to produce smooth black and white tones in between those two extremes.
- Don’t be afraid to try high-key or low-key conversions. Sometimes, using only bright tones – or only dark ones – can produce something really cool. It just means that the transitions between tones should get even more attention. But that’s another blog post entirely. :)
Experiment and Have Fun
Black and white photography lets you take away the distraction of color and allows your viewer to focus on other elements of your image, like patterns, tones, contrast, and detail. When working with black and white photos, watch your highlights and shadows in Photoshop. Most of the time, the best black and white photos have a nice range of tones – all the way from black to white. Don’t let shadows or highlights overwhelm the shot. Check for details in the brightest and darkest areas. For lower contrast scenes, try high or low-key conversions! It’s a lot of fun to play with different styles!

