Post-Processing Tips for Perspective Correction
When you are shooting with a wide angle lens, you often find that your images appear to be distorted and do not match the scene you are trying to capture. We often refer to this kind of physical distortion as perspective distortion. Landscape photographers face two kinds of perspective distortions when shooting with a wide angle lens:
- Perspective distortion: Have you noticed that the object that is further away from your wide angle lens appears much smaller compared to those that are closer to the camera? This type of distortion is known as perspective distortion. This is caused by the relative distances at which the image is captured and viewed, as well as the focal length of the camera lenses used to capture the landscape photo.
- Keystoning: Keystoning is another common problem that landscape photographers have to deal with when shooting with a wide angle lens. Have you ever tried taking a photo of a group of trees only to have them look like they are leaning in the final photo? This kind of perspective distortion is known as keystoning and it’s caused by the trees and the camera lens being on two different angles. Wide angle lenses pointed up or down easily cause keystoning.
In landscape photography, perspective correction is a warping or transformation of an object and its surrounding area that differs significantly from what the object would look like in camera vs. a normal focal length at 70mm. Perspective corrections and warping ride a fine line between digital art and reality. I sometimes feel really uncomfortable warping or changing the perspective on a mountain or sand dune. I want to keep my photography as close to reality as possible and I’m not sure if plumping up a sand dune is ethical. When does your image become digital art vs. what is actually in front of your face? I tend to lean conservatively when it comes to these types of adjustments and corrections.
Here are some post-processing tips for perspective correction in Photoshop and Lightroom:

Mountains in the left image are distorted in post-processing. The right image is the original.
In the realm of landscape photography, we are typically shooting a scene ultra wide. I’m usually around 16mm when I’m out shooting in nature. It’s important to keep in mind that 70mm is the focal length that is actually what we see with our own eyes. Objects at 16mm are smaller than they are in real life. So those big booming mountain ranges look less than dramatic at 16mm. Herein lies the argument where warping something is acceptable. Stretching up some mountains and sand dunes in post processing just a little in the background is one reason to warp. The other is creating digital art for the wow shock effect. Over exaggerating too much isn’t what is in front of your lens. Finding the fine line between the two in post processing can be really tricky as it relies on your personal preference.

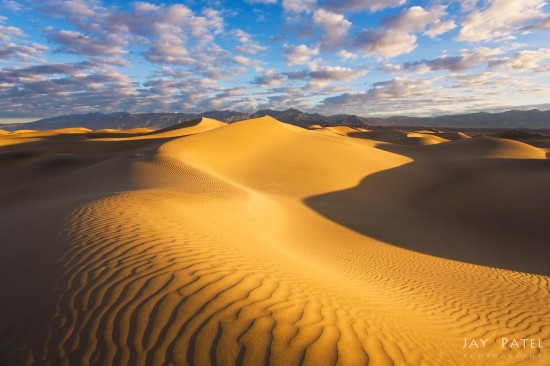
The left image is original. The right image has perspective correction applied to the sand dunes in post-processing.
Perspective Correction in Photoshop
I do my slight warping adjustments through Photoshop. Here’s how I do it:
- Open an image and create a duplicate layer from the background. I rename it to warp so I know what adjustments were made on that layer. Under Edit, I select Perspective Warp.
Here is where you create grid boxes over the entire image while the Layout button is selected. I usually select the one area that I want to warp first.

Step 1: Selection for Perspective Correction in Photoshop
- Draw grid boxes around the first selection. Make sure that the box edges all snap together. When you get them close enough they will change to blue and connect to each other.


Step 2: The entire image covered in grids in Photoshop


Step 3: The image after over-exaggerated warping.


- After the entire image is covered in boxes, click the Warp button.
I then return to the first box I drew and drag out the edges until the object is warped to my taste. You may have to stretch and adjust the other boxes around it and end up cropping out some of the image along the edge. - Click the check mark to accept the changes.
Keystoning Correction in Lightroom
Keystoning is something I really have to deal with when shooting architecture and real estate. I’ve also seen it pop up every once in a while when photographing vertical lines, such as a grove of trees. The trees can appear to lean towards the center or edges of the image. This can be easily fixed by either a simple lens correction or transforming the vertical or horizontal lines back to parallel.

The left image show the keystoning effect caused by a wide angle lens. The keystoning effect is corrected in Lightroom in the right image.
In Adobe Lightroom under Lens Corrections, make sure that the box for Enable Profile Corrections is checked. This makes automatic adjustments to lens distortion and vignetting. The distortion correction fixes a bit of the keystoning effect.


Step 1: Keystoning correction in Lightroom


Step 2: Apply manual post-processing correction in Lightroom as needed.


Sometimes it is not enough. In this case you can go under the Transform section and either click auto or make manual adjustments to the perspective by changing the vertical and horizontal adjustments. The downside to this is having to crop out some of the information on the edges of your images. You can do this automatically by clicking on the Constrain Crop box.
Wrap Up
In conclusion, perspective correction is OK in moderation. I find over-exaggerated mountain ranges to be a distortion on reality. Keystoning correction is pretty critical in getting your vertical lines straight and is quintessential in architecture and real estate photography. I also use it to get my vertical lines straight in landscape photography.
How do you feel about perspective wrapping for landscape photography to be larger than life? Please comment below.
About Author Lace Andersen
Lace is a full-time freelance photographer. She grew up in the farm town of Templeton, CA and majored in Graphic Communications. She started taking basic photography classes in 2008, and discovered her passion to create and be outdoors. She spent 8.5 years living on the island of Kauai, and moved to Utah at the end of 2020. When she doesn’t have a camera in hand you can find her hiking, camping, climbing, and playing sports.


