3 Highly Effective Bird Photography Composition Lessons
My first South Georgia Island bird photography expedition was in 2012; we circumnavigated South Georgia before heading to the Falkland Islands. It would be three years before I would return for my second visit. South Georgia is located in a remote part of the world and is fairly difficult to get to, for me it required several flights. My journey started in New Jersey where I took a flight to Dallas Texas. Next I flew to Santiago Chile. I spent a two days there before continuing on to Puerto Arenas and then to Mount Pleasant in the Falkland Islands where we boarded our vessel for the 3-day, 900 mile sea crossing.
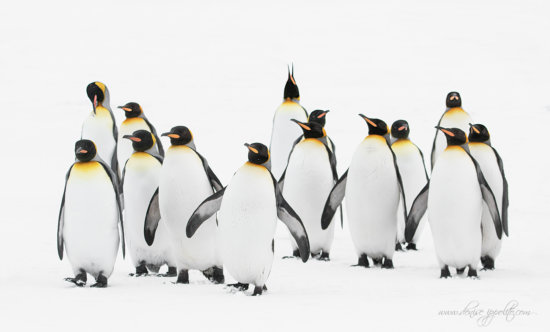
My targeted subjects for both trips were the variety of birds that call South Georgia home. I had the opportunity to observe and photograph six different species of penguin, including; Gentoo, King, Macaroni, Rockhopper, Chinstrap and Magellenic. The King Penguins were my favorites and just seeing one up close in-person was way more than I had ever hoped for. During our time at the big colonies we saw many “Oakum Boys.” The young King Penguins were named because their brown color that looks like the rolls of oakum (rope made from hemp fibers) once used to caulk old wooden ships.
To create stunning bird photos you need to pay attention to your photography composition. Composing for bird photography is not very difficult but there are a few things to consider when doing so.
Bird Photography Environment
First you’ll need to consider the subject and the environment. How much of the environment do you want to include while photographing birds? If the environment is stunning or holds a lot of interest than you will likely want to include more of it. I often like my images to give at least a hint of where they were captured. If the background or perch is not pleasing than I will go in for a tight shot with a telephoto lens and exclude the distracting elements.
The raw, natural environment provides a beautiful sanctuary and breeding ground for the plentiful wildlife found on these islands. During both of my trips we made several landings, including; Right Whale Bay, Gold Harbour, Fortuna Bay, St. Andrew’s Bay and Salisbury Plain. Some of my bird photography compositions from these locations also included the landscapes to give a sense of place to my bird images.
Orientation – Horizontal or Vertical?
Another popular place for wildlife photography is Falkland Islands: a remote South Atlantic archipelago. Some of the more popular hot spots include: The Neck on Saunders, Volunteer Point, Steeple Jason, Carcass, Pebble, Sea Lion and Bleaker. One reason this destination is so popular with photographers is because you do not have ropes and guards, you are free to roam the land at your leisure, photographing whatever you like when you like. There are some common sense rules that apply whenever photographing birds but the freedom that you enjoy on the Falklands makes it a number one spot for many.
Many bird photographers forget to turn their camera vertically but sometimes you will have a situation that works best as a vertical.
I also consider the action that I am capturing before I decide what is the best size and orientation for my photography composition. For example: A bird flapping it’s wings needs room around the frame, especially at the top. Another thing to consider is room for virtual feet.
Other things to consider are sun angle and wind direction; when photographing a bird having the wind and sun at your back is usually optimal. Why? well, birds take-off and land into the wind. Have you ever heard the words “ruffled feathers”, birds don’t like to ruffle their feathers so they will flap into the wind, stand into the wind, etc.. Having the sun behind you and pointing your shadow at the bird will help to eliminate shadow lines and illuminate your subject.
I usually try to avoid mixed, dappled light or harsh light in most situations. Sometimes a back lit subject can have a lot of appeal. It is best to evaluate the available light before deciding your shooting angle.
Consider the Head Angle
We hear a lot about head angle. For me it makes a lot of sense to capture an image of a bird when it’s head is slightly turned towards you. Having a bird looking out of the frame can work but it needs to make sense. If you have a bird that is small in the frame and it is looking off into the distance that can sometimes work very well.
When birds are interacting then I see no reason why they need to be totally engaged with the photographer, however I do like to see some kind of head angle because even when the action is incredible it almost always makes a better image when you see their eyes or heads turned towards you.
There are so many things to consider when photographing birds but this should get you started or at least headed in the right direction.


 Grant Collier
Beautiful images and helpful advice on bird photography. Nice work Denise.
Thank you Jim😊