4 Ideas to Improve Every Landscape Photography Composition
It happens to all nature photographers. At some point or another, it will be a struggle to find a compelling landscape photography composition. The pristine beauty overwhelms you as the sky is a blaze of fiery colors. Similarly, there will come a day after hours of hiking, you arrive somewhere with bleak weather conditions and a mundane setting. It is a day when nothing appeals to you and you are underwhelmed to pull your camera from your pack. For either scenario, consider these 4 tips to help improve every landscape photography composition you contrive.
#1: Rank your Zones & Unclutter
When you are looking out over a beautiful location, it is so easy to want to include everything in a composition. However, sometimes less is more. While it is easy to say unclutter the composition, how do you make the decision of what to include and what to exclude when you are in the field? One technique is to rank the zones of the composition. Look at the foreground in front of you, the midground, as well as the background. Determine which part of the photography composition deserves the most attention. Choose the part of the composition that drew you to that particular spot. With that in mind, compose around that area. That is the story or message you should try to convey to the viewer with the image.

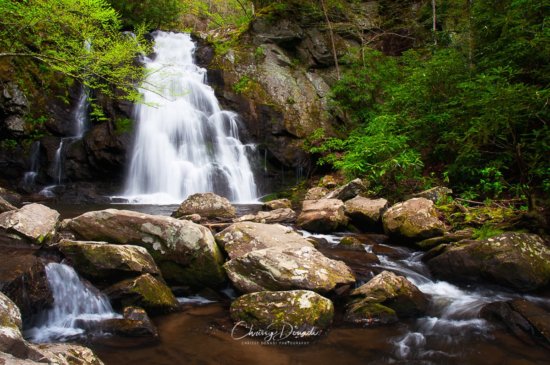
Landscape photography composition to try and highlight the cascading waters
In the image above, despite the vibrant fall colors, my goal was to highlight the water cascading from the flat rock formations. Therefore, I chose a wide-angle lens to highlight the water. The fall color became more of a supporting actor in the photography composition.
#2: Find the Right Focal Length
Next, determine how to highlight or draw the viewer’s eye to the preferred zone or area of the photograph, which is your main focal point. An important concept to consider is how different focal lengths will change the perspective of your zones. For example, when shooting at wide angles on a full frame camera, small foreground objects can look enormous while shrinking the landscape in the background. Similarly, longer focal lengths compress scenes, making objects in the background appear closer to the foreground and midground objects.
If you were drawn to the stream swirling at your feet in the foreground, perhaps go low and close to the ground with a wide-angle lens to have that part of the composition fill more of the frame. On the other hand, try using a 70-200mm focal length if you want to highlight the mountains in the distance. Here are some examples on Visual Wilderness that shows how landscape photography can change based on your choice of the focal length:
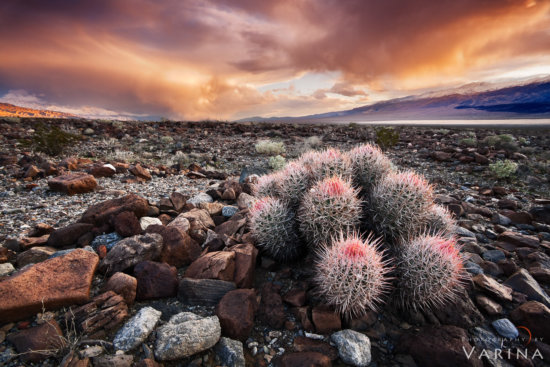
 - Death Valley National Park, CA")
Image #1: Focal Length: 10mm (on crop sensor) – Death Valley National Park, CA
 - Death Valley National Park, CA")
Image #2: Focal Length: 37mm (on full frame sensor) – Death Valley National Park, CA
 - Death Valley National Park, CA")
 - Death Valley National Park, CA")
In image #1, the focal length of the camera lens is chosen to highlight the pink cacti growing the Death Valley National Park. On the other hand, we used a a longer focal length of 37 mm in image #2. This made the mountains and the storm a more prominent part of the image. The focal length contributes to whichever story you wish to tell as an artist.
Last, what if you need both the foreground and background in the image with perspective? Then, the next step is to learn about perspective blending and focal length blending. Both are more advanced techniques. However, they are worth the time it takes to understand the concepts. These techniques will enable you to include more of that foreground in the composition and at the same time keep those mountains and swirling clouds from shrinking into a less significant background feature.
#3: Consider using Color Theory
While light and shapes are important in photography compositions, the colors within the composition should not be overlooked. Color harmonies show what works, what doesn’t work, and how color communicates to our eyes. Without writing a book on the subject of color theory, one of the basic principles is to apply complementary colors through the color wheel. The color wheel consists of three categories: three primary colors (red, yellow, blue), three secondary colors (green, orange, purple), and six tertiary colors.
 in photography composition.")
Complementary colors (Green & Purples) in landscape photography composition.
In the image above, capturing the yellow morning sunlight (as well as the green) was a perfect complementary color to the purple bluebells carpeting the forest.
If you look at a color wheel, colors located opposite of each other are complementary. With a sharp contrast between the two colors, it tends to make the image pop. Blue and orange, purple and yellow, as well as red and green tend to be visually appealing color schemes to include in a photo.

Color Wheel with Primary, Secondary and Tertiary Colors used in Photography
Applying color theory isn’t a hard rule. Not every landscape image is or should be showcasing complementary colors. Rather, it is something to consider when choosing a composition or to help get your creative juices flowing in the field.
#4: Edges Matter – Leave Breathing Room
Right before you are about the press the shutter button, review the composition with a technical eye. Specifically, edges matter. Look at the corners and space around the frame of the composition. Ideally, you don’t want to have things distract or be cut off in this area. I prefer to leave a little breathing room around my composition in the field. Once the image moves into post-processing, then I will apply a small crop as needed. This leaves me with some flexibility in post to keep the edges cleaner and less distracting. Moreover, it allows me to reconsider where exactly I’m going to cut off a portion of the landscape. It surprises me how many times I adjust my final crop based on the edits made in post-processing.
To determine a composition more pleasing to the eye, I carefully considered how the rocks and water would fall around the edges of the frame.
For example, I carefully considered how the rocks and water would fall around the edges of the frame when I was dialing in my final composition. I tried my best to find the point that was most pleasing to the eye.
I hope these ideas offer guidance on how to find a compelling photography composition in the field. Share your guidelines for making composition choices in the field below. Happy shooting!
About Author Chrissy Donadi
Chrissy Donadi is a professional photographer, photo educator, and writer born and raised in Pennsylvania’s Pocono Mountains. She spent many years in the engineering world working long hours and with stressful deadlines. Then a career-based moved to a foreign country pushed her into photography. With no friends or family near or even in the same time zone, Chrissy found herself with a lot of free time, a camera, and some nearby mountains were calling her name. What started as fun weekend excursions quickly developed into a hobby and then spiraled into an intoxicating and blissful obsession. She spent the subsequent years maturing her talents and now works solely as a travel, nature, and landscape photographer. With as much as Chrissy thrives in creating images, she equally enjoys teaching and sharing her passion with others.


Thank you so much for this brief lesson, before stepping out the door I can feel this will push me to the next level.
Very glad to know! Wishing you great light and happy shooting!
Leaving room allows one to print different formats- an 8X10 is difficult to make from a 4×6.
Yes, another excellent reason to leave some breathing room with each composition.