Bird Photography Tips For Making Your Subject Stand Out
As a bird photographer, I always prefer to see birds perched or flying against colorful backgrounds that accentuate their beauty. It is in the hands of the photographer to bring birds to life thru carefully crafted bird photography composition. Many photographers go into a shooting spree when they see a bird, often not taking the background or negative space behind it into consideration. This shooting spree seldom results in spectacular bird photography. Jaw dropping bird photography requires a photographer to use all his technical skills and creativity to isolate his subject from the background.
Take a look at the two photos of a common kingfisher perched on a branch. In Image #1 the distracting objects background competes with our subject by drawing attention away from the subject. Clean negative space in Image #2 allows the view to focus on the beauty and elegance of the kingfisher.


Image #1: Brid photography composition with distracting background – Canon 5D Mark III / 600mm / 1/160 @ f/8 / Gitzo Tripod / Common Kingfisher

Image #2: Brid photography composition with clean negative space – Canon 7D Mark II / 600mm / 1/125 @ f/9 / fill Flash / Gitzo Tripod / Common Kingfisher


Here are concepts that will make your bird photography can go from looking ordinary to spectacular.
Change Your Perspective
Look behind the bird and see if there is an area where with a clean patch. This means you may have to go lower, higher, and side-to-side to find a position to ensure the bird’s perch is away from any background distraction. Birds are creatures of habit and often return to the same area; so frame the image and wait. Always think about and look at the elements that will distract your audience from the bird; eliminate these elements while framing the image. Both of the images above are of the Common Kingfisher. It’s evident that the second image clearly makes the same bird look very attractive due to the cleaner green background.
Get Creative with Depth of Field
When using a telephoto lens, take into consideration that a large aperture gives you a shallow depth of field and throws the background out of focus. While a clean background may be pleasing, it can also make your images look redundant and boring. It’s ideal to use DOF to your advantage and to get creative. By closing down the aperture, essentially increasing the f-stop number, you can introduce some amount of the background with a subtle and creative effect. A textured look with varied tones can be pleasing and can complement the bird. By simply moving slightly to the left, I was able to bring in some distant tree branches behind the Coppersmith Barbet.
 to create soft background.")
Coppersmith Barbet captured with Canon IDX + 600mm telephoto lens (1/800s@f/8 + Fill Flash) to create soft background.
Photographing bird using silhouettes
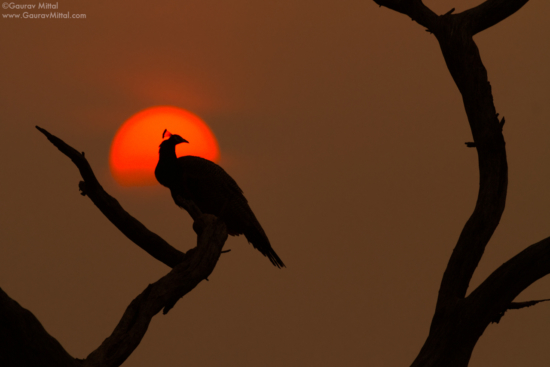
Another creative way to make your birds stand out in your photos is by using silhouettes. When photographing birds, we mostly consider showing their beauty by capturing sharp images with lots of details, often shooting portraits or capturing their behavior. While that is exactly how I like to photograph birds and never get tired of it, it’s always exciting to think outside the box and get the creative juices flowing. Photographing bird silhouettes is a technique where we capture their flight, movement, or portraits in a manner where only their dark outlines are visible against colorful backgrounds. If executed properly, silhouette images can render the scene, subject, or both looking visually stunning and artistic.
")
Bird photography silhouettes of Indian Peafowl – Canon 7D + 100-400mm Telephoto lens (1/640s@ F/5.6)
Timing & Location
Sunrise and sunsets are the best time for creating rich, colorful, and visually-pleasing silhouettes. It is extremely important to scout out the best locations and conditions for creating silhouettes. That means looking for the best locations from where you have a clear view of the sunrise or sunset as well as paying attention to the subject’s activity around these areas. Whether shooting at sunrise or sunset, try to include the sun; preferably keep it behind your subject for a more artistic appeal. This also helps to set a mood and a tone for story telling images about the location.
Exposure for Bird Photography Silhouettes
Before framing any birds, meter the sky where it is the brightest and adjust the exposure compensation setting to achieve the right exposure. While I always shoot in Evaluative metering mode, I suggest that you try Spot metering mode for silhouettes and pick a mode that fits your shooting style. Spot metering mode is often recommended for silhouette subjects.
A washed-out or a very bright looking silhouette without clipping the highlights is a sign that your histogram is pushed to the right side and a good exposure has been achieved. A histogram that shows a range of tones from dark to bright is a good indicator that the image has minimal noise. In post processing, the exposure, color, and contrast can be adjusted to bring back the rich colors. The relatively low noise can be removed without affecting image quality.
")
Black-headed Ibis silhouettes at golden hour – Canon 7D Mark II + 600mm telephoto lens + 1.4X converter (1/2500s@F/5.6)
")
Black-headed Ibis silhouettes at golden hour with more details in the birds – Canon 7D Mark II + 600mm telephoto lens + 1.4X converter (1/1600s@F/5.6)
")
")
Get more creative with silhouettes; instead of always rendering your subject as a black outline, try rendering some details. This may help capture a behavior and render the image much more visually appealing and impactful to your audience. Keep in mind that the best color in the sky appears closest to sunrise and sunset when the light is dim. Adjust your ISO up or down to achieve the required shutter speed; this will depend on whether you want to render the bird frozen or add some motion blur.
During post processing you can also manually set the white balance manually to between 7,500 Kelvins – 9,500 Kelvins. This will further warms up the image and adds a bigger punch to create fiery silhouettes. Finally I would like to mention that even while shooting silhouette images, you should have a sense of purpose for why you are making these images and what you want to convey to your audience.
Avoid Blue Skies
Unless there is a spectacular aerial fight or action happening between some birds, generally avoid the friendly blue skies. It’s much more appealing to show the bird in its habitat; it tells a story about the bird’s life and where it spends its time hunting or feeding. In the image above, I waited until the Streaked Spiderhunter came out from a nearby tree and flew onto the hanging tree vines, which these birds frequent for feeding and lookouts. As soon as I got eye contact, I pressed the shutter.

Hand Held bird photography of Streaked Spiderhunter with Canon IDX & 600mm telephoto lens
It’s extremely important to keep in mind that, when photographing birds, the background is just as important. The background complements the bird and accentuates its beauty as well as helps tell its story. Silhouette can also be an effective bird photography technique to isolate the birds from its background. Next time, before you press the shutter, pay attention to the background and think how it will impact your images.
About Author Gaurav Mittal
Gaurav Mittal is a professional bird photographer and a blogger who grew up with a passion for nature and wildlife in his native birthplace of New Delhi, India. Gaurav migrated to the U.S. at the age of fifteen. After completing his college, he pursued a career in tax consulting in the Washington D.C. area. It was, however the love for the birds that eventually brought the focus back in his life and a determination to follow his heart, to be a bird photographer. Gaurav’s passion for photographing birds began in 2011 in Bosque Del Apache, New Mexico where observing the Sandhill Cranes brought a sense of harmony and a new vision to him. A moment he captured and fondly calls, “Kissed in The Mist” left him with a vision to continue on further and explore and learn about birds and how he can present their beauty through photography. His desire to be a top class bird photographer has led him to places such as Bharatpur, Bosque, Alaska, New York, Costa Rica and Florida.


