Creative Nature Photography Tutorial
– by Varina Patel
A beginners guide to develop out-of-box thinking and creativity to build a diverse portfolio outside the golden hours.
– by Varina Patel
A beginners guide to develop out-of-box thinking and creativity to build a diverse portfolio outside the golden hours.
Ch1: What Is Creative Photography?

Creative Nature Photography at Sunset Beach, Mana Island, Fiji
That’s not a straightforward question to answer. For some, creativity is all about light. Others might think of an abstract wash of colors or an extreme close-up of a mystery subject. Really, creativity can mean any and all of these things. It’s a reflection of the photographer and their unique interpretation of a visual and emotional experience. That means that creative photography can take limitless forms.
With this in mind, let’s take some time to explore the topic of creativity a little more deeply. Jay tries his hand at defining what makes a photo creative and reveals some of his own creative process.
Ch2: Why creativity is important?
At this point, you already get the sense that it takes more than just great light or an interesting subject to produce a creative photo – it takes intentionally pushing yourself outside of your normal workflow in order capture the mood, the light, and the subject of your photo in a way that is unique to your experience of it.
In the previous example, Jay was able to capture creative photos of a crab on the shores of Fiji because Jay took the time to observe the entire scene and then only included the elements that enhanced my subject. In this case, that meant including the waves crashing around the crab as the tide came in.
Of course, what enhanced my subject in Fiji won’t work in every situation. Being creative isn’t as straightforward as following a formula or a set of guidelines. It all comes down to taking the time to observe your surroundings and pushing yourself think outside the box. That’s what makes creative photography so challenging.
Ch3: How To Develop Creativity
Now that you know the importance of out-of-the-box thinking in the field, what is the best way to get the creative juices flowing?
If someone were to take a few hundred random photos, it’s likely that at least some of them would turn out to be pretty good. Jay experienced this for myself when he first started out in landscape photography. However, whenever he attempted to take a specific type of photo, his lack of skill became quite obvious. When Jay took this shot of Marymere Falls, for example, he struggled to work through the details of setting up his camera. It wasn’t until returning years later that Jay was able to come away with the shot he had hoped for.
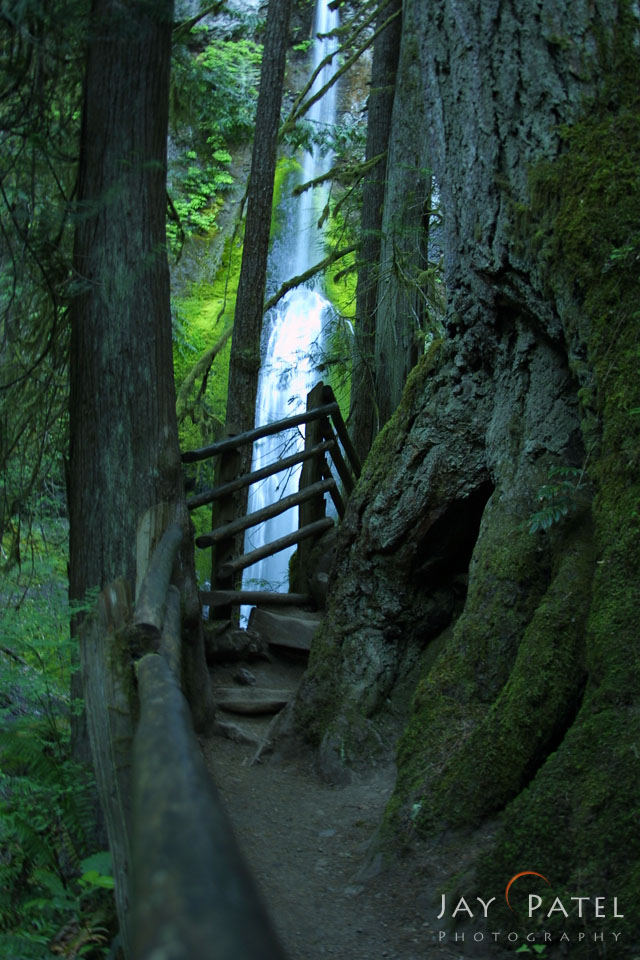
Marymere Falls, 2001
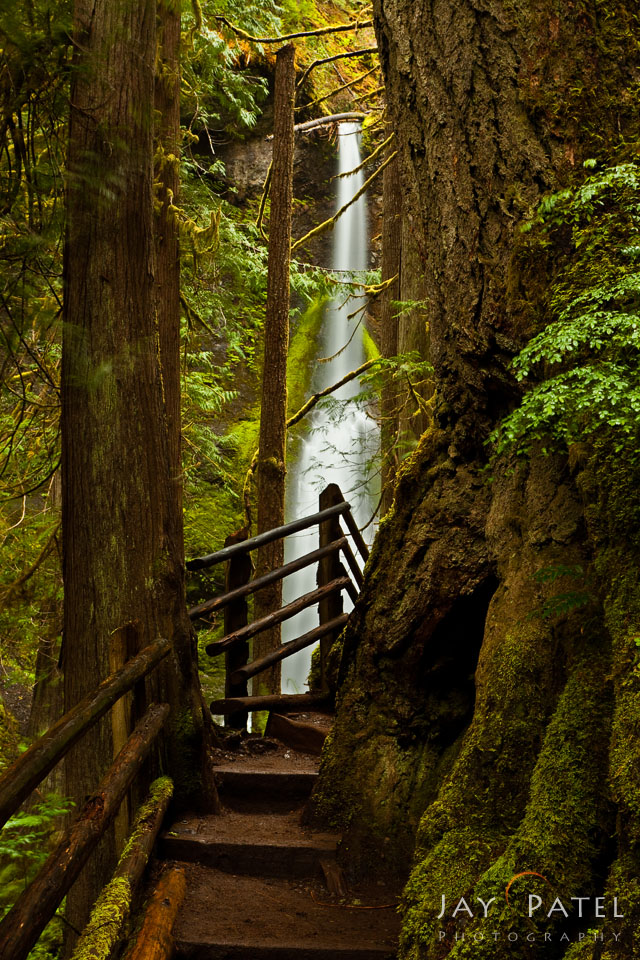
Marymere Falls, 2010
Over the years, I’ve learned that one of the best ways to learn about photography is to shoot with a specific intent in mind. That’s where creative challenges come in. If you’re hoping to develop your technical skills and your eye for composition, these challenges will guide your time in the field by providing specific goals for you to work toward.
Creative challenges are short photography assignments that will help you to push your skills to the next level by giving you an intention to keep in mind while you are shooting.
There is NO purchase or subscription fee necessary to participate in creative challenge. Participation is absolutely free. We hope you’ll make the most of these creative challenges by committing to push yourself and give your absolute best with every assignment.
Before embarking on your first creative challenge, here is a brief video from Varina to get you started.
CC01: Monochromatic Colors
Capturing monochromatic image is harder then it sounds. You can use your camera settings, composition and light to capture images with monochromatic colors. This weeks challenge is for you to capture images with monochromatic color scheme. Here are some examples to get your started:


What You Will Learn
In this video, Varina talks about a few different types of color schemes then challenges you to find a way to make your subject stand out without the help of color by paying attention to other compositional elements. She gives a few examples of successful monochrome images from her own portfolio and offers a few ideas to help you get started.
LEARN TO CREATE PHOTOS WITH BRILLIANT COLORS
Check out the following tutorials on Visual Wilderness:
CS02: Minimalism vs. Inclusiveness

Glen Eilt, Scotland
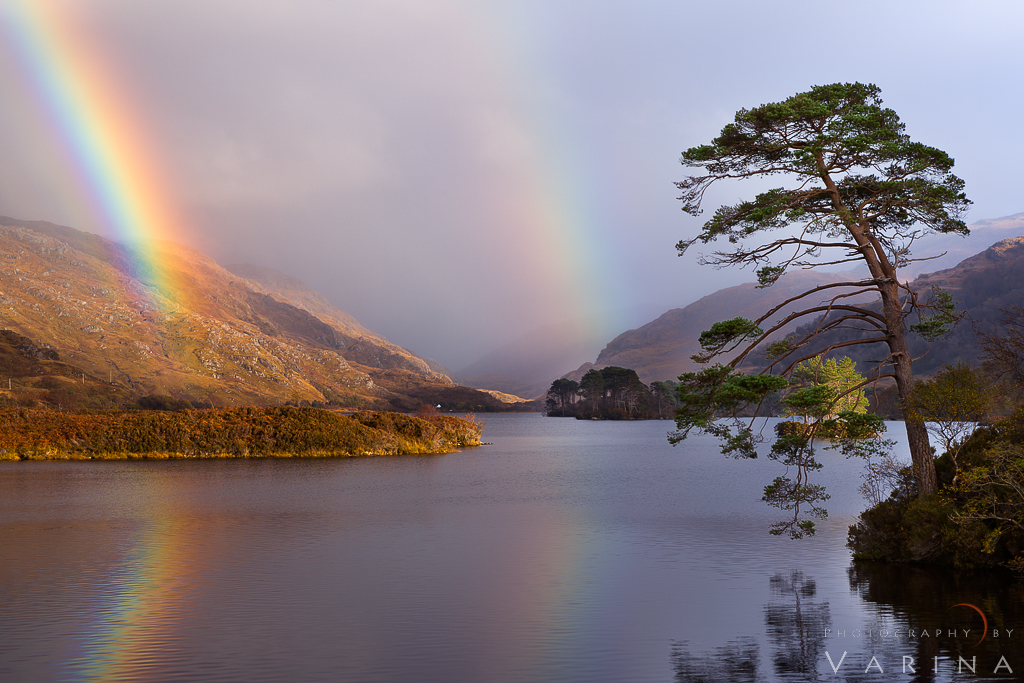
Glen Eilt, Scotland
When you come upon a jaw-dropping scene like this one, it can be hard to know what to include in your shot – or, perhaps more importantly, what not to include. After all, when the grasses are glowing gold, smokey storm clouds are giving way to a perfect blue sky, and a serendipitous rainbow has gracefully arched into view, the landscape photographer’s reaction is usually to grab a wide-angle and capture it all at once. And, as you can see from the first image, that is often a very worthy endeavor. But sometimes zooming in can offer another completely new, just-as-worthy perspective.
It has been my experience that, learning to see is one of the hardest skills to master. One of the ways you go about mastering this is to capture photos of the same scene in completely different styles and composition. For example here are few photos of the same scene captured as either an all inclusive landscape or a minimalist image.


With this in mind, let’s take a look at our next challenge.
What You Will Learn
In the following video Varina offers some tips, techniques and creative ideas for coming up with different compositions of the same scene. She gives a few examples of minimalist and inclusive compositions and shares some of her own personal workflow in the field to help you get started.
BEGINNERS LANDSCAPE PHOTOGRAPHY TUTORIALS
Check out the following tutorials on Visual Wilderness:
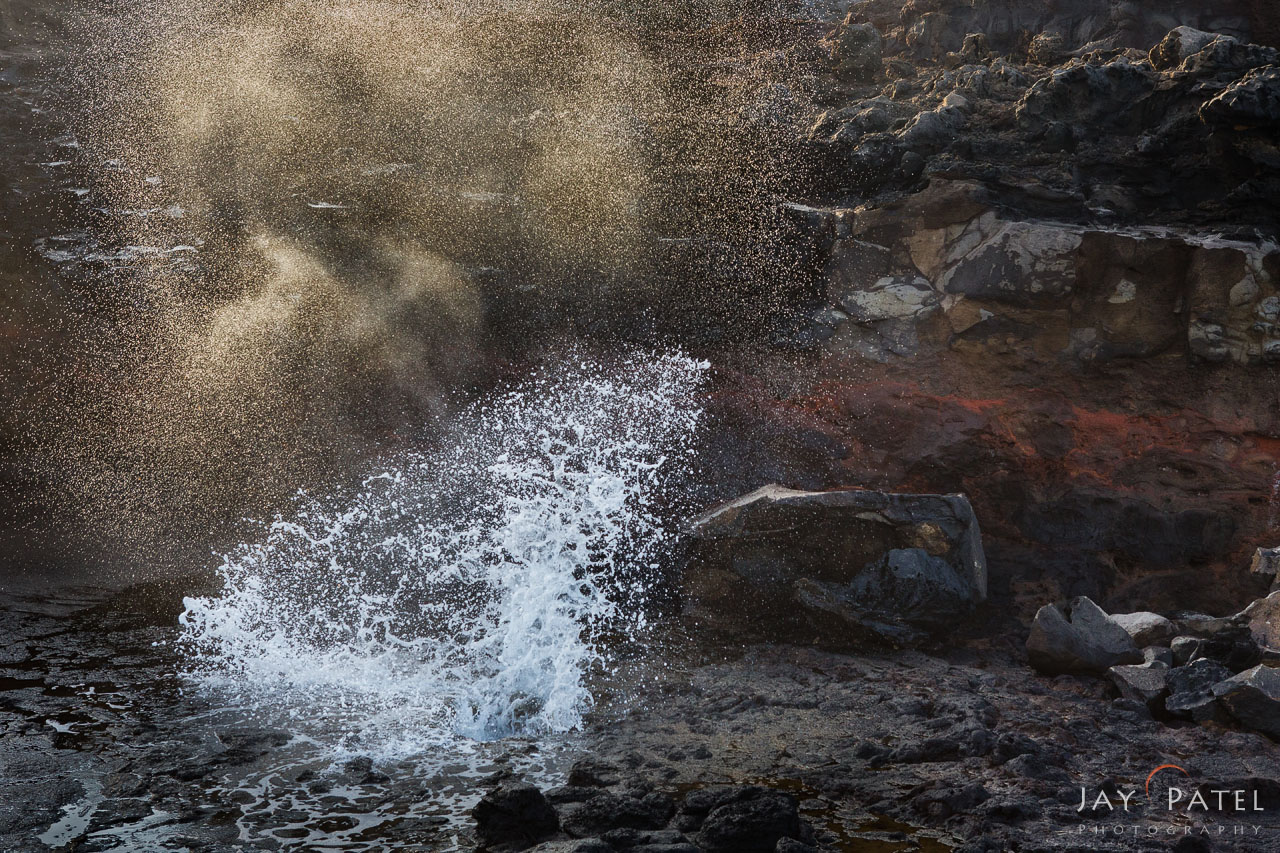
CC03: Capturing Motion
In nature, something is almost always moving: the flapping wings of a sparrow, the grasses blowing in the wind, the waves crashing on the shore, the storm clouds racing overhead. Motion makes up the experience of our lives, but it can be difficult to capture in a single image. Here are few examples that showcase motion:

Big Island, Hawaii

Aspen, Colorado
Maui, Hawaii (HI), USA

Hawaii Volcanoes National Park
Skogar, Iceland

Evening Light on Mount Rundle – Banff National Park – Alberta, Canada
What You Will Learn
Here is a video in which Varina walks us through her thought process in the field as decides which camera settings to use as she captures different types of motion. She provides examples of motion at several different shutter speeds and offers some inspiration for making the most of the motion in your environment.
HOW TO SET YOUR EXPOSURE
Check out the following tutorials on Visual Wilderness:
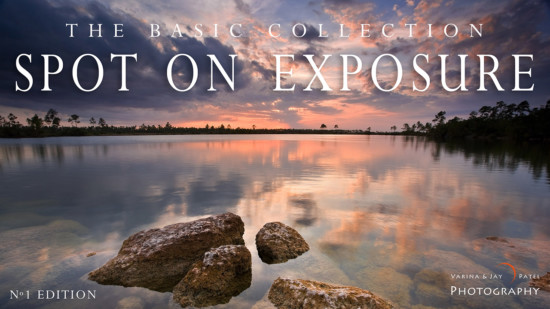
Spot on Exposure Tutorial

Histogram Exposed Tutorial

Bracketing Exposed Tutorials
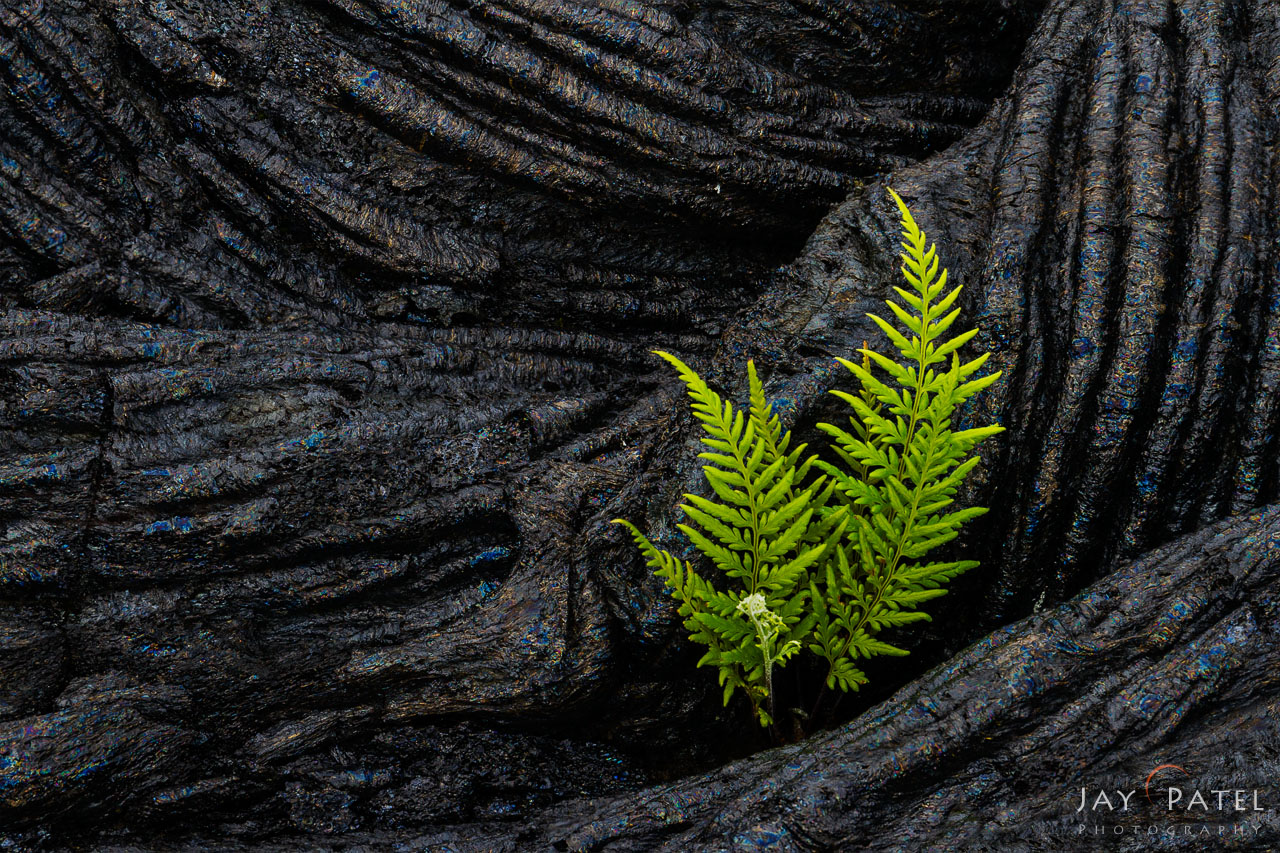
CC04: Contemplating Contrast

Color Contrast – Death Valley National Park, CA
Contrast in Texture, Big Island, Hawaii

Contrast in Lines – Vermillion Cliffs – Arizona, USA
Our eyes gravitate toward things that are different – differences in light, in texture, in color, and even in shape or form. Take the photo of the gecko above, for example. Even though the image is almost completely green, we can clearly decipher the subject from its background because of it’s distinctive shape. In the next image, we see a variety of colors, tones and textures, all which send our eyes racing across the sand dunes and into the cloud-scattered sky. Each of these images effectively uses contrast to draw the eye toward the most important parts of the scene and ultimately to create impact. With this in mind, let’s take a look at this week’s Creative Challenge.
Objective: Use contrast to make your subject stand out.
In this video, Varina provides a few examples of the many kinds of contrast – besides just the difference between light and dark – that can help you to call attention to your subject. She explains how she goes about finding contrast when she shoots and discusses a few in-camera and compositional techniques to help you start creating images with impact.
LEARN ABOUT CREATIVITY & PHOTOGRAPHY COMPOSITION
Check out the following tutorials on Visual Wilderness:
CC05: Noticing Details
When you’re traversing the great outdoors, how often do you stop to take a closer look? Take some time to slow down and look a little deeper, and you’ll begin to notice teeny tiny landscapes all around – a few strands of a spider’s web, the ragged edge of a leaf, a single droplet of water. It’s up to you how you want to fill the frame of your camera. But rather than focusing on the grand vistas, why not focus your attention on just one tiny piece of a landscape this week? Taking some time to slow down and observe details present at the scene can yield spectacular results like these…
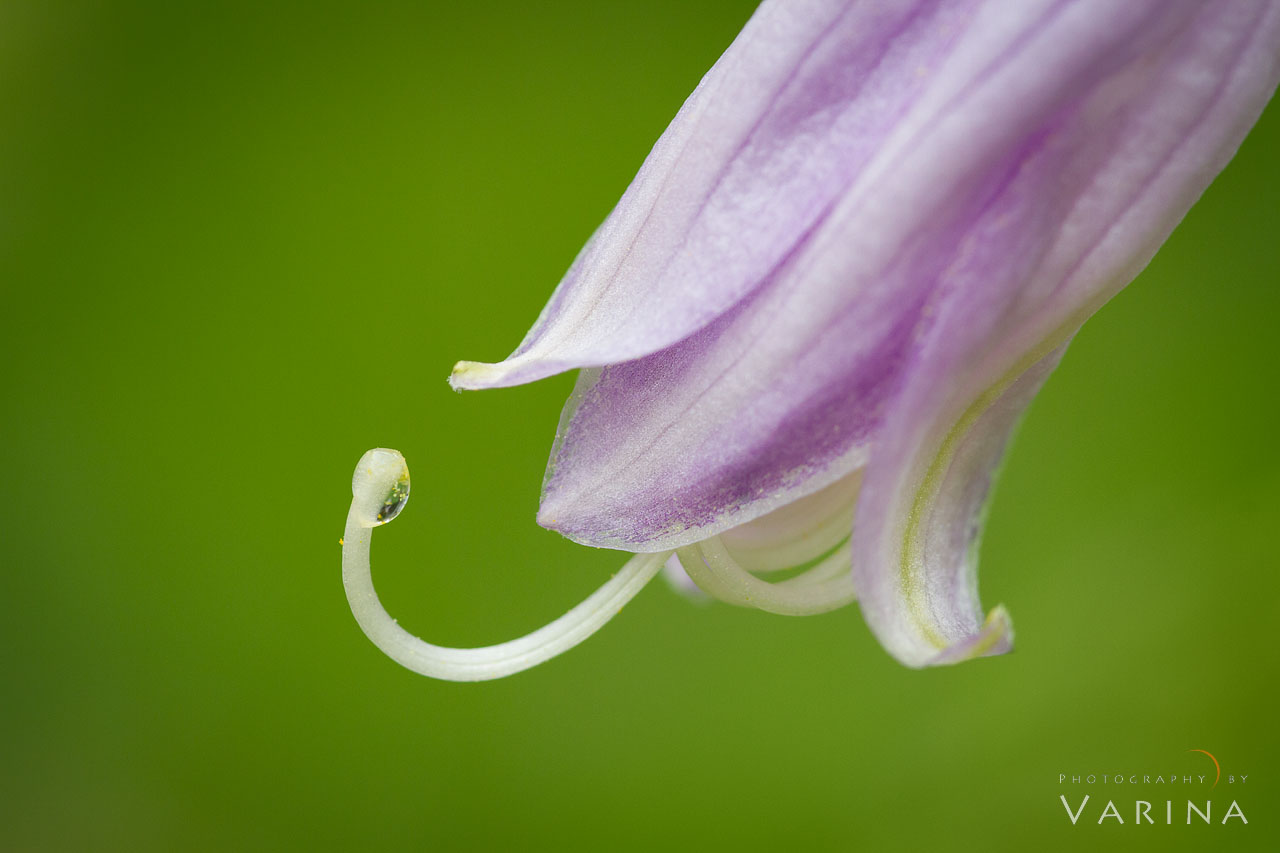
Details in a Flower, Ohio
Tide Pools, Redwood Forest National Park, California

Broken Heart, Death Valley National Park, CA
Big Island, Hawaii (HI), USA
Objective: Move in close to your subject to capture details.
Varina explains the importance of paying attention to the small details in your environment. She also shows how moving in close to your subject can help you to highlight its most interesting characteristics. She offers a few examples of simple, minimalist compositions that are all about detail and she talks about the equipment and camera techniques that will help you to get the job done.
GET STARTED IN MACRO PHOTOGRAPHY
Check out the following tutorials on Visual Wilderness:
Ch4: Conclusion
Now that you have gone through our creativity course, it’s time to honestly evaluate yourself. What challenges did you run into?
If you did run into one or more of these issues, you are not alone. Unlike other genres of photography, you have almost no control over the many variables that present themselves when you are trying to capture a stunning landscape or nature photo. Light, weather, subject matter and even human elements play a role in getting the right photo. Although there are always unforeseen challenges in the field, by thinking creatively, we are able to overcome some of all of these variables and walk away with beautiful images.