Visual Wilderness
  • Get Started
  • Shop
    • SPECIAL OFFERS
    • STREAMING SERVICE
    • Browse by Topic
    • Learn To Shoot
    • Post Processing
    • Online Classes
    • eBooks
    • Landscape Photography Guide
  • Blog
    • Blog
    • Guest Photographers
  • About
  • My Account
    • My Account
  • Search
  • Menu Menu
  • 1Shopping Cart

Common Post Processing Mistakes to Avoid

January 25, 2016/in Post Processing/by Ryan DeFreece-Dyar

We all start somewhere and learn as we go, striving to grow as artists and expand our skill set. I’ve found that one of the best ways to learn is to realize the mistakes we make. I learn more from mistakes than from anything else. Luckily, I make a ton of mistakes so I have a ton of opportunities to learn!

Here are two big mistakes I see made by both rookies and veteran photographers. Avoiding these can keep your photos from looking like they’re from amateur-hour.

1. Keep your reflections in check.

Look. I get it. We all love a dark and dramatic sky. People often use graduated ND filters and/or blend multiple exposures to not only handle dynamic range issues, but to also get that dark drama. That’s all fine and dandy… until you start to break the rules of basic science. I’ve said this (what feels like) a million times to my clients during post-processing instruction: Your reflection MUST be darker than what it’s reflecting. This is a big rule you should always follow.

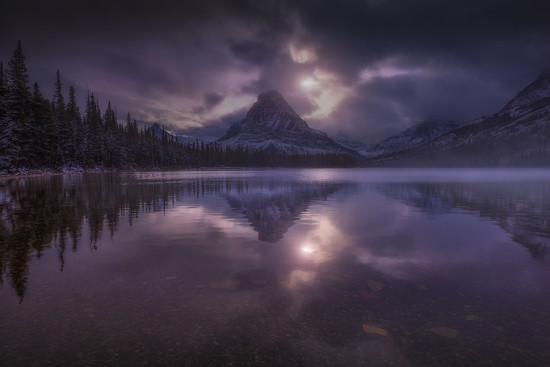
A mirror is almost 100% reflective, so we see the reflection as almost identical in brightness of what it’s reflecting. Since water (such as a lake) is not as reflective as a mirror, some of the light dissipates which results in a reflection that is darker than what it’s reflecting. Don’t believe me? Look at shot, straight from the camera, of a mountain/lake reflection scene.

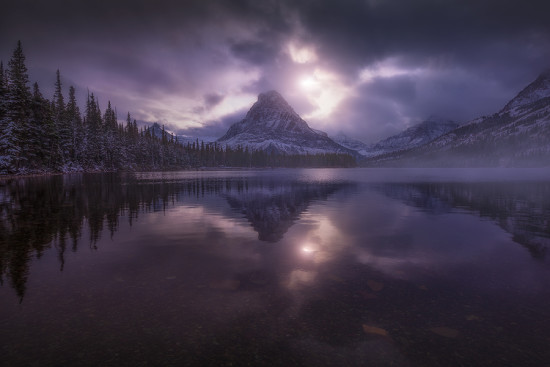
Here’s an example. The first image is a poor exposure blend, like something I did too often back in 2008 when I was still a little green.

  • Post Processing - Poorly Processed Reflections

    Post Processing – Poorly Processed Reflections

  • Post Processing - Real Look of Reflections

    Post Processing – Real Look of Reflections

You can decide for yourself how much darker you want your reflection. But please… don’t make your reflections brighter than what they are reflecting.

2. Keep your Orton in check.

Note: The Orton Effect is a photography technique that blends two different photos of the same scene resulting in a distinctive mix of high and low detail areas within the same photo.

A nice glowing Orton Effect is all the rage these days. It lends itself to the popular painterly-kind of processing style and can do a lot to enhance the atmosphere in a photo, mostly in backlit scenes. But the blur used in all types of the Orton Effect can be your downfall if you don’t pay close attention.

In most Orton recipes, there are two ingredients – blur and contrast. These can be applied in hundreds of different ways but they all give a similar result. (If you are unfamiliar, I cover the Orton Effect in my video here.) The problems arise when the blur lets the darks bleed into the highlights around high contrast edges. This creates a dark halo along these areas which is then exaggerated by the added contrast.

Post Processing - Avoid Orton Halos

To deal with this issue you can either run your Orton Effect through a luminosity selection to exclude certain areas or simply mask out the problem areas. But be sure to take of the halos right from the beginning, as they are a huge headache to deal with later in processing.

Again, we all make mistakes; it’s just part of learning. The goal is to realize these mistakes and use them to grow. Hopefully you can put this info in your back pocket and keep it in mind the next time you’re working on your shots.

About Author Ryan DeFreece-Dyar

I'm a full time nature photographer based in Seattle, Wa. I point cameras at stuff.

Website | 500px | Facebook | Twitter | Google+

Tags: Photoshop
You might also like
Cover for landscape photography blog article about Photoshop adjustments.Essential Photoshop Skills for Beginner Landscape Photographers
Using Colors to Create Depth & Direction
Print Sharpening in Photoshop for Landscape Photography
Cover for Nature Photography blog article about creative post processing by Kate Silvia5 Practical Photoshop Tips for Creative Post Processing
Cover for landscape photography blog about Photoshop Layers & Masks by Jay PatelWhy I use Photoshop Layers & Masks for Nature Photography
Photography Workflow: Lovers
1 reply
  1. Thibaut
    Thibaut says:
    April 11, 2016 at 2:49 pm

    Thank you Ryan for theses tips. I didn’t know about the possible dark light leak with the orton effect. I think I’m going to check your tutorial on this because I already saw so much different ways to do it, that I’m a bit lost.

Comments are closed.

NATURE PHOTOGRAPHY NEWSLETTER

Join 45,000+ Nature Photographers and get the free eBooks, free creativity course & discount codes right in your inbox.

loader

Note: We never share your email address with anyone. More Info.

Blog | Shop | About

 Email Policy  |  Privacy Policy  |  Terms

INFOCUS NEWSLETTER

Join 45,000+ other photographers and get the Free eBooks, Free Creativity Course & Discount Codes right in your inbox.


loader

Note: We never share your email address with anyone. More Info.

All Rights Reserved, © Copyright Visual Wilderness

Choosing a Location to Photograph Aurora BorealisMy Favorite Camera Settings and Why I Use Them
Scroll to top

This site uses cookies. By continuing to browse the site, you are agreeing to our use of cookies.

OK

Cookie and Privacy Settings


How we use cookies

We may request cookies to be set on your device. We use cookies to let us know when you visit our websites, how you interact with us, to enrich your user experience, and to customize your relationship with our website.

Click on the different category headings to find out more. You can also change some of your preferences. Note that blocking some types of cookies may impact your experience on our websites and the services we are able to offer.

Essential Website Cookies

These cookies are strictly necessary to provide you with services available through our website and to use some of its features.

Because these cookies are strictly necessary to deliver the website, refusing them will have impact how our site functions. You always can block or delete cookies by changing your browser settings and force blocking all cookies on this website. But this will always prompt you to accept/refuse cookies when revisiting our site.

We fully respect if you want to refuse cookies but to avoid asking you again and again kindly allow us to store a cookie for that. You are free to opt out any time or opt in for other cookies to get a better experience. If you refuse cookies we will remove all set cookies in our domain.

We provide you with a list of stored cookies on your computer in our domain so you can check what we stored. Due to security reasons we are not able to show or modify cookies from other domains. You can check these in your browser security settings.

Other external services

We also use different external services like Google Webfonts, Google Maps, and external Video providers. Since these providers may collect personal data like your IP address we allow you to block them here. Please be aware that this might heavily reduce the functionality and appearance of our site. Changes will take effect once you reload the page.

Google Webfont Settings:

Google Map Settings:

Google reCaptcha Settings:

Vimeo and Youtube video embeds:

Privacy Policy

You can read about our cookies and privacy settings in detail on our Privacy Policy Page.

Privacy Policy
Learn More
NATURE PHOTOGRAPHY NEWSLETTERJoin 45,000+ Nature Photographers

Unlock Your Photography Potential! Get Free Webinars, Tips, eBooks, and More Delivered Straight to Your Inbox! 📸✨

We never share your email address with anyone. More Info.

Enter your email address