How many photos do you take at a Nature Photography Location?
Truth be told, nature photography is now easier than it’s ever been in the past. Traveling is more streamlined and simpler. Natural areas are often more accessible. Not to mention the fact that digital cameras are everywhere especially with the improved quality of smartphone cameras.
Speaking of digital camera – we are all likely guilty of getting carried away with shooting too many nature photos. It doesn’t cost us anything to take a few thousand extra shots, after all! The only downside? Possibly running out of space on our memory cards. But with wireless uploading options, even that has become less of an issue.
So, how many nature photos do I take when I’m on location? It varies, of course. And there is no “correct” answer. I generally shoot lots of images but as I shoot, I delete the ones that aren’t worth keeping.
Let me walk you through what a typical morning nature photography shoot looks like for me…
Being Prepared for the Location
First off, before I even step foot out my door, I make sure that I’m prepared and know what to expect from my chosen nature photography location. I do my research and I carry the right photography equipment for the environment and types of photos I may be taking. I also check and double-check the weather since that can potentially affect my plans.
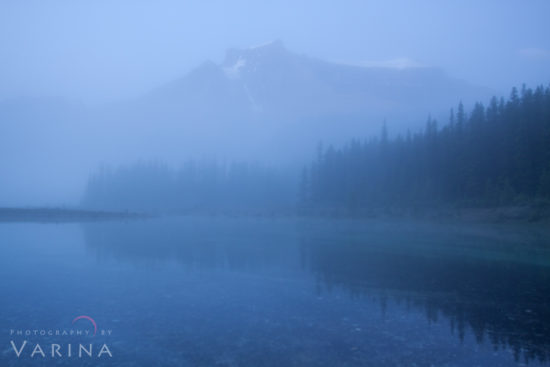
Here is a nature photo from Graveyard Flats in Alberta, Canada. Since the weather forecast called for fog, my plan was to shoot some moody photos that would be enhanced by foggy or misty weather conditions.
Along the same tangent of being prepared – it was so cold! To stay outdoors long enough for quality photos, I made sure I had enough warm clothes to be comfortable. I also carried extra battery because the cold weather tends to drain the camera battery quickly. I also made sure that I had an extra battery that morning. Cold weather drains my DSLR battery at a much faster rate.
Get to Your Nature Photography Location Early
When I’m on location for my nature photography, I’m typically up bright and early, ready to get to work.
When I get to Graveyard Flats in Banff National Park (Alberta, Canada) I find that mist is rising off the lake, and the world looks positively blue. The sun isn’t up yet, so I set up my camera for a long exposure, using my tripod to keep my camera perfectly steady. I take my first shot. Maybe it’s a little underexposed as per the histogram on back of my camera, so I take another to correct the error. I compare the two images and then delete one of them right there in the field.
Deleting images in the field does make some nature photographers really nervous. It’s way too easy to accidentally delete the wrong image. And the last thing you want to do is delete all the images on your card! But I like to clean up my card as I work so I don’t have to sort through lots of extra, unnecessary nature photos later.
I feel the need to reiterate this: not everyone is comfortable with deleting nature photos in the field. If this is something that makes you uncomfortable, don’t do it. It’s a personal preference and certainly not a requirement. You can always bring extra memory cards or even a laptop or other stand-alone device to download your photos in the field.
Try Different Photography Composition
Moving on to nature photography composition…
As I look at my surroundings and my current view, I know I’ll probably try this scene from another angle. Maybe I’ll lower my tripod to get a more unique shot from down low. Or I may take a few steps to the left or to the right. Sometimes I just look at the scene through my viewfinder and reject it, but I also might take another shot or two if I like what I see.
Each time I shoot, I compare the tiny image on my monitor, check the histogram on back of my DSLR, maybe even zoom in to check the focus… and delete any image that isn’t quite right. When I get home, I choose the one that looks the best and delete the others after I’ve finished my photo processing.
There are several advantages to shooting a variety of nature photography compositions in one location. For one thing, it provides far more options for creating your perfect images. I also almost always shoot both a vertical and horizontal composition – both layouts have different uses. Vertical compositions are most often used for magazine covers and smartphone backgrounds whereas horizontal compositions are generally used for desktop computers and an online photography course.
Pay Attention to Changing Light
During early morning nature photography outing, the light changes as the sun nears the horizon. So ready for this.
When I first started to photograph this location, I want a nature photo that shows the strange and beautiful landscape surrounding the lake. So, I set up my tripod close to the ground for another shot then follow the same steps. I also pay close attention to my histogram. I need to ensure that I’m capturing the entire range of light as the sky gets brighter and that my shadows aren’t too dark.
The histogram shows me that I need just one image for this photo, but I take two anyway – one a little brighter than the other, just to make sure. In the end, I don’t actually need that brighter shot, so after processing, I delete it.
While I’m waiting for the sunrise, I try out a couple of different compositions. Another shot survives. I shot this one with my tripod just a few inches from the ground. It highlights the patterned rocks by the water, with the mist still hanging around the mountain, and the appealing curve of the lake. But… I’m still hoping for something better.
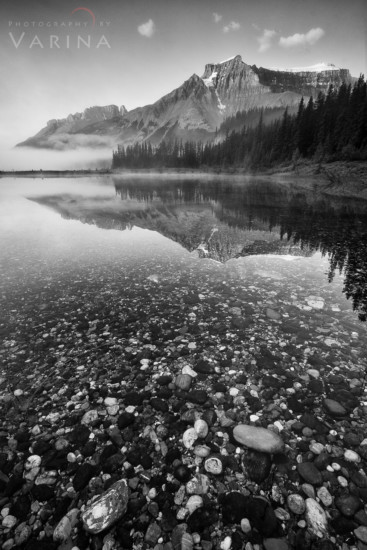
Now the sun is rising over my left shoulder. I’ve been waiting for the sun to light up the top of the mountain because I want to capture its reflection on the surface of the lake. My tripod is already set up with one leg in the water, and I’m careful not to create ripples on the crystal-clear surface. I’ve found these interesting stones that make appealing foreground elements, and I have my camera on my tripod as low and as close as possible. I’m glad to see a little bit of mist still hovering at the base of the mountains and, although the sky is clearing, I still have some pretty little clouds hanging over my mountain.
Of course, this approach works well when light and conditions are changing slowly. I won’t waste time reviewing and deleting if I’m in a hurry to capture a scene that is rapidly changing. When I need to work fast, I worry about deleting later – but I still check my focus settings and my camera exposure frequently so I can correct any issues that might come up as I’m working.
How Many Photos Did I Take?
At this point, I’ve probably pressed the shutter release 30 or 40 times, but I’ve deleted a good number of images that I know won’t make the cut. I might have 10 or 15 shots from this location remaining on my card. A few bracketed images, a couple of different angles and photography compositions, and some shots from different times of the day.
When I get home, I’ll pull the images off my card and compare them at a larger size. In this case, I ended up processing four images. And then I take this last shot and convert it to black and white. Everything I haven’t used gets deleted. In the end, the file for Graveyard Flats contains nine files… four original RAW files, four processed color TIFs, and a black and white TIF.
Five processed shots. Typically, just one or two end up in my nature photography portfolio and the rest never see the light of day. Unless, of course, someone asks specifically for an image from this location.
I know so many nature photographers who shoot thousands of images at each location. If that’s what works for you, by all means, keep doing it! For me, the problem with that approach is that I can’t process all those photos. If I shoot and keep that many, most never receive any attention. And an even worse scenario – you lose the good ones amongst the junk.
On an average day, I’ll leave a location with two to five images (maybe as many as 20 if I’m bracketing). Even if I visit several locations in a single day – get great skies all day long – I won’t end up with more images than I can handle.
An Exception to this Rule
For me, there IS an exception to this rule: wildlife photography and high-speed photography to capture action such as flying birds, breaking waves, or exploding lava. For these types of action shots, I generally shoot with DSLR or mirrorless cameras in high-speed shooting mode. When this is the case, I often come away with hundreds of images. If the action it is taking place quickly, I simply don’t have the time to delete any unwanted images because the goal is to capture action as it occurs. Once I’ve completed all of my nature photography from this location, I then delete the extra photos.
So, hopefully now you get a sense of what a day of nature photography looks like for me. This is the type of process I most always follow to capture breathtaking photos from a typical location. With a little preparation, an understanding of how weather and the changing light affects your shots, and a willingness to try different photography compositions, this type of process may work for you as well. And, as always, ENJOY your time out there!


