An Intro to Camera’s Metering Modes
It may come as a shock that, when I’m out in the field creating my images, I throw a lot of the technical stuff out the window. I am all about trial and error and creativity, but it’s also important to understand the basic functions and settings on your camera to see how they can relate and create the image you just took. One function that I don’t necessarily use all the time is the camera’s metering modes.
When I first got into photography, the majority of photographers used gray cards and physical light meters to figure out exposures. Now, with the great technology in the current cameras, these functions are built inside of the camera. You may be thinking, “Why is there more than one option?” Let me explain…
Evaluative Metering
I’ll first explain Evaluative metering (or Matrix metering on Nikon cameras). Looking through my photos from the past few years, it seems that I’ve had this setting selected since I purchased my Canon 6D. Keep in mind… if you use the auto mode on your camera, this is the default setting. You are able to change it with any of the other modes on your camera (manual, shutter priority, program, etc.).
For most landscape photography purposes, I find that this metering mode works best. It allows you to get a light reading on subjects that may be off-center from your focal point. Instead of pinpointing one specific spot in the scene, it takes a broader view of the the various light values and calculates what it feels is the proper exposure for the entire scene.
As I mentioned before, sometimes I toss out the technical stuff when I am in the field. Here is why… If you have an extremely high dynamic range image, you’ll likely need to blend various exposures together. Typically, there is no single perfectly-exposed scene because the camera doesn’t know which area needs to be properly exposed. Although it is possible to pull all of the highlight and shadow detail from a single file with some newer cameras, you may find yourself in a situation that requires an exposure blend. In this case, I change my shutter speed accordingly.

Evaluative Metering Mode – A lone silhouetted figure stands in a giant sandstone alcove along Lake Powell.
Center Weighted Metering
Now we move on to Center Weighted metering. This one is almost self-explanatory. It takes the light values from the center of the frame only to calculate the proper exposure for the scene. I find that this metering mode works well for those who do portrait work or perhaps wildlife where you have the animal take up a good portion of the frame. I never quite thought to use this mode, but I can most certainly see myself using it in the future for any wildlife photography.
The image below may or may not have benefited from using this mode. Because the bear was rather dark and the surrounding vegetation was much brighter, I used evaluative metering to get a better overall reading so the camera could calculate a more even exposure between the tones.

Center Weight Average Metering Mode – A grizzly bear sits in the autumn shrubs in Glacier National Park, Montana.
Partial Metering and Spot Metering Modes
Last but not least, Partial and Spot metering. I decided to include these two together because they are closely related in terms of functionality. Both of these metering modes read the light values in very small areas in the center of your frame, with spot metering being the most pinpoint of the two.
Spot metering accounts for less than 5% of targeted area, which works well if the subject you are trying to photograph is very small in relation to the overall scene. Perhaps it is a red cardinal against a snowy bush or maybe a single tree in a forest that has gotten the light.
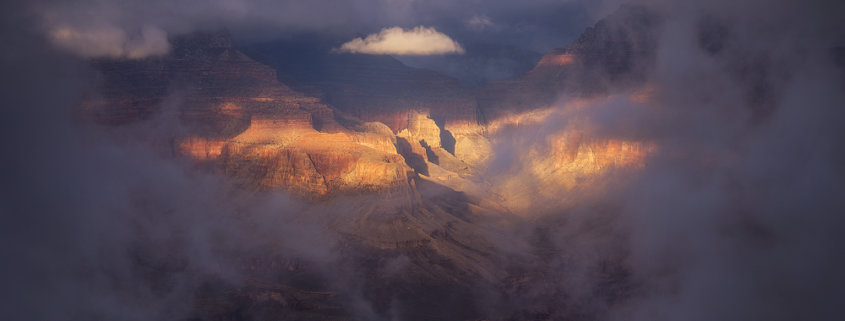
Partial metering gives you a little more leeway and accounts for a little more than 12% of the targeted area. Both of these can be particularly useful when you have high contrast scenes such as back-lit images or if you have a portion of the scene lit up and surrounded by darkness such as the image below. Again, I used evaluative metering here, but may have benefited by using partial or spot metering because of the high contrast scene.

Partial or Spot Metering Modes – A brief window of light over the grand canyon after a clearing winter storm.
Summary
While it’s important to know which of these features may be best for an image, I’ve found that, for me, it often simply doesn’t matter. There are various ways to get to your final image without having to go over every single technical aspect. As I grow more into the photographer I am, I am less concerned with the technical aspects as I am with the creative aspects. However, having looked into these other features, I’ll be using them a bit more often in different situations. The best way to learn is to go out and start testing each setting. Soon enough, you’ll find the benefits and drawbacks to each. Time to go explore the world of metering modes!
Do you use metering mode to set your exposure? If so feel free to share your techniques and examples in the comments below.


Thanks. Great article. :)
Great topic.