Wildlife Photography: How to Capture Stunning Back-lit Photos
A photographer’s development can be split very easily into two halves. The first half is when the learning curve is the steepest – where you try to come to terms with the basics of exposure, metering, auto-focus, etc. Once that initial hurdle is overcome, things tend to take different paths for different photographers. With wildlife photography, you always worry about getting sharp images.

The second half of development is where you are comfortable with your gear and you start noticing and improving on the background. I think once one conquers this stage, then the fun stage begins. This is the point where you have the urge to break all rules.
One of the top-most rules to be broken is placing the source of light behind your shoulder with wildlife photography.
Take a look at the first sketch below:

Sketch #1: Front lit Wildlife Photos
This is how all of us have clicked and still do for most of our wildlife photos. After all, the exposure for this scenario is quite easy as everything is evenly lit in most cases.
Lets look at something diametrically opposite of this. In the following sketch, the source of light is directly opposite. It’s behind the subject instead of behind the photographer.

Sketch #2: Back-lit Wildlife Photos
This is what shooting into the light to create back-lit wildlife photos is all about. Its challenging in terms of controlling the exposure, it’s challenging in terms of controlling the focus, but it is mighty rewarding once you get the hang of it. Believe me, after a certain point of trying it, it’s addictive.
Take a look at the following image. The photographer positioned himself in such a way that the source of light (in this case, the sun) was behind his shoulder. There is beautiful light on the subject. Most of the light on the subject is being reflected onto the camera. It looks absolutely regal, doesn’t it?


Image #1: Front Lit Wildlife Photography

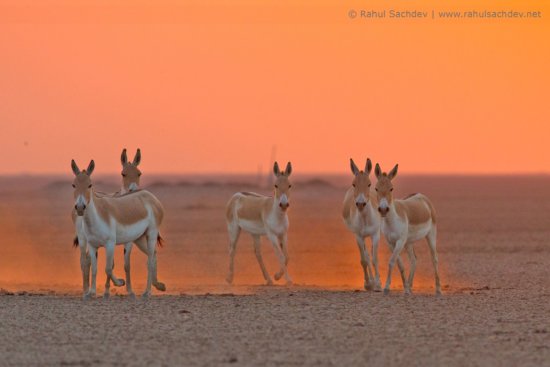
Now take a look at the next image (Image #2). It is the same subject but in this case, the photographer chose a different position. Slightly rim-lit, this one clearly holds the edge. It clearly shows the photographer’s perspective.

Image #2: Back-lit Wildlife Photography
For Image #2, the light is coming in from behind the subject and almost directly into the camera. The result is an image dominated by the warm light and that, with the correct angle of the sun, shows the rim of the subject lit-up.
This way of shooting is called shooting into the light, where the photographer is positioned such that the source of light is behind the subject. It’s a challenging style in terms of focusing and metering but, once you get it right, it’s an absolute gem.
Lets take a look at the steps needed to achieve this.
Step 1 – Exposure
When you shoot into the light, most of the time the camera exposure meter is fooled by the amount of light coming in. I usually have to play around with the exposure to achieve a desired result. There are three kinds of images that you can make when shooting into the light.

Rim Light Wildlife Photo

Silhouette Wildlife Photo


Back Light Wildlife Photo


- Rim-lit: This is the result of a darkish background and a little bit of the light bouncing off of the subject’s fur. To enhance the rim-lit effect, a bit of under-exposure helps.
- Silhouette: This is when the background is the sky/water with a low hanging source of light rendering the subjects black. One way to achieve this effect is with underexposure or exposure-lock on the sky.
- Back-lit image: These are images where the entire subject is almost decently exposed. The image simply looks different because of the way you use the light. (This blog is more about back-lit images; the rim-lit/silhouettes varieties each warrant their own blog.) The metering depends on the strength of the light coming into your sensor, but I have often found myself underexposing to get the images right under a strong source of light and vice-versa. Shooting into the light is more of a creative way of looking at things and takes you one step away from being a documentary photographer.
Step 2: Focusing

Probably the toughest parameter of the lot. When you shoot with the sun very low and into the camera, like you often would in this situation, the contrast in the overall scene falls and the camera then struggles to achieve critical focus on the subject. Please note that, in one way or another, all our focus mechanisms work better when the contrast is highest. So, many times you need to help your camera with Manual Focus Assist to lock on.
Unless I am looking specifically for rim-lit, I also use the 3/4th approach. Meaning, I wouldn’t be standing directly opposite to the source of light but slightly off that line. This helps retain more contrast in the entire shot.
Step 3 : Visualize

Back lit lioness by Rahul Sachdev
Shooting into the light does not come naturally, at least when you start. It’s going to take some practice before you can start visualizing the results/images well. The best way, as always, is to put yourself in the locations where it is possible to click into the light. Practice and you’ll soon start loving it.
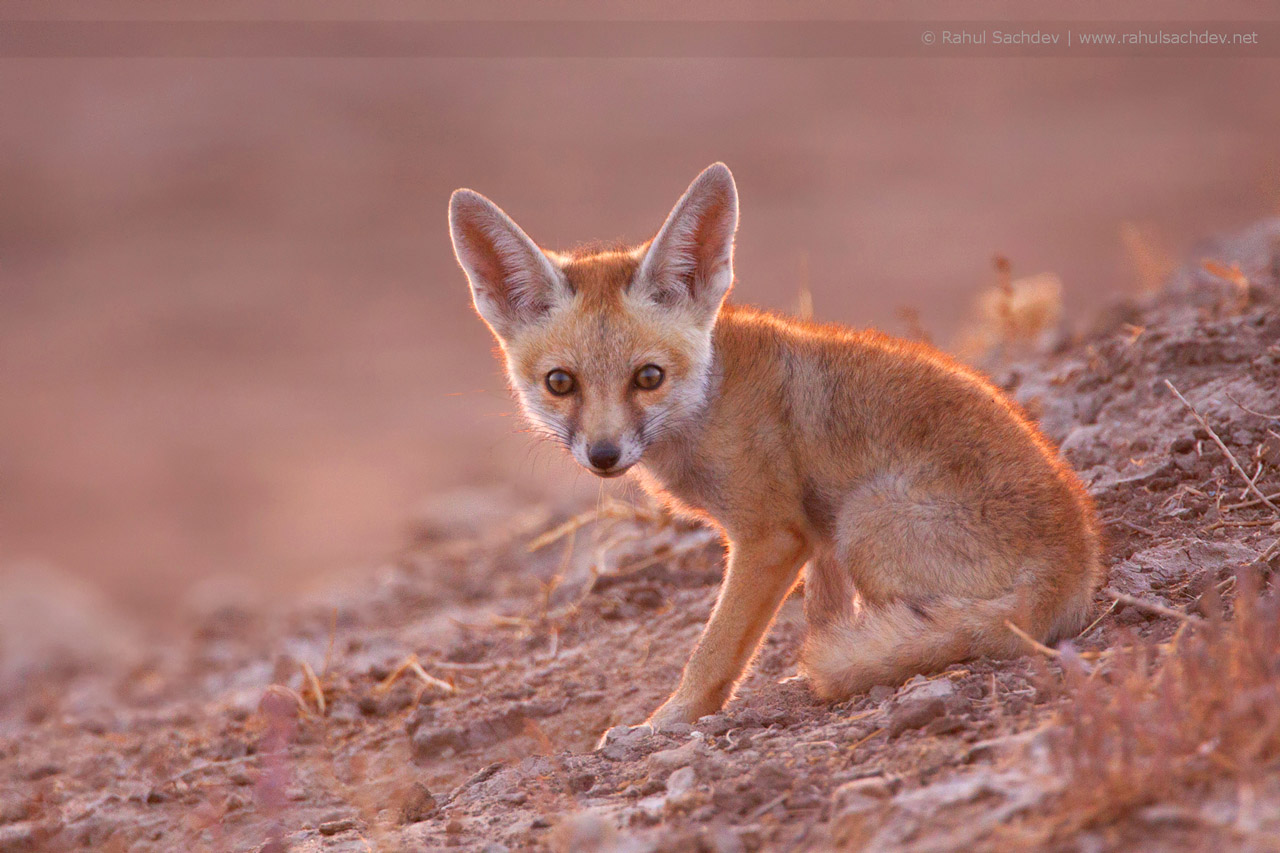
Step 4 : Take the Shot
Well, you are almost there. There is only one more thing to watch out for. Lens flare. With the sun facing your camera, the chances of having lens flares in your images are high. In these cases, be sure to use the lens hood.

Back lit Wildlife Photography by Rahul Sachdev
That’s it. Go ahead and make some different kind of images. Use the light and use it well. It might take a little practice but I would love to see you try this approach.
Feel free to comment and share your images with us.
About Author Rahul Sachdev
My interest in wildlife goes back to my play-school days. I remember having a collection of plastic replicas of wild animals and believe me, that collection used to be as dear as gold to me. The fact that I grew up on stories of Jim Corbett helped a lot as well. I started wildlife photography around 2004. Thats the year when I had a family outing to Ranthambhore national park in India and that trip changed a lot of things for me. I had a Nikon N65 (a film camera) then and a basic 70-300mm lens. I did not make any decent images during that trip, I did not see a tiger on that trip but it definitely served as a trigger for my journey as a wildlife photographer because it made me aware of the sounds and colors of nature like never before.
 circling above the fjord, Norway by Karin De Winter and Jo Van Rossem")


Ordinarily I don’t post comments just on typos but there is one that I believe is contrary to the intent of the article. Image #2 (backlit) states that the sun is behind the photographer’s shoulder which is contrary to what follows.
While I’m at it, here are the rest:
2nd. paragraph after Sketch #2 has several instances of “its” which should be “it’s”.
2nd. paragraph after Image #2 “positions” should be “positioned”.
Thanks for the article reminding us how a good photo could be turned into a great photo by simply repositioning the light relative to the subject.
Thanks…Corrected.
Thanks a lot for sharing your knowledge! Did you make any publications so far? Were can we see all your works? Are you on Istagram?
Thanks for the tips! I’ll be trying this out tonight at a local wildlife preserve.
Does the EV range on a camera’s AF system help with the focusing in these situations?
Apologies for the delayed response Matt, hope it worked well for you.
A camera with a larger EV range AF system would technically help in such situations but i’ve often found that focussing slightly away from the direction of the source of light initially and then coming back to the subject (if the source of light is very strong) helps much better.