 Grant Collier
Drone Photography For Landscape Photographers
I have a confession to make. I’ve recently gone over to the dark side. I bought a drone, got a commercial drone license, and am now hopelessly addicted. I thought I’d share some things I’ve learned about drone photography in the process.
Which Drone to Buy
I’ll make this simple – the DJI Mavic Pro 2, or if that costs too much, the original DJI Mavic Pro. The Mavic Pro has a 12 megapixel sensor, whereas the Mavic 2 has a larger, 20 megapixel sensor that will produce a little better quality images.
If you want to complicate things, you can also look into the Mavic Air, though it has a shorter battery life.

Drone Photography: Red Mountain Pass in Colorado
First Learn to Fly or Your Drone Might Die
When you first get your drone, you may be tempted to immediately fly it up and try to get some stunning aerial images. If you do this, you probably have a greater chance of crashing and destroying your drone than you do of capturing a great image. Before you fly, you should watch a lot of YouTube videos and/or read a lot on how your drone works. Then, you should find a big, open field with no people around and practice flying your drone a lot in low wind conditions.
Once you’ve learned the basics of flying, I recommend learning how to fly with forward sensors disabled and then to fly in Sport mode. You should know how to switch between these modes while in flight. This will allow you to fly the drone much faster than when the sensors are enabled. This can come in handy if the winds pick up and you need to get your drone back fast before the battery dies (not to mention that it’s just plain fun to fly fast).
You’ll also want to learn how to focus the camera, set the exposure on your camera, bracket exposures, take panoramas, etc. And, of course, learn where and when you are allowed to fly, how high, etc.

The sandstone fins in Behind the Rocks, near Moab, look stunning from Drone’s point of view.
Know Why You Must Go High
Once you know how to fly your drone, you may be tempted to take most or all your photos from the air. However, I believe that most landscape photos are still best shot from the ground. A drone gives you a nearly limitless number of new perspectives to shoot from, but it doesn’t allow you to include any really close foreground objects in your images. You are pretty much limited to mid-ground and background objects. Many of the best landscape images have great foreground objects, so getting stunning photos from the air can be more challenging.
Before you fly, you should have a clear idea of why you need to shoot from a higher perspective. Usually, this will be to get a view of objects you cannot see from the ground or to get a view looking straight down to the ground.

By flying my drone up about 50 feet, I was able to get a view of the upper waterfall that is barely visible from the ground.
Google Earth is Your Friend
If you fly your drone before knowing how the view will look from up high, your chances of getting a great image are slim. This is why I spend hours poring over Google Earth looking for good compositions from the air. Once I find a good composition, I’ll decide whether it is best shot near sunrise or sunset. I try to avoid looking towards the sun, so when shooting towards the west, I shoot with the sun behind me in the east just after sunrise. When shooting towards the east, I’ll shoot just before sunset. When looking straight down, shooting shortly after sunrise or before sunset can work. Overcast conditions can also work well when shooting straight down, as this will provide soft, even lighting.

Months before taking this shot, I found this stunning view above Clear Lake in the San Juan Mountains on Google Earth.
Use Bracketing
I usually set my camera to always take 5 bracketed exposures of a scene. If you shoot near sunset or sunrise, the light will change while you’re in the air. I don’t want to constantly be adjusting my exposure during the limited amount of time I have to fly. By having bracketed exposures, you can simply pick out the image with the best exposure later. You can also create HDR images if the dynamic range was too extreme for a single exposure. However, if you avoid shooting into the sun, you usually won’t need to do this with aerial images.
You can get unique self-portraits from the air.
Okay, that’s it for the basics of drone photography. Once you have masted the basics of drone photography you will be ready to focus on some of the more advanced techniques, including an app that lets you fly to an exact spot and automatically take pictures there. Here are few of the advance techniques you should keep in mind.
Consider the AutoPilot App
For Mavic Pro owners, I recommend using the AutoPilot app for DJI to help with taking your drone photos. After finding the spot you want to shoot in Google Earth, you can program the GPS coordinates and height into AutoPilot and it will fly the drone to that exact spot and take a single image or, better yet, a large panorama that you can later stitch together. You can even program an entire mission and have it fly the drone to multiple locations, taking panoramas at each spot. The missions usually take a little longer than the estimated time, so you should limit missions to no more than 10 or 12 minutes so the battery doesn’t die.

I programmed AutoPilot to stop the drone 50 feet before the wilderness boundary and take this stitched panorama of Blue Lakes below Mount Sneffels.
Once it finishes, you can have your drone automatically return and land, or you can have it hover in place. For shorter missions, I usually have it hover in place, so that I can take some images manually. Although Google Earth is a great way to plan drone photos, you won’t know exactly what you’re shooting until the drone is in the air. Sometimes you will want to revise the composition based on lighting and weather conditions.
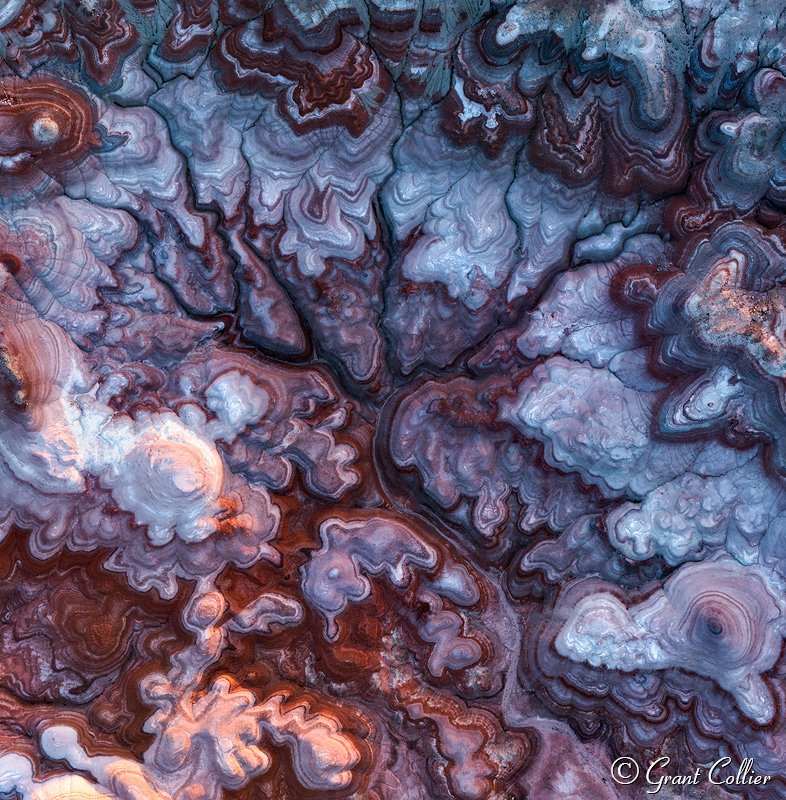
Another very useful thing you can do with Autopilot is to program your drone to fly in a grid-like pattern, while your camera is pointing straight down, taking shots every 5 or 10 seconds. You can later stitch all of the landscape photos together to capture an extremely high-resolution image of a very wide swath of land while remaining at or below the 400-foot height limit.
It does take a while to learn this app, so you should watch YouTube tutorials and practice using it over a big, empty field. There are other apps that are easier to learn, but they seem to be mostly geared towards shooting video, whereas AutoPilot is very useful for both photo and video.
Update: Autopilot has not released an updated version of this app that works with the Mavic 2, and it looks like they won’t be releasing one. Lichti is an alternative app, but I find it more useful for video than photography. The DJI Go 4 app now lets you do some basic missions with Waypoints. You can’t program it to do stitched panoramas during the mission or fly in grid-like patterns, but it can at least get you to the exact spot you want to photograph. The Autopilot app does still work on the original Mavic Pro and other earlier drones.
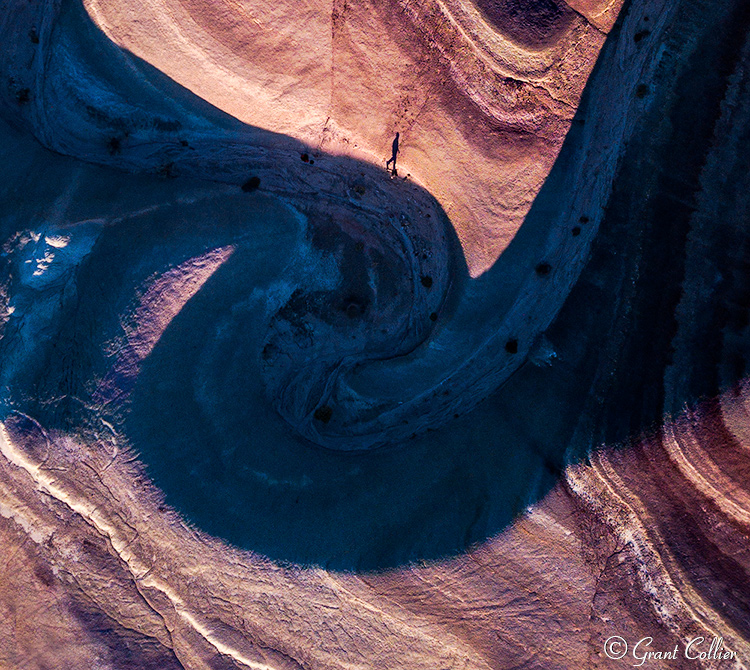
I programmed Autopilot to fly in a grid-like pattern and capture a huge stitched image of this bizarre landscape.
Flying Higher than 400 Feet
FAA guidelines state that you should never fly your drone over 400-feet high. However, the 400-foot limit applies to the height of the drone above the ground, not the height of the drone above you. As long as you’re within 400 feet of a tall object, you can fly 400 feet above that object. So if you take off from the base of an 800-foot tall cliff, you can fly to 1200 feet. The Autopilot app is very useful for this, as you can program your drone to fly to precise locations, while always remaining within the height limits.
FAA regulations also state that you need to keep the drone within unaided sight. So that can also limit how high you can fly.
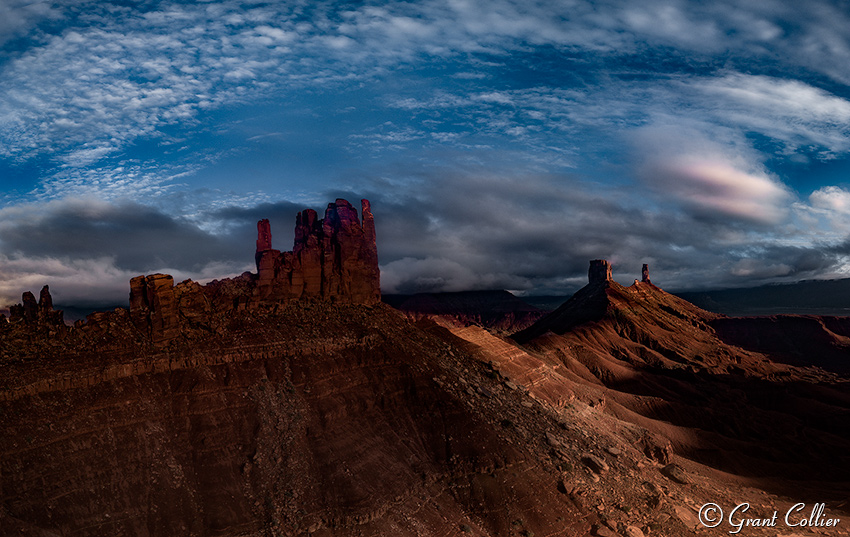
By staying close to the tall rock formations in Castle Valley, I was able to fly over 400-feet above my takeoff point.
Commercial Drone License
If you plan to sell images you take from your drone, you should get a commercial drone license. You have to pass a test and pay $150 for the license. I got mine last year. Many of the questions relate to flying a drone near an airport. This is a catch-22, as the FAA will almost never grant permission to fly a drone near an airport. Therefore, much of the knowledge you gain from the test is almost completely irrelevant. You simply need to stay at least 5 miles away from an airport when flying a drone. I spent about 8-hours studying for the test by watching YouTube videos and reading the FAA drone manual. So you really don’t need to pay for a course that teaches the test.

I found this view above the Colorado River on Google Earth and then programmed the exact GPS coordinates into AutoPilot.
Drone Etiquette
People seem to either love drones or hate drones. Drone owners love them for the exhilaration of being able to fly on a low budget. Others hate them for their noise and the disturbance they can cause. If drone owners try to minimize the noise and disturbance, it can at least reduce tensions.
I try to fly in places where there is no one else around. If that’s not possible, I recommend immediately taking the drone up to 400 feet, where it can barely be heard. Always avoid flying near or directly over people. You should also know how to manually return and land your drone rather than relying on the Return-to-Home feature. When Return-to-Home is activated, the DJI controllers give off a loud, annoying beep that cannot be disabled.

Drone Photography Example – A unique perspective of Colorado Waterfall from the air.
Keep these tips about drone photography in mind next time you head out to capture that stunning shot with your drone. Feel free to share your own tips and techniques about drone photography in the comments below.
About Author Grant
Grant Collier has been working as a professional photographer since 1996 and has been shooting photos at night since 2003. He is the author of 12 books and has recently released a book called Collier’s Guide to Night Photography in the Great Outdoors. He has also produced a new instructional video called Collier’s Guide to Post-Processing Night Photos.


