A Guide to Infrared Photography
Infrared photography can be a great way to expand your landscape and nature images. More than twenty years ago when I first started out in photography, I was immediately drawn to infrared. I loved black and white and the traditional darkroom, so infrared was a beautiful and ethereal small step from that. During my time with infrared film, very few photographers were able to produce good images. But with practice and hundreds of rolls of film, I excelled. Unfortunately, in 2009 my film of choice was discontinued by Kodak, so I was reluctantly introduced to digital infrared. Now, ten years later, I am well integrated into the digital infrared world where I teach others the magic of this beautiful medium. (Join my upcoming digital and film infrared workshop in Montana August 4-9,2019)
Understanding Infrared Light
Infrared (IR) light surrounds us, but you cannot see it. By having your camera converted and in some cases, using special filters, your digital camera can capture the infrared light. People often see infrared images as being surreal and magical.
The visible spectrum, which enables you to see violet, blue, green, yellow, orange, and red, falls on the light spectrum between 400nm and 700nm. When the range of light is around 700nm to 1000nm, this is referred to as near infrared. And when working with external IR filters, the lower the number, the more color your IR-converted camera picks up. The darker red the filter, the more pronounced the infrared is. Processing infrared in your personal style is where the creativity lies.
Getting Started with Intrared Photography
Granted, there are some filters that allow you to use your existing camera to shoot infrared. I tried a few but the negatives outweighed the positives. Through my experience, I suggest you move onto actually converting your camera in order to shoot infrared. Choosing the conversion that is right for you can be the biggest infrared decision you make.
These are your choices of conversions: 720nm standard infrared, 850nm deep infrared, 665nm extra color infrared, 590nm infrared, a full spectrum filter, a two spectrum filter, a Blue-IR filter, and an H-alpha Astrophotography filter.
The two spectrum and full spectrum will allow you to use different color external filters to modify the outcome of your images. It also allows you to handhold your camera during exposure. With the purchase of a hot mirror blue filter, you will also be able to shoot regular color images.

Full Spectrum Conversion with the top row showing the image from the camera using different colored filters. The bottom row shows what the image will look like by processing with a channel mix.
Selecting ideal White Balance
In regards to white balance, there are differing opinions. Some photographers like to custom white balance in camera and others choose to white balance in post-processing. It really is a personal preference.
Custom white balance should be adjusted anytime there’s a change in the type of light in which you are shooting. Custom white balance can be achieved by photographing a white card in the type of light in which you are shooting or metering off of green foliage (grass is a perfect choice). As for auto white balance, as long as you shoot in RAW, you can make your white balance adjustments in the RAW processing. Auto white balance provides the ease of not having to change the white balance based on the light. A good rule for me is to have something white within the frame of the first photo of the session. A white card works best. Once you get the hang of post-processing your auto white balance, you can create custom presets that keep your image’s white balance consistent.
Shooting with Digital Infrared Cameras
- It is best to shoot in RAW
- As long as it is a bright day, keep your ISO at around 100
- Find your subject, focus and compose your image
- Adjust your exposure. With raw, it is better to expose for the highlights. (don’t blow them out)
Any exposure modes can be used such as manual, shutter priority or aperture priority. As long as you remember to check your exposure meter, manual mode is easy. But if you are accustomed to using the other settings, be aware of the exposure the camera gives you. Check your histogram so that you are within the range of a correctly-exposed image. When in a contrasty situation, bracket your images. A good rule of thumb is -1, 0, +1
As with focusing, test your lenses. In some cases, if you are shooting wider than f8, you may need to slightly adjust your focal point. I find that when I shoot at f8-f16, I focus on the subject and do not notice any focus softness.
When is best time for Infrared Photography?
The great thing about IR photography is that beautiful photographs can be captured during the times of day when most color landscape photographers are done shooting. What you are looking for is similar to what a black and white photographer is interested in… interesting shadows, tones and/or an interesting sky.

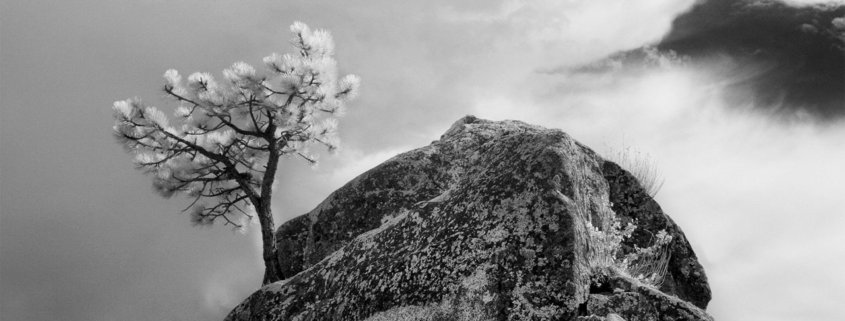
By using a dark red external filter on my 2-Spectrum converted camera, I am able to capture dramatic skies.
Other Helpful Photography Equipment
As with color photography, it is always good to have a tripod with you. I also enjoy having a cable release for long exposures as well as a ND filter and polarizing filter. With the software now available, it is not as necessary to have a graduated neutral density filter but make sure you bracket your images and learn how to combine them as realistic HDR.

With my 2-Spectrum conversion, I am still able to add a neutral density filter over my red filter. I use very good quality filters to make sure the quality of my images is high.
Photography Composition
The basic rules of composition still apply in IR photography, but IR relies on contrasts, textures, tones, and a great subject. Too often, I see IR photographs where the photographer got excited about the foliage but paid little attention to how those trees interacted with other elements in the scene. The way I look at it is… if the composition is bad in color, it will be bad in infrared. You still want to utilize the rule of thirds, diagonal lines, curves, shapes, perspective, patterns, symmetry, and balance.
Unique Infrared Photography Subjects
The following are some unique IR subjects:
- Water – Because water absorbs IR light, it often appears similar to the blue sky. On an overcast day, it appears lighter.
- People – Skin tones appear to glow and veins are more noticeable. Experiment with different skin tones as well as worn fabrics.
- Sky and Clouds – Skies with clouds tend to be very contrasty depending on the filter you use or the post-processing you do. Blues skies can be dark grey or even black with the clouds being white. Be sure to expose for the clouds so that they do not blow out.
- Foliage – IR photography is best known for foliage. Different greens reflect light differently so, you will have a resulting image of different tones of greys. Also, the more sunlight that hits the foliage, the more dramatic the infrared results.
- Animals – Similar to people, the tones of the animals in infrared can be quite interesting against the green grass.
I look forward to your results and I hope to see you in Montana!
So, if you are ready to make the move into infrared photography, there are two reputable companies that can do your conversion. Both also have cameras available that have already been converted for you to choose from. I had my conversion done by Kolari Vision.
I look forward to your results and I hope to see you in Montana!


 Grant Collier


Nice work… love the saguaro! I’ve been dabbling in near-IR photography for a long time, and I’ve just started looking more closely at the differences between visual monochrome, near-IR monochrome, and a combination of the two.
I converted my Nikon D3100 to Super Color IR at Life Pixel. I’ve been extremely happy with the conversion. While I’m still learning the ropes, I have managed to get some pretty amazing shots. Right now I’m using Nikon’s Capture NX2 to process the white balance (I know I would forget if I went to another place to take the WB reference photo). Then I bring it into Photoshop for the channel swap and other tweaks. I’m in the process of learning the CLiR panel so I can play with the colors more. I’d share some of my photos but can’t add them here. Thanks for the info…everything I can learn about this process is a huge help to me.