5 Reasons to Use Shallow Depth of Field for Landscape Photos
When you think about landscape photography, what’s a common trend that comes to mind? The images that immediately come to me, at least, all have one thing in common; they are in sharp focus, from edge to edge, front to back, however you like to put it. Every single one of them.
But what about ditching that whole concept entirely? Why not try, for a little while, something entirely new for landscape photography? Forget about finding the most alluring foreground element, forget about focus stacking, crank open your aperture, and swim against the current for a spell!
In this article, we’ll explore five powerful reasons to use shallow depth of field (DOF) in landscape photography, and how this creative technique can transform the way you capture nature.
1. Framing with Blur
One of the most overlooked uses of shallow depth of field in landscapes is framing. Normally, when landscape photographers talk about framing, they think about rocks, trees, or overhanging branches—all in sharp focus. But what if you could use those same elements differently?
By shooting with a wide aperture for landscapes (say f/2.8 or wider), you can soften the foreground elements while still using them as compositional tools. Instead of fighting with busy leaves or cluttered branches, you can turn them into abstract shapes of color that naturally lead the viewer’s eye into the scene.
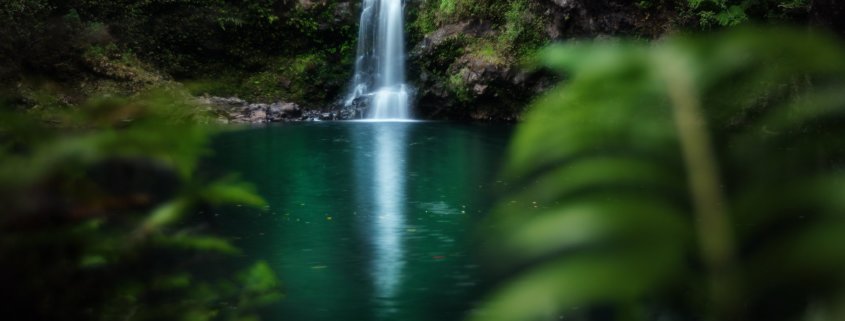
In the image above, the fern on the right is not sharp—it doesn’t need to be. Instead, it provides a soft green frame that enhances the composition without becoming a distraction. This is especially useful when you want to add context or color to your photo but don’t want unnecessary detail to steal the spotlight from your main subject.
Pro tip: Don’t be afraid to get really low. In many situations, placing your camera just inches from the ground can reveal small plants or grasses that make for excellent blurry frames. The closer you get to those elements, the more pronounced the shallow DOF effect becomes.
2. Faster Shutter Speeds in Low Light
Low light conditions—think dense forests, twilight skies, or deep canyons—can be a real challenge in landscape photography. Normally, you’d stop down your aperture (f/11, f/16) to maximize sharpness and depth, but doing so drastically reduces the available light. The solution? Open your aperture and embrace shallow DOF.
In the photo example, the forest was dim, and the leaves were swaying gently in the wind. By opening the aperture to f/2.8, Jaclyn avoided raising ISO even further and achieved a faster shutter speed in low light. This allowed her to freeze some of the subtle motion of the leaves while still preserving atmosphere and detail.
If you’re photographing in dark forests, golden hour, or even at night, using wide aperture settings in nature photography is not just creative—it’s practical.
Additional Benefit: By opening up to f/2.8 or wider, you don’t just get faster shutter speed—you also reduce the risk of motion blur in subtle elements like swaying grass, rippling water, or drifting fog.
3. Simplifying Busy Foregrounds
Sometimes, landscapes are messy. Fallen branches, dense undergrowth, distracting rocks—these elements can clutter a scene and make compositions feel overwhelming. Often, you can’t physically move around them (especially when hiking trails restrict your movement or when fragile ecosystems prevent stepping off path).
Here’s where shallow DOF becomes a powerful simplification tool. By opening your aperture, you can transform that messy forest floor into a gentle blur. Instead of becoming a distraction, it becomes a soft wash of color and texture, allowing the viewer’s attention to land squarely on your subject.
For example, in one of my images, the cluttered ground cover dissolved into a pleasing, painterly blur. This not only simplified the frame but also enhanced the mood of the shot—turning chaos into calm.
Pro tip: This works especially well with wide-angle lenses at close distances. Get near your subject, and let the shallow DOF blur out everything else.
4. Adding Depth to Flat Scenes
Landscape photographers often talk about “adding depth” to an image. Usually, this involves leading lines, atmospheric perspective, or post-processing techniques like dodging and burning. But there’s a more immediate method: use shallow DOF.
By placing an object close to the lens (grass, flowers, leaves) and focusing on a mid-ground or distant subject, you instantly create a sense of three-dimensionality. The blurred foreground and crisp subject trick the eye into perceiving distance and depth.
This is especially powerful in scenes that otherwise feel flat—like cloudy days, dense forests, or fields without strong natural layering. Shooting with a wide aperture in landscapes helps you carve out space and give the image visual dimension.
Pro tip: Try this technique with flowers in bloom, reeds by a lakeshore, or even rocks on a beach. Position your lens close to the foreground object, focus beyond it, and let the blur create that immediate sense of separation.
5. Creative Bokeh: Turning Details into Magic
Let’s be honest—sometimes the best reason to use shallow depth of field in landscape photography is pure creativity. Enter: bokeh.
In one of Jaclyn’s photographs, thousands of tiny mosquitoes hovered over a marsh, backlit by the setting sun. At a small aperture, those bugs would have looked like distracting specks. But at f/2.8, they transformed into shimmering golden orbs—a magical detail that turned a mundane subject into something enchanting.
This is the beauty of using bokeh in nature photography. Raindrops on spiderwebs, leaves catching light, reflections on water—all of these can be transformed into painterly circles of light when shot wide open. Instead of documenting a scene literally, you interpret it artistically.
Pro tip: To maximize bokeh, look for backlit conditions, use lenses with wide maximum apertures (f/1.4 to f/2.8), and create distance between your subject and the background highlights.
How to Use Shallow DOF in Landscape Photography
So how do you actually apply this in the field? Here are some quick guidelines:
- Open your aperture: Start at your lens’s widest aperture—f/2.8, f/1.8, or even f/1.2 on primes. If it feels too blurry, stop down slightly to retain some shape.
- Get close: The closer your lens is to the object you want to blur, the stronger the effect.
- Use wide-angle lenses creatively: Foreground blur is exaggerated with wide angles. Experiment with grasses, flowers, or rocks.
- Mind your subject distance: For zoom lenses (f/4–f/5.6), make sure the blurred element is close to the lens and far from your subject.
- Experiment with bokeh: Backlight small details like leaves, rain, or insects to transform them into glowing highlights.
Remember: if you’re too far away from everything, shallow DOF won’t have much effect. This is why close-up landscapes with shallow DOF are often the most striking.
Final Thoughts
Artistically speaking, shallow depth of field allows you to leave something to the imagination. It strips away distractions, enhances mood, and brings new visual possibilities into play. Sure, landscape photography is often about crisp, sharp images—but sometimes, soft edges, blurry frames, and glowing bokeh can tell a more compelling story.
Next time you’re out in the field, resist the urge to stop down to f/16 automatically. Instead, twist that aperture wide open, get close to your subject, and see what happens. You might just discover a whole new way of seeing the landscape.
Have you tried using shallow DOF in your own landscape photography? If not, I hope this inspires you to give it a shot. The possibilities are endless—and you might just find that blurring the details makes the story even sharper.
Original Article Published in Sept 2019.

 Jaclyn Tanemura


