Choosing the Right Aperture Setting for Nature Photography
It is a well-known fact that camera lens aperture is one of the three variables (shutter speed and ISO are the others) used to control a camera’s exposure. But aperture is not just about exposure—it is also one of the most powerful creative tools in nature photography.
Beginner photographers often focus on aperture settings only for controlling depth of field (DOF) and exposure, but they overlook how aperture can shape mood, storytelling, and artistic expression.
And who can blame them? Learning how to use aperture settings on a DSLR or mirrorless camera as a creative variable can be tricky. Aperture doesn’t just control exposure—it directly impacts depth of field in landscape photography, macro flower photography, and wildlife photography. Mastering it requires a mix of technical understanding and creative experimentation.
Here are some tips for choosing the right aperture settings effectively for wildlife, night, macro, and landscape photography.
Maximizing Sharpness for Landscape Photography
Landscape photography is one of the most aperture-dependent genres. Aperture choice determines whether your photo has edge-to-edge sharpness or selective focus on the foreground.
- Sharpest aperture (sweet spot): Most lenses perform best between f/8 and f/11, offering maximum sharpness and depth of field.
- Using hyperfocal distance with aperture: Focusing at the hyperfocal distance ensures maximum sharpness from foreground to infinity. For example, at f/11 with a 16mm lens, focusing a third into the scene keeps rocks in the foreground and distant mountains sharp.
Capturing Wildlife Photography
Wildlife photography presents unique challenges when choosing the right aperture setting. Unlike landscapes or flowers, animals are often in constant motion. Aperture decisions here directly affect sharpness, background blur, and the ability to freeze action.
- Best aperture for bird photography: A setting of f/5.6 to f/8 is often ideal when photographing birds. These apertures provide enough depth of field to keep the bird’s eye and body sharp while blurring the background. This technique, called subject isolation, makes the bird stand out dramatically against cluttered environments.
- Balancing aperture and shutter speed: A wider aperture (f/4 or f/5.6) allows faster shutter speeds, which are essential for freezing the wing motion of birds in flight or the quick movements of mammals. A fast shutter combined with a wide aperture keeps your ISO lower, reducing noise in low light.
- Using telephoto lenses with wide aperture: Long telephoto lenses, like a 400mm f/2.8 or 600mm f/4, naturally compress the background. Combined with a wide aperture, this creates a stunningly blurred backdrop—perfect for wildlife portraits. The trade-off is razor-thin depth of field, so precise focus on the animal’s eye is critical.
Aperture Setting for Night Photography
Night and astrophotography depend heavily on aperture because it controls how much light enters the lens during long exposures.
- Best aperture for astrophotography and Milky Way photography: A wide aperture such as f/2.8 is generally the sweet spot. It gathers the maximum amount of light in a short period, reducing star trails when using exposures under 25 seconds.
- Wide apertures vs lens sharpness: While f/1.4 or f/2.0 lenses allow even more light, they often introduce distortions like coma, chromatic aberrations, or corner softness. Stopping down slightly to f/2.8–f/3.2 improves sharpness without losing much light.
Controlling Depth of Field in Macro Photography
Macro photography, whether of flowers, insects, or small details, is where aperture control becomes critical. Because of close focusing distances, depth of field is extremely shallow—even at small apertures.
- Shallow depth of field for flower photography: Shooting at f/2.8 or f/4 allows you to isolate delicate petals or stamens, leaving the rest of the frame blurred. This creates dreamy, abstract images.
- Focus stacking for extreme detail: Very small apertures (like f/22) cause diffraction and softness. To solve this, many macro photographers shoot a series at f/5.6–f/8, each focused on different parts of the subject, and blend them together with focus stacking software.
As seen in the example above:
- Aperture of f/13 for landscape photography created a distracting background when photographing a trillium flower at Clifton Gorge, Ohio.
- Switching to f/4 for flower photography blurred the background and isolates the subject beautifully, even though the depth of field is shallow.
By carefully selecting your focus point and using wide apertures like f/2.8–f/5.6, you can isolate a flower or subject from a busy environment. This technique is essential in macro photography, where simplifying the background strengthens the composition.
Create Artistic Effects with your Aperture Settings
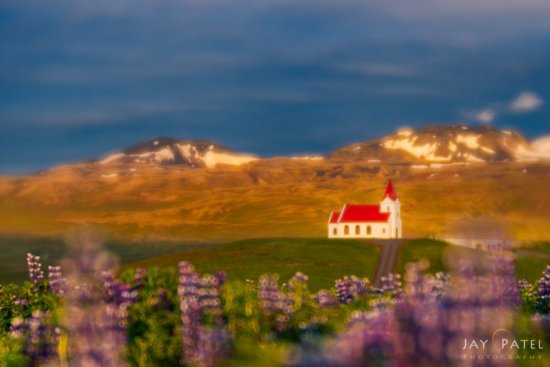
Wide apertures, such as f/2.8, can also introduce a dreamy, moody effect in landscape and travel photography.
For example, in Hellissandur, Iceland, I used an aperture of f/2.8 to soften both the foreground and background, keeping only the church at the top of the hill in focus. This resulted in an artistic and atmospheric photo that conveys emotion rather than technical perfection.
Use Bokeh Creatively at Wide Apertures
Bokeh—the aesthetic quality of blurred background—varies by lens and aperture choice. In macro nature photography, switching from f/8 to f/2.8 can completely transform harsh background highlights into soft, glowing bokeh circles.
For example, a flower photo captured in Costa Rica looked flat at f/8, but when photographed at f/2.8 with a Lensbaby Velvet lens, it produced luminous bokeh and an artistic feel.
This is one of the best reasons to experiment with wide aperture photography when photographing plants, insects, or even wildlife portraits.
Creating a Sunstar with Narrow Aperture
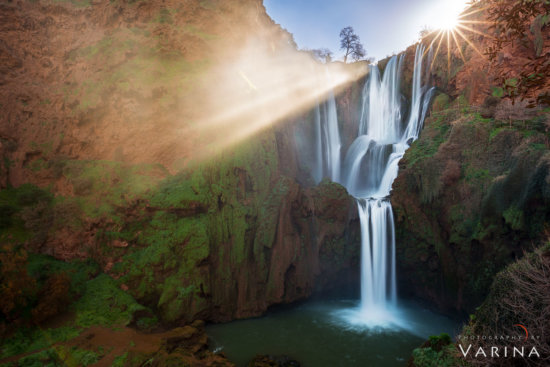
While wide apertures are perfect for background blur, small apertures (such as f/16–f/22) can be used to create sunstar effects in landscape photography.
In Morocco, Varina used an aperture of f/22 to capture a sunstar over Ozud Falls. This technique adds dramatic impact to sunrise and sunset photos, but it requires experimenting with different f-stops to balance lens flare, diffraction, and sunstar quality.
Experimentation is Key
There is no single “correct” aperture for every nature scene. Sometimes, even mid-range apertures like f/7.1 can create the right balance between sharpness and blur.
For example, in Fiji, I photographed a shell at f/7.1 with close focus, keeping the subject sharp while softening the background to create a sense of place.
In the above photo from Kootenay National Park, British Columbia, I used shallow depth of field and selective focus to isolate a single fireweed flower from its surroundings. Fireweed is one of the first plants to return after a devastating forest fire, and here you can still see the burned trees in the blurred background. This technique shows how aperture and shallow depth of field can be used to isolate a subject in a cluttered setting while also allowing for visual storytelling in nature photography.
This is why successful photographers experiment with aperture and depth of field—because creative results often come from trying multiple settings rather than sticking to formulas.
Final Thoughts
Using aperture as a creative variable doesn’t mean you ignore its relationship with shutter speed and ISO. Instead, it means developing a workflow that harnesses aperture settings for creative nature photography while still maintaining proper exposure.
Whether you’re photographing wildlife, night skies, macro flowers, or sweeping landscapes, the right aperture setting can make the difference between an ordinary photo and a memorable image.
So—do you use aperture as a creative tool in your photography? If not, what are you waiting for?









 Jaclyn Tanemura