Common Mistakes to Avoid When Using a Telephoto Lens
Telephoto lenses open up a world of creative opportunities for landscape and nature photographers. From isolating intimate scenes to capturing wildlife from afar, these powerful lenses allow you to bring distant subjects closer and create compelling compositions filled with depth and atmosphere.
However, telephoto lenses also present unique challenges. Their magnification, narrow field of view, and sensitivity to movement can easily lead to technical and compositional mistakes that ruin an otherwise great shot. Understanding these pitfalls — and how to avoid them — is key to mastering telephoto lens photography.
In this article, we’ll explore some of the most common mistakes photographers make when using telephoto lenses and how to fix them. You’ll learn how to keep your camera steady, choose the right shutter speed, and effectively isolate your subject for stronger, more creative images.
Keeping Your Camera Steady with a Telephoto Lens
One of the biggest challenges when shooting with a telephoto lens — especially one longer than 200mm — is keeping your camera steady. Even the slightest vibration or movement can cause motion blur and destroy image sharpness. This problem becomes more noticeable as the focal length increases, since telephoto lenses magnify not only your subject but also any camera shake.
1. Relying Too Much on Image Stabilization
Modern lenses often feature advanced image stabilization (IS) or vibration reduction (VR) systems that can help counteract small movements. However, one of the most common telephoto lens mistakes is relying solely on stabilization.

La Sal Mountains Overlook, Arches National Park, Utah captured without Image Stabilization by Jay Patel
While IS or VR can make a big difference, it’s not foolproof. It won’t correct for subject movement or strong vibrations caused by wind or an unstable tripod. Furthermore, image stabilization should be turned off when your camera is mounted on a tripod, as the system may actually introduce motion while trying to “correct” nonexistent shake.
Pro tip:
Use image stabilization when shooting handheld or in breezy conditions with a monopod, but switch it off when your camera is on a sturdy tripod.
2. Avoiding “Composition Creep” with a Cheap Ball Head
A sturdy tripod and ball head are essential companions to your telephoto lens. Many photographers make the mistake of pairing their expensive lens with a budget ball head that can’t handle the weight.
When you frame your shot and tighten the ball head, the camera may sag slightly — a frustrating issue known as composition creep. Even a few millimeters of movement can ruin your careful composition, especially when you’re zoomed in tightly on a distant subject.

Tripod & ball head setup for photographing leaf cutter Ants in Costa Rica with a telephoto lens.
To avoid this, invest in a high-quality ball head designed to support heavier telephoto lenses. Look for one with a strong locking mechanism and smooth tension control. Alternatively, consider using a gimbal head, which is ideal for larger lenses and makes it easier to track moving subjects like wildlife or waves.
Pro tip:
Always test your ball head before a major shoot. Frame your shot, tighten the lock, and see if the composition shifts. If it does — upgrade before it costs you great images.
3. Battling the Wind
When photographing landscapes in open spaces, the wind can become your worst enemy. Even a gentle breeze can introduce vibrations that lead to soft or blurry images when using a long lens.
To minimize this, hang your camera bag or a small weight from the center column of your tripod for extra stability. Shield your setup behind rocks, trees, or even your own body when possible.
If the wind is strong, shoot in short bursts — sometimes one of several frames will be sharp even if others aren’t. You can also increase your ISO slightly to use a faster shutter speed (more on that below).
Pro tip:
Keep your tripod legs low to the ground and avoid extending the center column — it acts like a sail in strong winds and amplifies vibration.
Using the Correct Shutter Speed
Choosing the right shutter speed is critical when shooting with a telephoto lens. Because longer focal lengths exaggerate camera shake and subject movement, the “safe” shutter speed you might use with a wide-angle lens often won’t cut it here.
1. Following the Reciprocal Rule
A common guideline for avoiding motion blur is the reciprocal rule: use a shutter speed that’s the inverse of your focal length. For example, if you’re shooting with a 400mm lens, aim for at least 1/400 second. If your camera has a crop sensor (APS-C), multiply that number by the crop factor (typically 1.5x), which means you’d want around 1/600 second or faster.
However, this rule assumes you’re photographing a stationary subject and have excellent handholding technique. In real-world conditions — like wind, moving subjects, or shooting from a less stable position — you’ll often need an even faster shutter speed.
Pro tip:
When in doubt, go faster. Increasing your ISO slightly to achieve a faster shutter speed is almost always better than ending up with a blurry image.

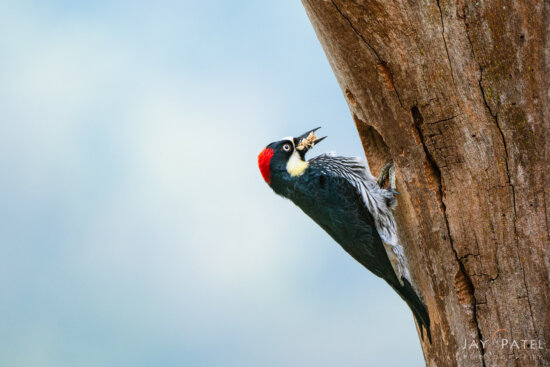
Captured at 1/1600s to free motion of woodpecker in San Gerardo Valley, Costa Rica by Jay Patel
2. Compensating for Subject Movement
If you’re photographing wildlife, birds, or crashing waves, the subject’s motion adds another layer of complexity. Even if your camera is perfectly still, your subject might not be.

Captured with a telephoto lens using 1/2500s shutter speed to free motion at Yellowstone by Jay Patel
For fast-moving subjects, aim for shutter speeds of 1/1000 second or faster. For slower movements like grazing animals or gentle waves, 1/500 second is often sufficient. Experiment with different speeds to find the right balance between freezing motion and maintaining sharpness.
Pro tip:
Use your camera’s burst mode to capture several frames in quick succession. Often, one image will be sharper than the rest due to slight variations in timing and movement.
3. Using a Remote Shutter or Timer
Even the act of pressing the shutter button can introduce tiny vibrations when using a long telephoto lens. One of the easiest ways to avoid this is to use a remote shutter release or your camera’s built-in 2-second timer.
This small step can make a noticeable difference in sharpness, especially when photographing at slower shutter speeds or using a lightweight tripod setup.
Isolating Your Subject with a Telephoto Lens
One of the greatest advantages of telephoto lenses in landscape and nature photography is their ability to isolate your subject from distracting surroundings. However, achieving that sense of intimacy and focus takes more than just zooming in — it requires careful composition and attention to depth of field.
1. Forgetting to Simplify the Composition
A common mistake is to zoom in tightly on a subject without considering the background or edges of the frame. Telephoto lenses compress perspective, bringing distant elements closer together. This can lead to cluttered or confusing images if you don’t simplify your composition.
Before pressing the shutter, scan your viewfinder for unwanted elements — like bright patches, branches, or horizon lines cutting through your subject. Move your position slightly or adjust your focal length to clean up the composition.

Isolating subject from the background using a Telephoto lens with proper composition in Costa Rica by Varina Patel
Pro tip:
Think of your telephoto lens as a tool for exclusion rather than inclusion. Use it to remove distractions and emphasize what’s important in the scene.
2. Ignoring Depth of Field and Background Blur
Telephoto lenses naturally produce shallow depth of field, even at moderately narrow apertures. Many photographers make the mistake of shooting wide open (like f/2.8 or f/4) and ending up with parts of the subject out of focus.
For landscape photography, where you often want more of the scene in focus, start around f/8 to f/11. For wildlife or intimate nature scenes, a slightly wider aperture like f/5.6 can beautifully separate your subject from the background without losing critical detail.
Pro tip:
Pay attention to the distance between your subject and the background. The greater that distance, the more pleasing your background blur (bokeh) will appear — even at smaller apertures.
3. Overlooking Foreground and Layering
Telephoto lenses are excellent for compressing layers in a scene — for example, a series of rolling hills or waves catching the light. But it’s easy to overlook the role of foreground and layering when zoomed in tightly.

Keeping foreground layering to a minimum for bird photography in Grimsey Island, Iceland by Jay Patel
Try composing with multiple planes of depth — a subject in the midground, a textured background, and perhaps an atmospheric element like mist or light rays. This creates a sense of depth even with a long lens.
Pro tip:
Use live view or your camera’s grid display to align layers and balance elements across the frame.
Final Thoughts: Avoiding Mistakes with a Telephoto Lens
Telephoto lenses can transform the way you see the world as a photographer. They help you capture intimate landscapes, highlight hidden details, and create unique perspectives that wide-angle lenses simply can’t match.
But with their power comes responsibility — and a learning curve. By keeping your camera steady, choosing the right shutter speed, and mastering subject isolation, you’ll avoid the most common telephoto lens mistakes and elevate the quality of your landscape and nature photos.
Whether you’re photographing wildlife at dawn, waves in bright sunlight, or distant mountain layers, remember that every small adjustment — a tighter ball head, a faster shutter, a cleaner composition — makes a big difference.
With practice and patience, your telephoto lens will become one of your most creative tools for crafting powerful, expressive images that stand out from the crowd.
About Author Jay Patel
I could startoff like this – “Seeds of Jay Patel’s appreciation for beautiful places were planted early in his childhood….” but it would get boring really fast. I will just sum it up and say that I am a Landscape and Wilderness Photographer who loves to capture dramatic light. My photographs have been published in various magazines, calendars and advertising materials throughout the world.
Patience is a virtue...unless you are chasing your dreams


