How to build an ultimate Landscape Photography Filter Kit
At its very heart, landscape photography is about capturing light on a sensor (or film, if you’re still shooting the old-fashioned way). Besides camera settings, photography filters are the only accessory available to a landscape photographer to control and modify that light. Photography filters allow a landscape photographer to explore creativity, control colors, reduce glare, manage dynamic range and more. So it is important to carry the ultimate landscape photography kit with you when you travel to exotic locations. What makes an ultimate landscape photography photography filter kit?
If you are just starting to think about getting photography filters, the process can be confusing due to the many options that are available in the market today. You will have to think about the size of the front element of your camera lenses, type of photography filters to get, size of the photography filters and number of other factors. So just how does one go about building an ultimate landscape photography filter kit? To answer this question let’s first look at what the landscape photography filters used for.
Understanding Photography Filters
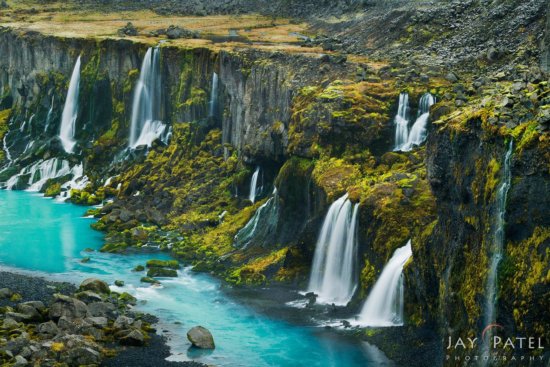
The first thing you need to learn about filters is what they do and how they affect your images. This helps determine which filters to purchase and how to use them effectively to capture photos like this one from Iceland.
Circular Polarizer Filter
A circular polarizer is the first filter I would purchase. This photography filter reduces or removes the glare from a reflective surface caused by scattered light. While there are plenty of circular polarizer effects software presets, there is no way for software to accurately reproduce the effects of a circular polarizer. You can see the effect of a circular polarizer in the images below.
Neutral Density Filters
Neutral Density (ND) filter is my second choice. This photography filter cuts down the light entering the camera and allows you to slow down your shutter speed. We use this filter to produce the silky smooth effect in the water as seen in the image below.
An ND filter allows you more options to explore creativity as seen in this video.
If your Photoshop skills are exceptional, you may be able to manually produce a few ND filter effects. However, this takes a lot of time and effort and is, at best, an approximation of what a real filter can do. An ND filter comes in different strengths. For someone who is just starting out, I suggest one between 4 and 6 stops. If you can afford it, I suggest picking up two ND filters – one between 4 to 6 stops and a 10-stop filter.
Graduated Neutral Density Filters
Graduated Neutral Density (GND) filters can be used to reduce the dynamic range of the scene you are photographing. They also allow you to capture proper details in both highlights and shadows. Today, HDR software can very effectively replicate the effects produced by this filter. If you are on a budget, this is one filter that you can skip. If you were going purchase this filter, I suggest purchasing a 3-stop soft GND filter. This is one of our most used filters. Here are couple of images taken using the GND filters…
During our workshop we often get this question: Should I carry Graduated Neutral Density Filters or just rely high dynamic range (HDR) processing in Photoshop?
Our answer is always the same… “it depends”. The important thing is to understand the advantages of each option and to know when to use one or the other… or both. If you know how to use a GND filters, you can produce the results with a graduated neutral density filters that are very similar to a manually-blended image. There are times when we prefer to use a graduated neutral density filter over a manually blended landscape photo. Here is a short video where Jay explain why we carry a GND filter.
We recommend that you take the time to experiment with GND filters and HDR processing. Find out what works best in any given situation. Most importantly, make the effort to understand WHY that approach is best. Each option has it’s place. We teach our students how to use GND filters during our on-the-ground workshops… and we teach manual blending techniques in video courses.
How to build your Photography Filter Kit
ND Filters can be square filters (GND Filters are rectangular) or circular filters. We highly recommend that you start building your filter kit using square filters because of a couple of reasons. First, if your kit is selected properly you can stack multiple filters without producing vignetting. Second, rectangular GND filters can slide up and down as needed so you do not have to place your horizon in the center.

1. Step-up rings 2. Filter holder and adapter 3. Circular Polarizer Filter 4. Graduated Neutral Density Filters 5. Neutral Density Filters (Our filter system is from Benro.)
Now that you know what each filter does and the options available to you here is how I would start building my filter kit:
- Select a reputable photography filter brand you want to purchase from. We use Benro Filters because they use high quality glass without any color cast for all their neutral density and graduated neutral density filters.
- Purchase a photography filter holder (most filter holder will come with an adapter) to fit your camera lens with the largest front element and then get step-up rings for smaller lenses. Make sure that this photography filter holder will accept a circular polarizer.
- Purchase circular polarizer filter that works with your photography filter holder.
- Purchase ND Filters that work with your photography filter holders. We carry 4-Stop and 6-Stop ND filters without any color cast.
- Optionally you can purchase GND filters as needed. We only carry 3-Stop Hard and Soft GND filters without any color cast.
We recommend a carrying case to carry your filter holder and various filters securely. Make sure it has room to extend your filter kit as needed.
How to Purchase
If you decide to go with square filters, you must purchase a circular polarizer that works with your filter holder without producing vignetting on your widest lens. It is best to purchase a filter kit from a single vendor as it is easier to ensure that different parts fit together properly. If you decide to combine filters from different vendors, do your research to ensure that all the elements properly fit together.
If you are in the market for a new filter kit, we have partnered with Benro Photography Filters to design the Visual Wilderness Photography Filter Kit to get you started. You can order it using the link below and get 10% off.
Sponsored Content by Benro Filters
Disclaimer: Varina & Jay Patel are brand ambassadors for Benro Tripods & Filters.


