Winter Photography Tips to Capture Stunning Photos
Winter is one of the most magical seasons for photography. Snow-covered mountains, frost-laden trees, frozen lakes, and frigid temperatures create incredible opportunities for winter landscape photography. However, photographing in cold weather can be challenging. Successfully shooting in these conditions brings a sense of accomplishment, especially when you’re rewarded with soft winter light or even the mesmerizing Aurora Borealis over snowy landscapes if you’re in higher latitudes.
Here are a few essential winter photography tips to help you capture stunning images and protect your gear from harsh elements:
Tip #1: Stay Warm during Winter Photos outing
When it comes to cold-weather photography, your comfort and safety are paramount. Nothing is more frustrating than cutting your photo shoot short because you’re too cold or, worse, at risk of frostbite.
. Normally, I dress in three layers. A wool base layer, a middle layer, and the outer shell. For my feet, I have a set of wool winter socks and winter waterproof hiking books. More recently, electric heated gloves and socks have become popular, and can really help in very cold environments. Also, I have a set of crampons/ice cleats for my boots. For my hands, I wear a pair of base layer gloves along with mittens; the mittens provide more warmth because they keep my fingers are together. For my face/head, I have a balaclava face mask and a winter beanie. Lastly, I have hand and toe warmers.
- Layer your clothing for extreme weather: Wear a wool base layer, a thermal middle layer, and a waterproof outer shell. For footwear, opt for wool socks and insulated waterproof hiking boots. If space allows, it is better to pack too much than not enough.
- Invest in heated gloves and socks: These are game-changers for keeping warm during extended photo shoots in frigid temperatures.
- Use crampons or ice cleats: Attach them to your boots to safely navigate icy surfaces.
- Protect your face and hands: Wear a balaclava or face mask, along with base-layer gloves inside mittens to keep your fingers warm and nimble. You can also use hand and toe warmers if necessary.
Staying warm allows you to focus on composing the perfect winter landscape photograph instead of worrying about the cold.
Tip #2: Prepare for Extreme Winter Conditions
Winter photography often involves navigating snowy and icy terrain, which can pose risks. Planning ahead is crucial for your safety and success.
- Drive safely in snowy conditions: If renting a vehicle, ensure it has winter tires or, ideally, a 4×4 drivetrain. Carry snow-removal tools like a scraper and shovel in your car.
- Test frozen lakes before walking on them: Ensure the ice is thick enough to support your weight, as lakes freeze at varying rates. When walking in snow and ice conditions, use crampons to provide extra grip.
- Pack emergency supplies: Bring a first-aid kit, extra layers, snacks, and a charged phone or GPS device for remote winter photography locations.
Taking precautions helps you safely enjoy the unique opportunities that winter landscape photography offers.
Tip #3: Essential Winter Photography Equipment
The right gear is vital when photographing in extreme cold. Here’s what I recommend for a successful winter photo shoot:
- Camera gear for winter photography: I use the Nikon Z7ii mirrorless camera with a 14-24mm lens for landscapes, along with 24-70mm and 70-200mm lenses for versatility.
- Filters for creative shots: Magnetic Kase filters, including 10-stop and 6-stop neutral density filters, are great for long exposures.
- Lightweight camera backpack: I use the Atlas Athlete pack, which is designed for mirrorless systems and perfect for snowy conditions.
- Other Equipment: Other items that I carry in my pack include: headlamp, snacks/protein bars, microfiber towel, and a camera shell for shooting in the rain.
Pro Tips for Protecting Camera Gear in Cold Weather
Depending on the extremity of the weather, there may be some special considerations to take into account.
- Avoid condensation on your camera lens: Store your gear in a sealed plastic bag when transitioning between cold and warm environments.
- Prolong battery life in freezing temperatures: Keep spare batteries in an inner pocket close to your body or attach a hand warmer to the outside of your camera.
- Prevent lens fog during winter shoots: When temperatures fall well below freezing, the breath you exhale freezes. It also freezes on the camera, such as on the LCD screen. Your breath can also put a coat of frosting on the camera lens, so never exhale on the glass.
Real Life Winter Photography Workflows
Star Trails with Northern Lights, Albert Canada
The Northern Lights are a dream subject for many photographers. This photo below is special to me because it was the first time I ever saw the northern lights. This is captured at Lake Minnewanka in Banff National Park in Alberta, Canada.
I was shooting longer here because the lights were a bit faint. I set it up with a little bit of water in the shot and the main peak in the center to give the image balance. After taking a few shots, I had the vision to combine the magic of Northern Lights with star trails. So I hooked up my intervalometer and set up a program to take 200 continuous shots. This gave me the final result with the circular star trails.
Camera Settings: 30 seconds at f/2.8, ISO 2500, using a wide-angle lens. I captured 200 continuous shots, one second apart, to create the stunning circular star trail effect.
Long Exposure Winter Photography from Grand Tetons, Wyoming
The jagged peaks of the Grand Tetons offer endless inspiration. When arriving to this scene, I had pretty good sense of how I wanted to photograph them. There were these massive clouds moving swiftly, so I knew I wanted to capture the motion of the clouds. At the time I was shooting, there was still plenty of daylight, so create the motion in clouds, I needed to shoot with a relatively long exposure using a 10-stop ND filter.
After experimenting with different exposure settings, I landed at a shutter speed of 71 seconds for this image. This gave me the final result with dramatic movement of the clouds above the Grand Tetons.
Camera Settings: 71 seconds at f/22, ISO 50, focal length 24mm. This technique highlighted the swift motion of clouds against the still, majestic mountains.
Seascape Photography at Diamond Beach, Iceland
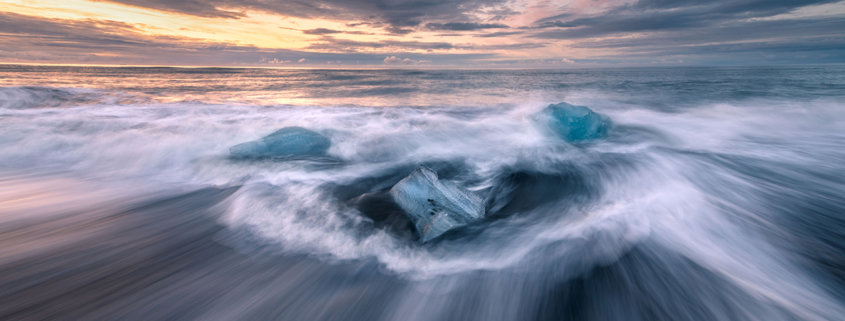
Diamond Beach in Iceland is a winter photography hotspot, with icebergs scattered across the black sand. Shootings these icebergs at the Diamond Beach takes proper planning to get the best results. This is a sunrise shot at the beginning of winter, taken while going in an out of the water.
The best advice for shooting any seascapes in cold water is to wear light weight fishing waders. I travel with these anytime I’m going to Iceland, or other cold destinations with oceans. I used the sturdy RRS tripod for this long exposure photograph to keep the camera steady.
Camera Settings: 0.8 seconds at f/20, ISO 31, with a 14mm wide-angle lens. Timing and composition are crucial to capture the perfect shot as the waves receded.
Final Thoughts on Winter Photography
Winter photography is a thrilling challenge that offers unparalleled opportunities for capturing snow-covered peaks, icy reflections, and breathtaking light. The unpredictable elements force you to think creatively and stay spontaneous. By following these tips and taking the time to protect your gear and yourself, you’ll be ready to create unforgettable winter photographs.
Original Article Published in Jan 2022.


