How to get a Perfect Crop in Lightroom
Have you struggled to find the perfect crop in Lightroom for landscape photography? Perhaps you have to submit landscape photos for a presentation or a camera club with specific pixel dimensions and don’t know how to do it. With so many of our images being shared or making their way to social media, it can be difficult to find the perfect crop ratio for different outlets. Even on a single platform like Facebook, your profile photo, banner image, and photos for your feed are all different crop ratios and have specific recommended pixel dimensions for the best viewing.
In the digital age, we have some amazing options with respect to what to do with our photos. Cropping and resizing them shouldn’t be a daunting task.
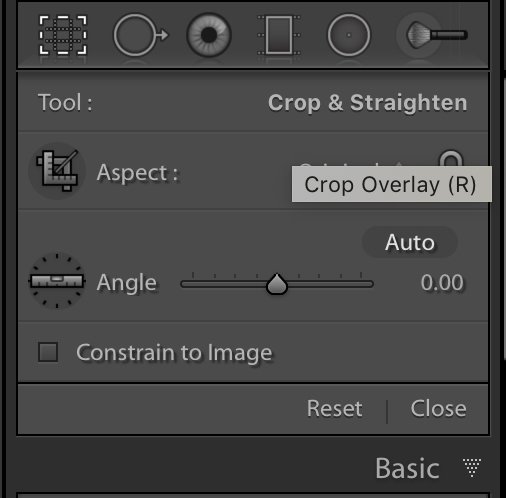
In Lightroom Classic, the crop tool is located in the develop module. It’s the dotted box in the tool strip above the Basic Panel. You can quick access it by typing the letter R on your keyboard. Get to know your shortcuts… they’ll save you a lot of time.
Straighten Your Image
When you open the crop tool, I recommend straightening your image before doing anything else. Because the image automatically crops just a tad in order to straighten it, doing this first sets the stage for success.
You can straighten your image in a few ways…
- If you hover your cursor outside of the actual image but within the window, the cursor turns into a curved arrow. If you click and drag, the image rotates and you can line up the horizon with any of the horizontal lines or your building/tree with the vertical lines.
- You can also click the Level button just to the left of the word Angle. Click along a horizon line or vertical line and drag the cursor along a straight edge, then let go. It automatically rotates to line up with that edge.
- Or you can simply grab the Angle slider and drag it left or right to straighten. If you did too much in one direction or another, simply click Reset within the crop tool and try again.
The Auto button tries to find a straight line and adjust the crop accordingly. I rarely use this option but it’s there for you to try if you wish.
Finding the Perfect Size
Now that you know how the tool works, what about finding that perfect size? That’s were the Crop Ratio options come into play.
Next to the word Original is an up and down arrow. If you click this, the menu below displays. You can choose a predetermined crop ratio and create your own. If you wish the proportions of the image to remain the same, leave the padlock locked. If you wish to have freedom to crop in Lightroom however you like, be sure to unlock that by clicking on it.
When the crop ratio menu opens, an array of options displays. Many of them are the “typical” dimensions to which you would either print, upload to a slide show presentation, submit to a camera club, post online, or email.
When you choose Custom, you have the option of entering the exact pixel dimensions you want to get a precise corp in Lightroom. This is perfect for somewhat odd sizes like Facebook banner images or sizes required on your website galleries. Many sites have “drag and drop” windows for your images and they’ll look better if you abide by the dimensions set forth by the website builder.
Here is a short video tutorial that explains how to get a perfect crop in Lightroom:
Hopefully you now have a better understanding of how the Lightroom’s crop tool works and how best to use it to get a perfect crop ratio for your landscape photography.


