How to create Tiny Planets in Photoshop

Here’s something fun I’ve been playing with lately. I’ve been fooling around with making tiny planets in Photoshop, and I thought I’d share the steps for making them – along with some basic tips that I learned as I played with the process. I have to admit that I had entirely too much fun with these. :)
Here’s how it works…
Step 1: Choose the Photo you want to use to create your planet. I’d recommend planning for these shots in advance, and taking some nice pano shots with interesting horizons. But, it works just as well to choose existing photos and crop them to your specifications. I chose this shot from Florida because it had a nice, wide horizon, some pretty reflections in the water, and an interesting sky.
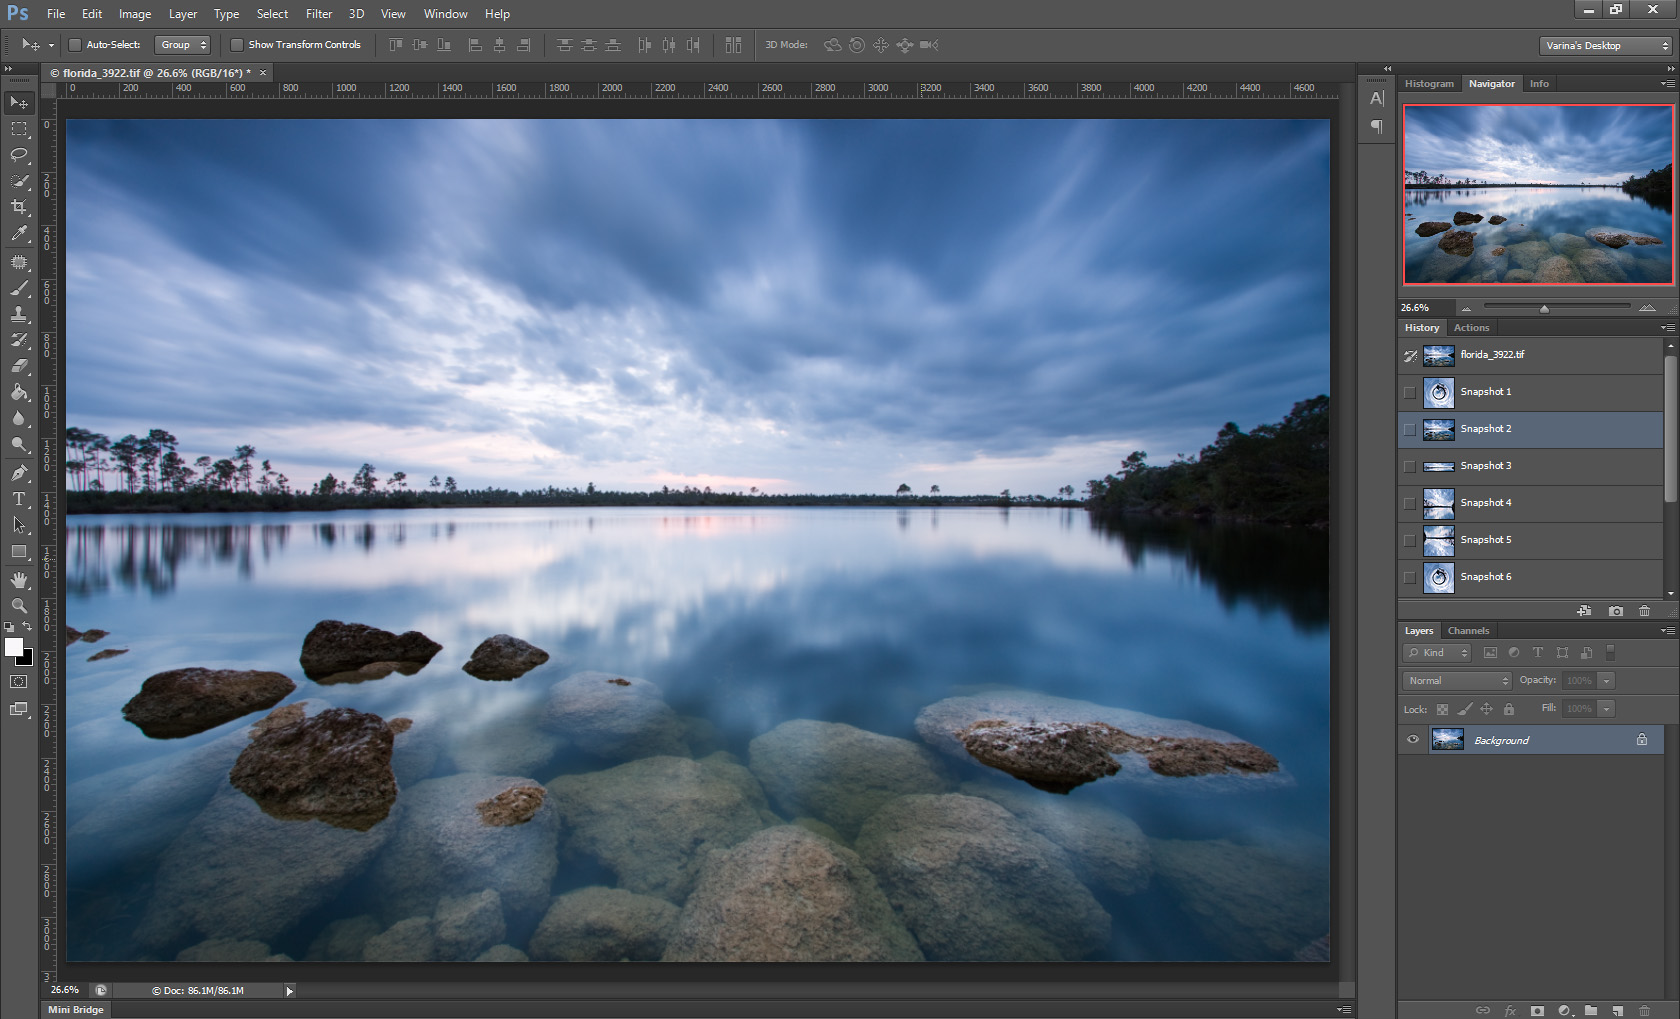
This is what I started with.
Step 2: Make sure your horizon is level, and then crop the photo to create a wide panorama.
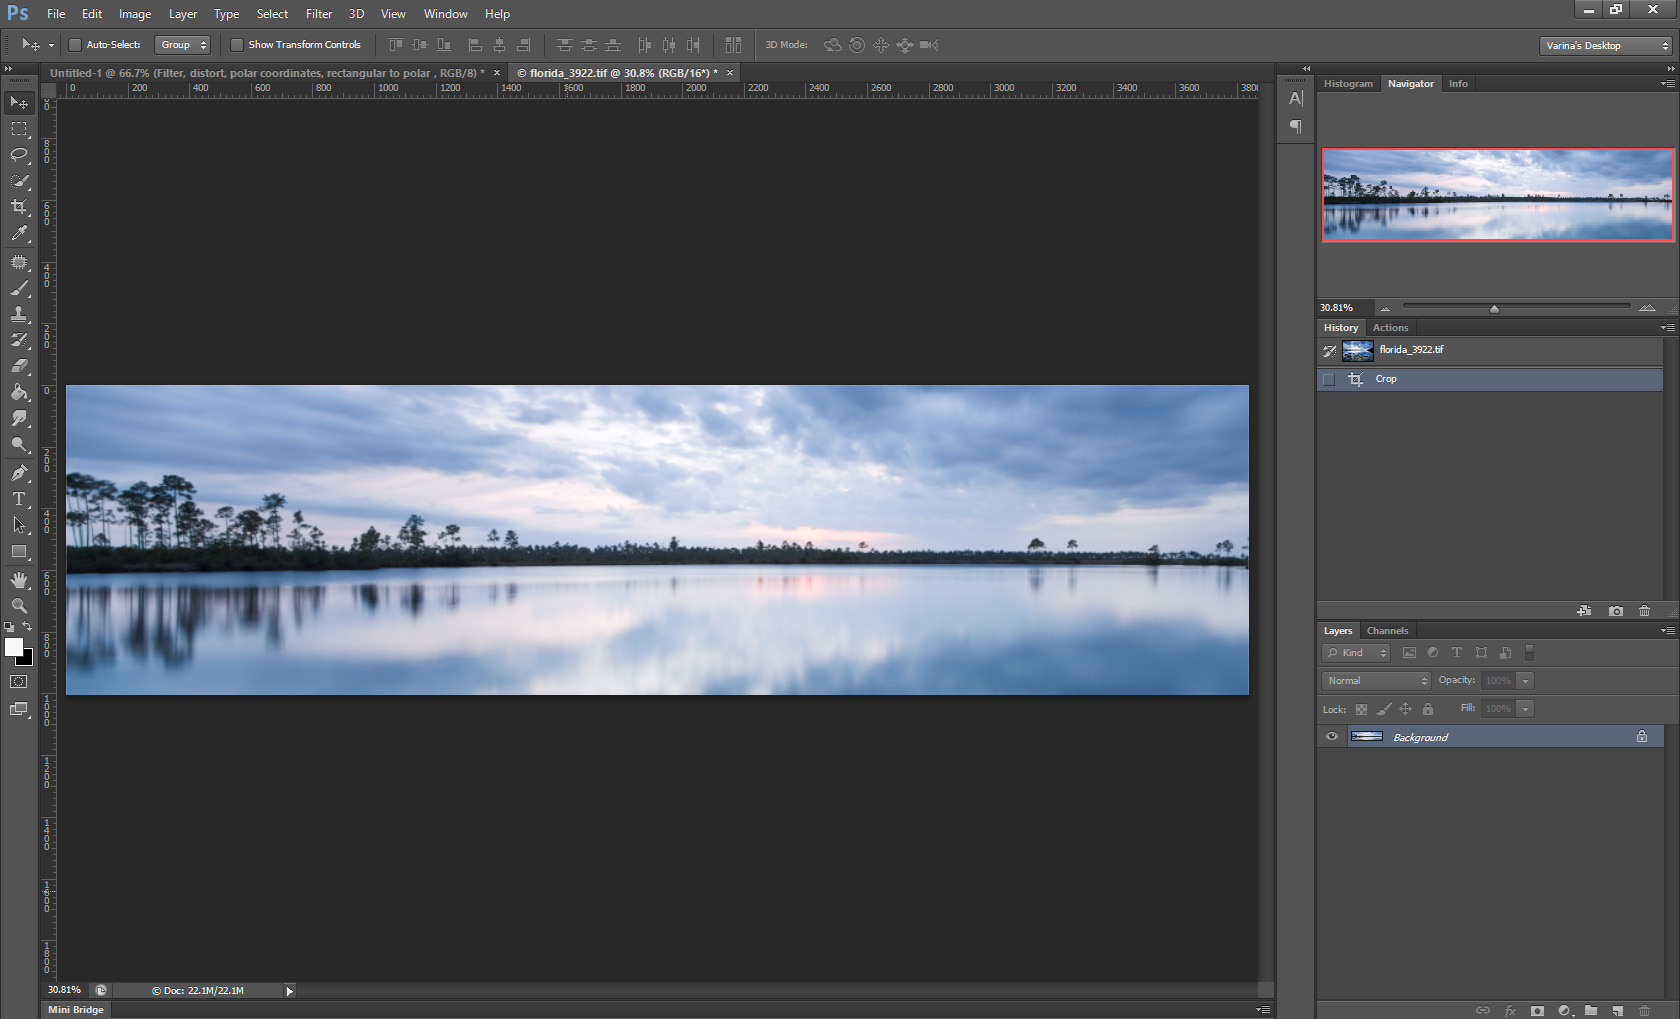
Here’s my pano crop.
Step 3: Next, we’re going to create a square shape by stretching the image. Choose Image > Image Size, then copy the dimensions for the Width into the Height box and click ok.
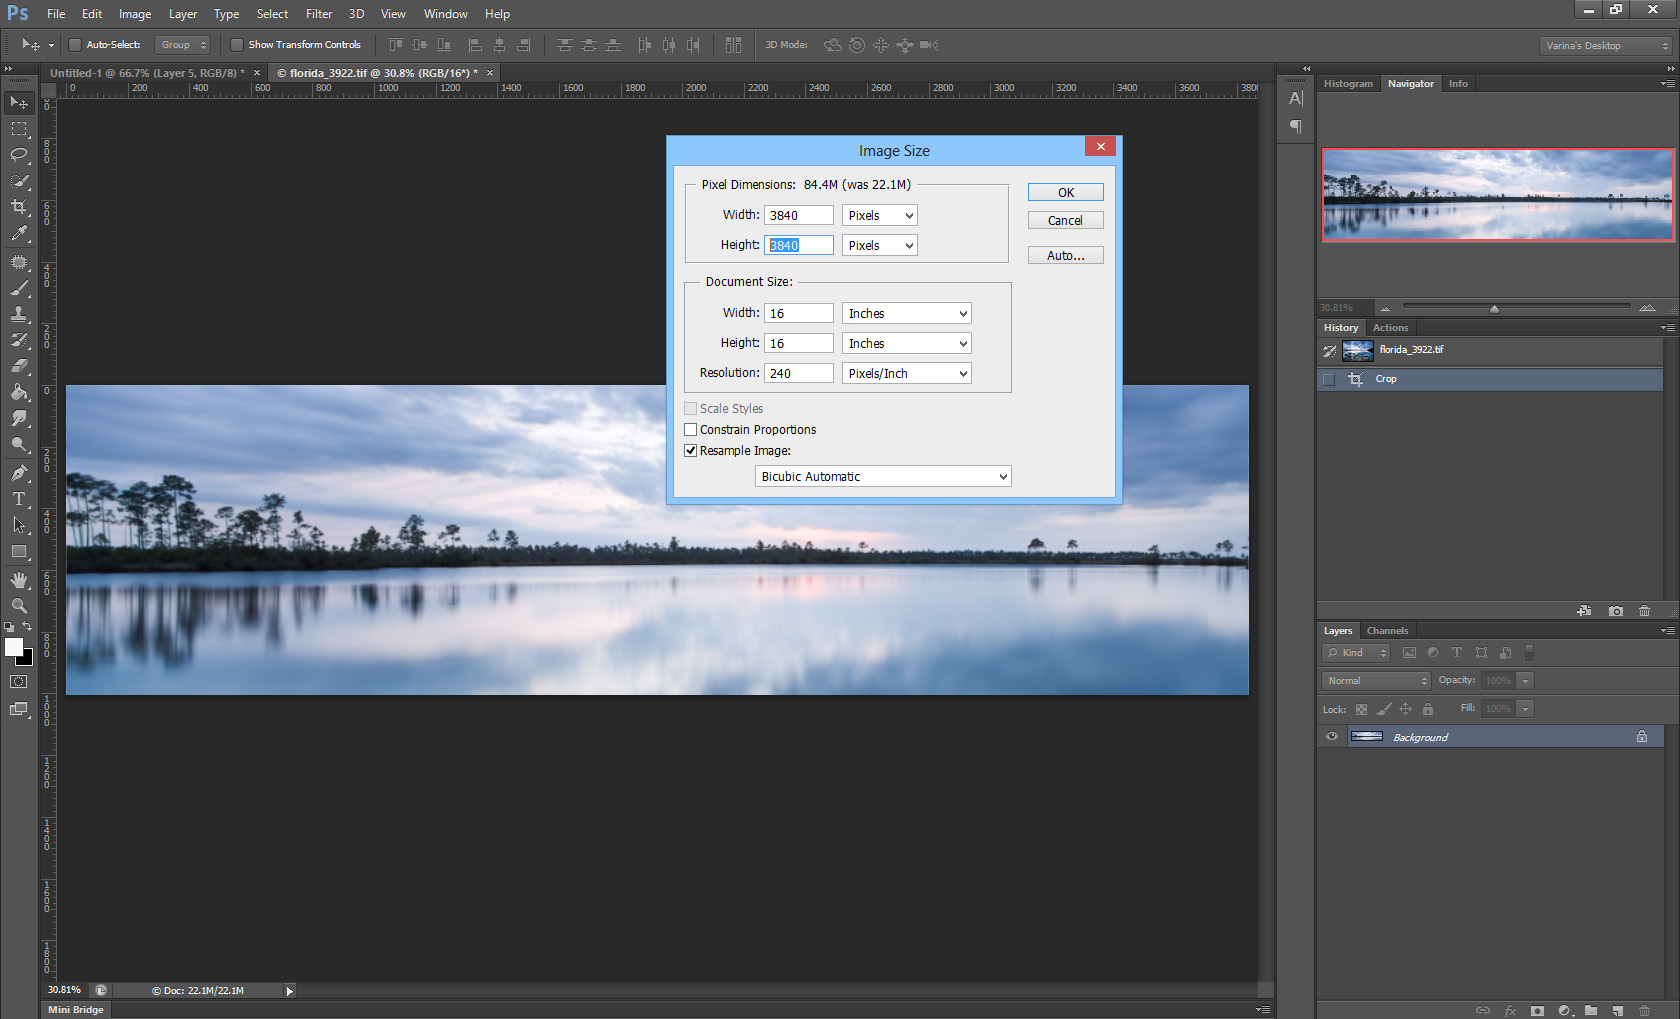
Convert your pano to a square.
Here’s what happens to your image – it gets all stretched out. Stay with me here.

It looks weird, but don’t worry.
Step 4: Turn your image upside down. Choose Image > Image Rotation > 180 degrees.
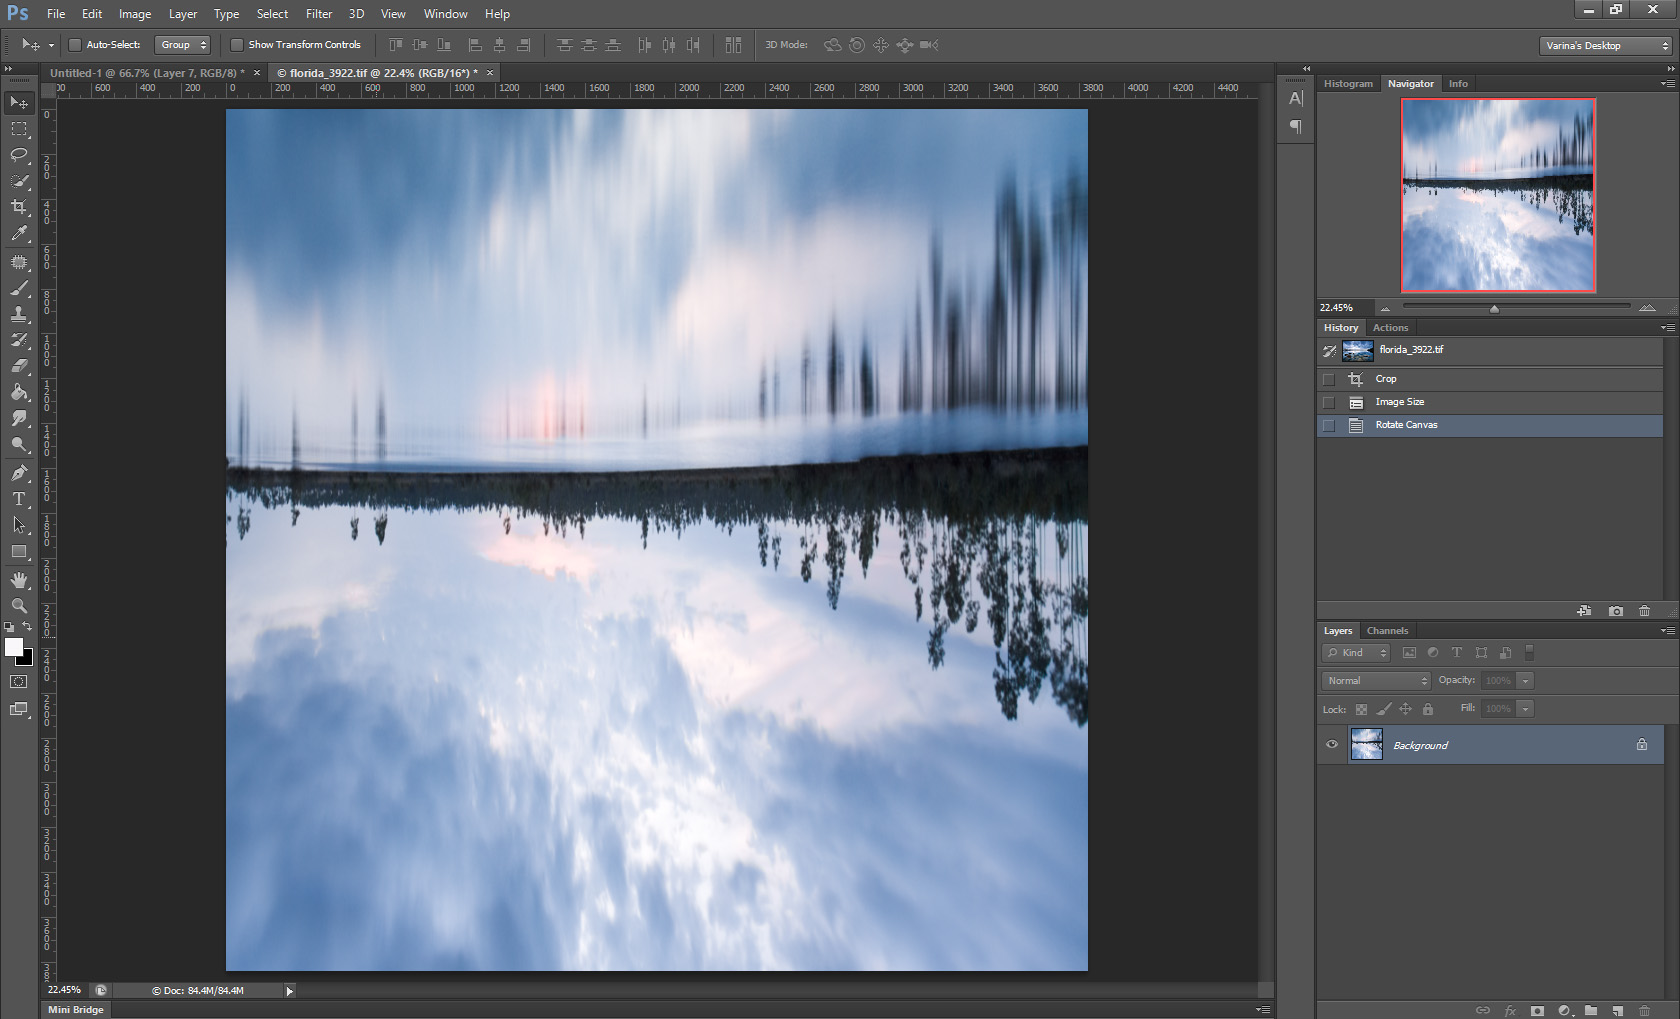
Don’t forget to turn it upside down.
Step 4: Convert your image to 8-bit if it isn’t already. The polar coordinates filter doesn’t work for a 16-bit image. Choose Image > Mode > 8 Bits/Channel.
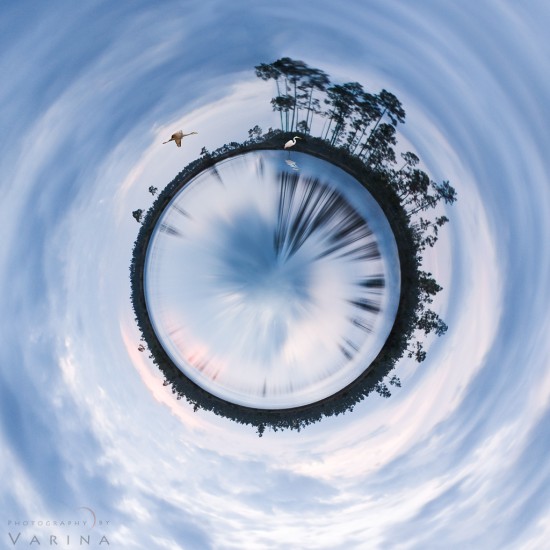
Step 5: Select Filter > Distort > Polar Coordinates. Select the Rectangular to Polar option, and click ok. And there it is! Your very own little planet! It needs a bit more work, but you are mostly there! If you don’t like the result, go back and tweak your original image. You can choose a different one with a more interesting horizon, or crop it differently for a different finished effect. I’d recommend doing some experimentation to see what happens when you choose a wider or narrower panorama, include more or less sky or foreground, and so on.
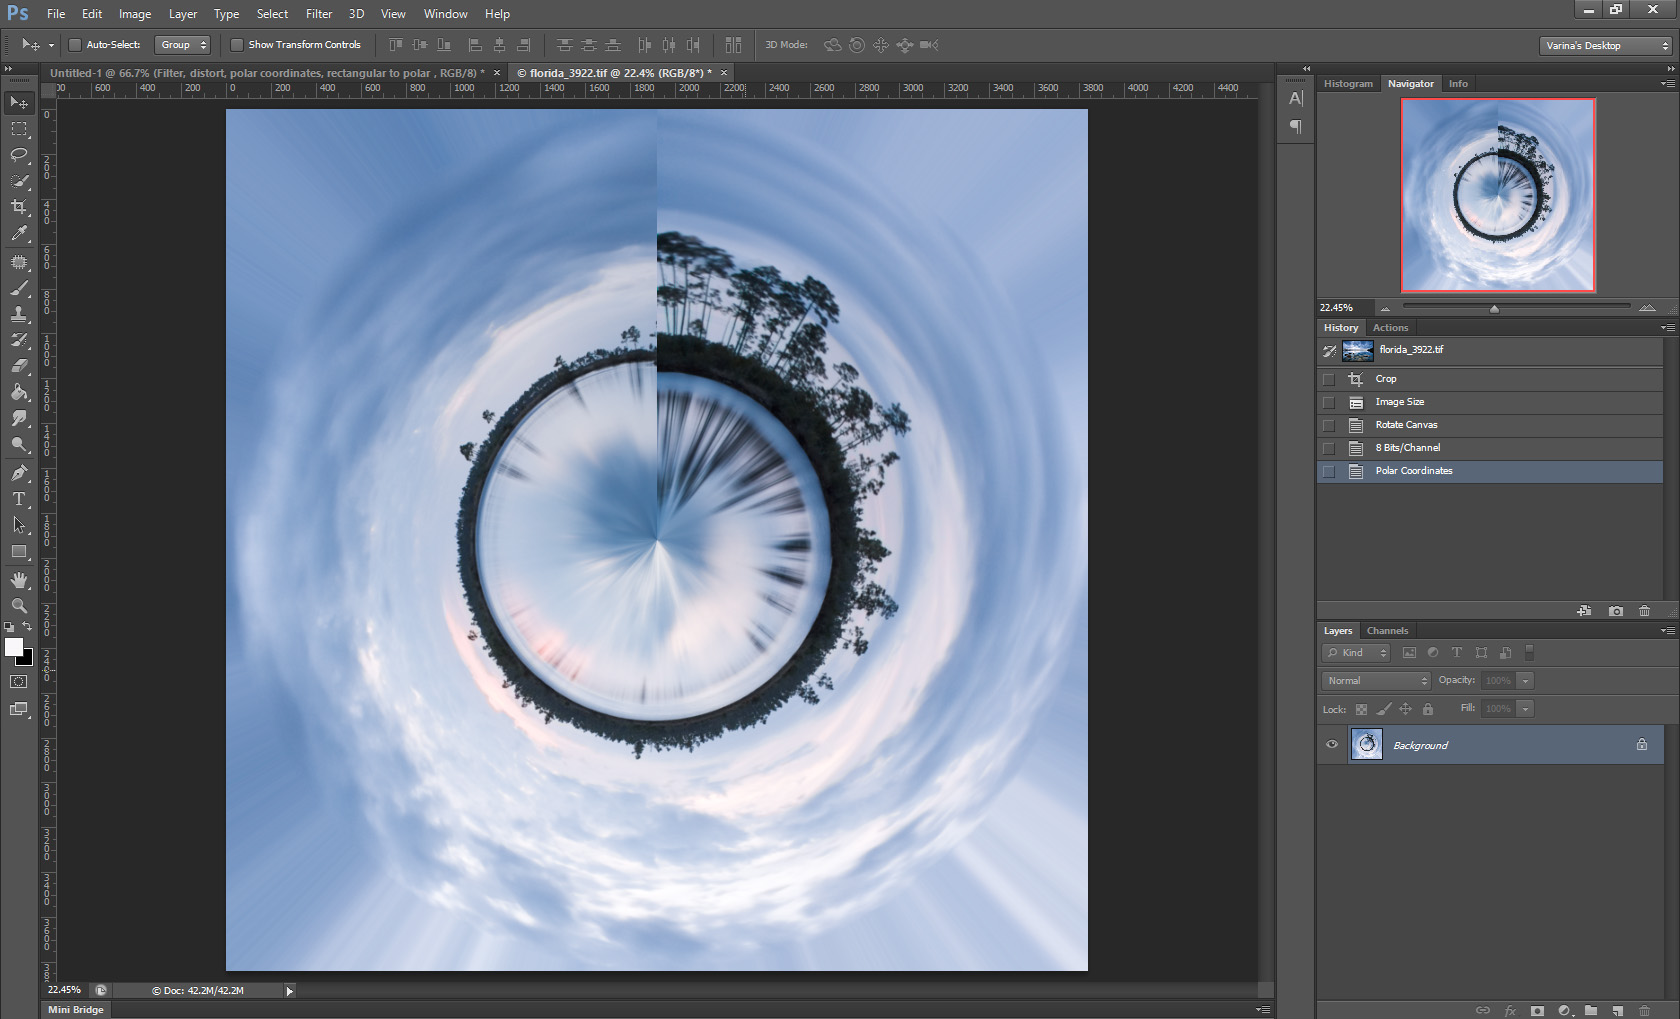
How cool is that?
Step 6: Now it’s time for some cleanup. I use the clone tool, the spot healing brush, and the patch tools – along with content aware functionality – to get the look I want. This is where my Wacom Intuos 5 tablet and stylus come in really handy. I’m zooming way in and working with lots of tiny details – and the stylus lets me have all the control I want. (Did I mention I’m a control freak?) ;) Anyway – I try to get rid of the sharp “crease” that happens when the filter does it’s work, and then I go in and make sure my reflections and horizon line are just right.

Cleanup time.
Sometimes, I’ll create a duplicate layer and rotate it to help me achieve the finished look I want. In this case, my horizon wasn’t quite right. I rotated the duplicate layer on top of the original planet, and then used a mask to isolate part of the horizon line for that layer. Then I merged those layers, and continued with the cloning process. I used that little bit of rotated horizon to help me create a cleaner finished look.
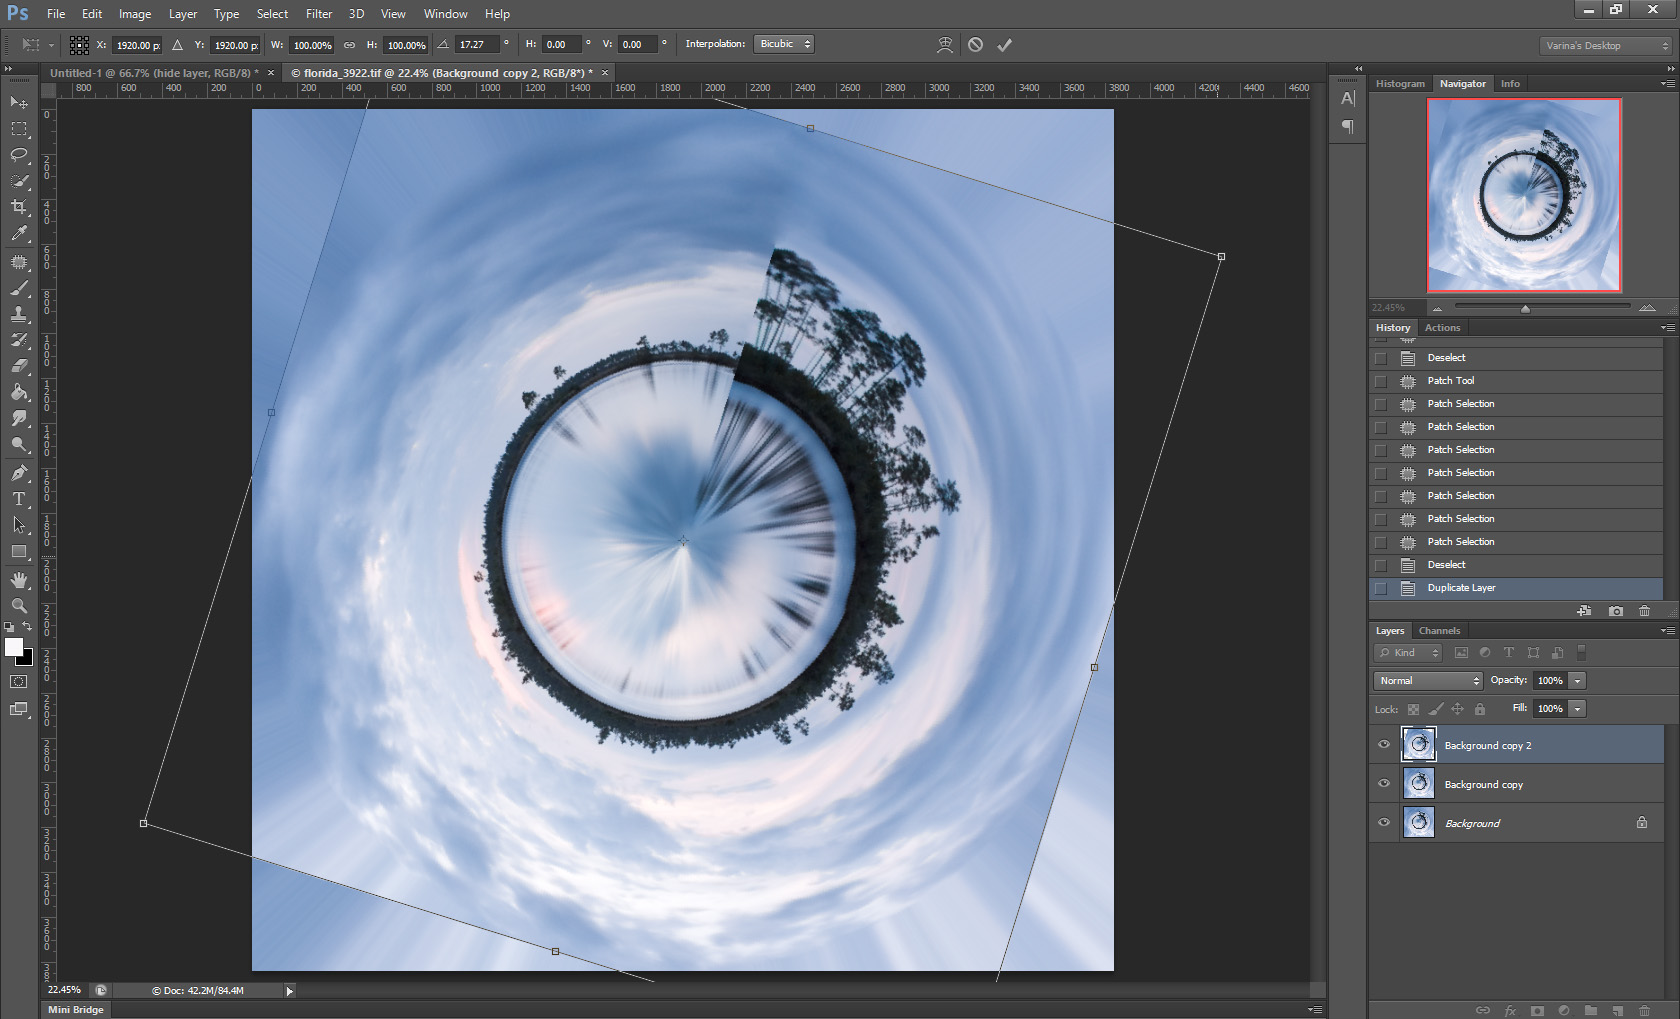
Use whatever techniques work best for you for cleanup.
Here’s what the planet looked like when I was done with the cleanup.
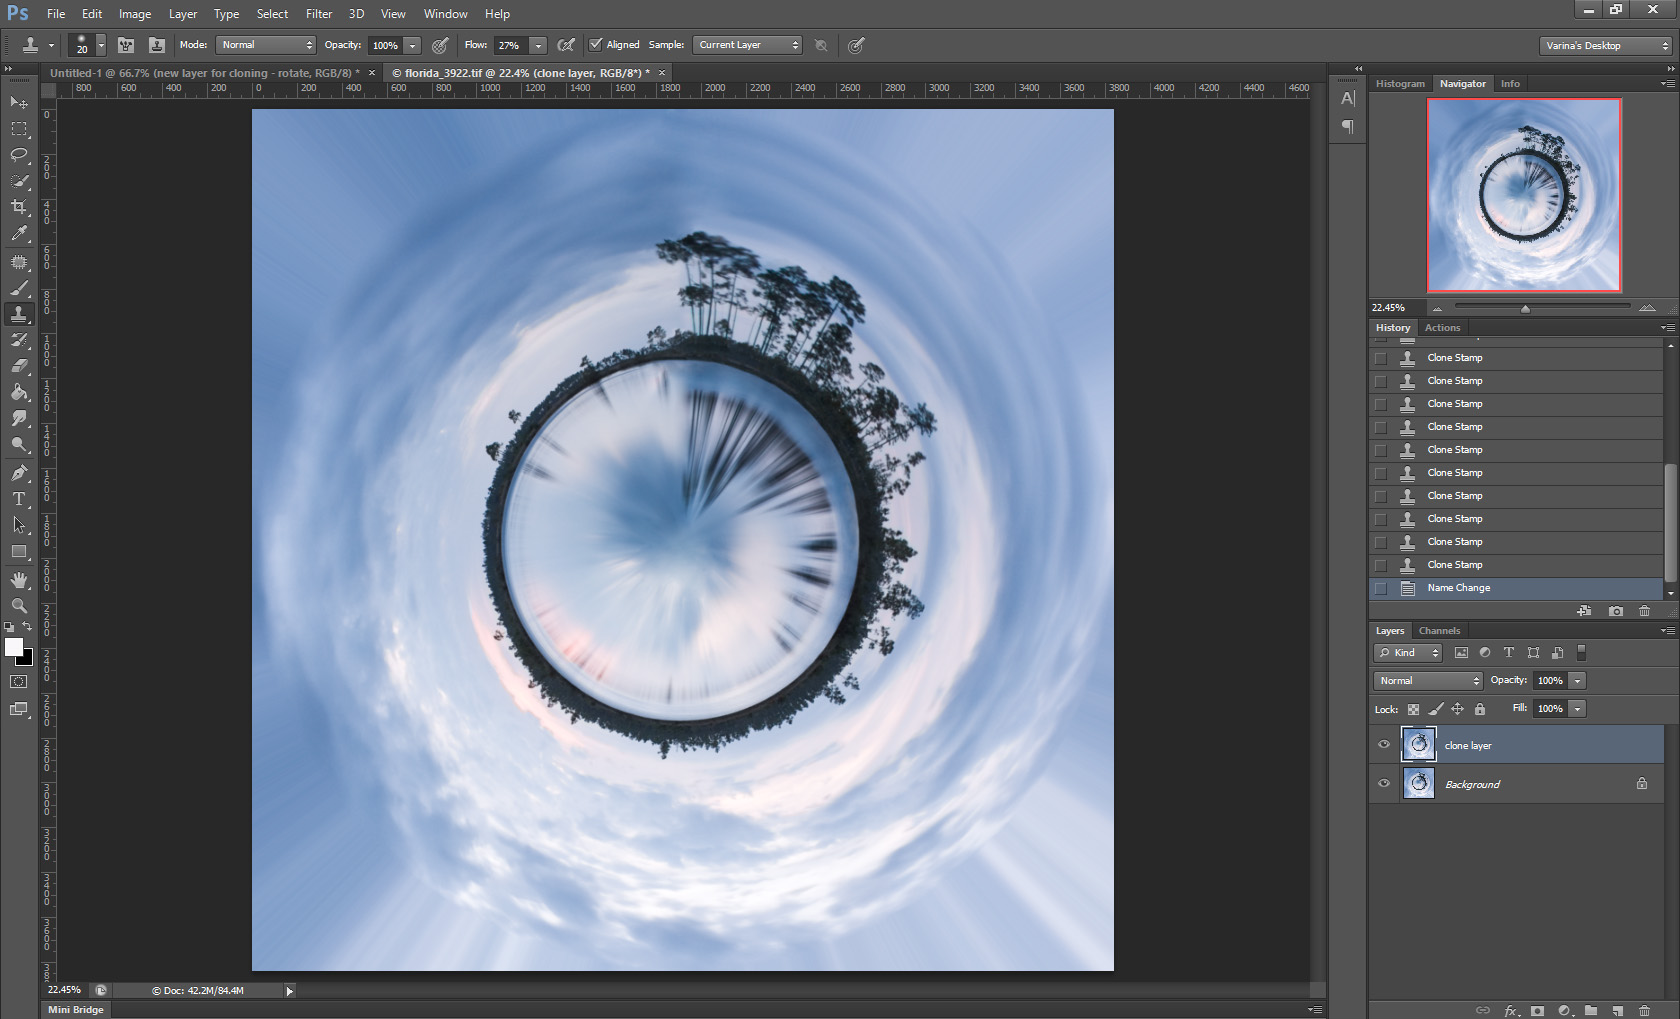
Here’s my cleaned up planet.
For the finished image, I added some more clouds to fill in the stretched corners. I also added some wildlife. The birds add interest and also provide a sense of scale. I wanted my planet to feel truly tiny.
What do you think?
Here are a few more examples of what you can create with this fun technique. This glowing planet was created from a burning sunset over Badwater Basin in Death Valley National Park.

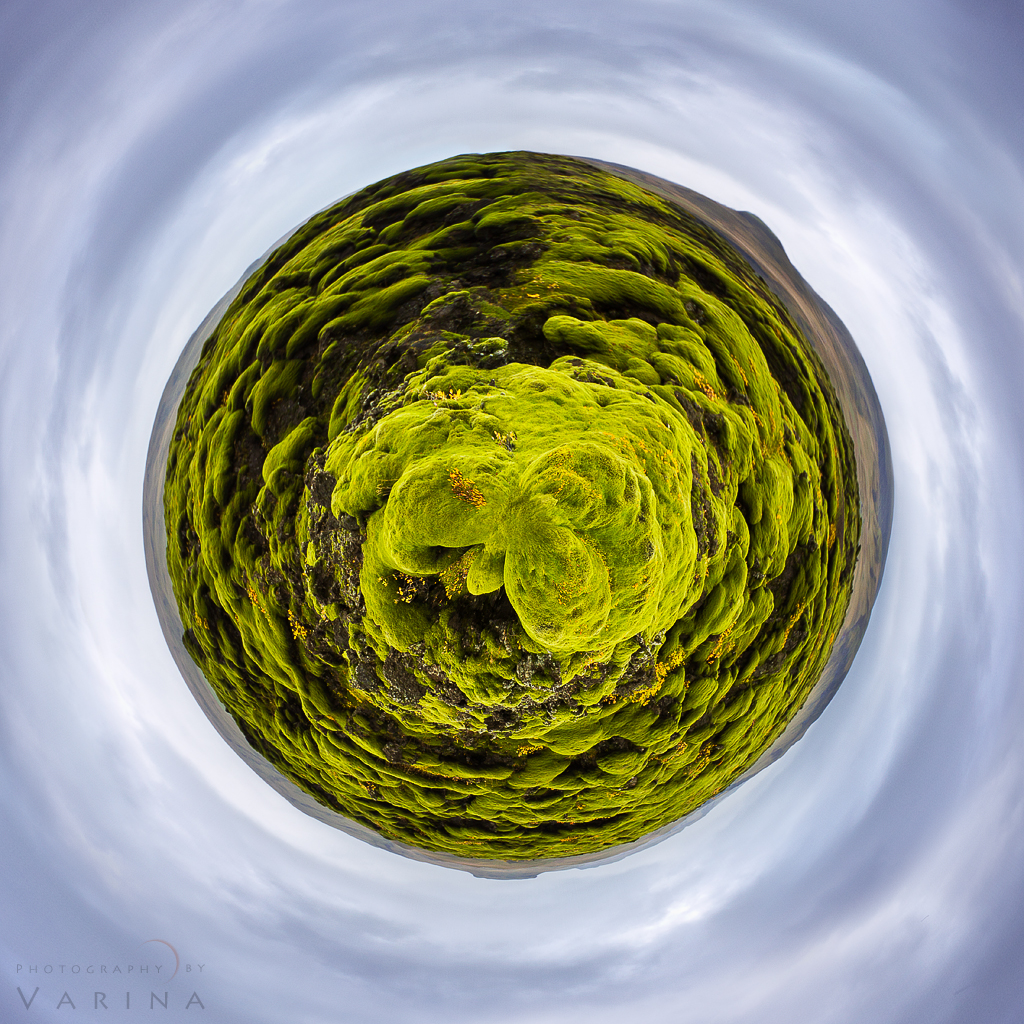
And this one is a Faerie World straight out of Iceland!
I’d love to see what you create using this technique! Please share a link in the comments… and feel free to share suggestions for creating great tiny planets as well. Have fun!
About Author Varina Patel
There is nothing more remarkable to me than the power of nature. It is both cataclysmic and subtle. Slow and continuous erosion by water and wind can create landscapes every bit as astonishing as those shaped by catastrophic events – and minuscule details can be as breathtaking as grand vistas that stretch from one horizon to the other. Nature is incredibly diverse. Burning desert sands and mossy riverbanks… Brilliant sunbeams and fading alpenglow… Silent snowfall and raging summer storms… Each offers a unique opportunity. I am irresistibly drawn to the challenge of finding my next photograph, and mastering the skills required to capture it effectively.


You lost me here.
“Sometimes, I’ll create a duplicate layer and rotate it to help me achieve the finished look I want. In this case, my horizon wasn’t quite right. I rotated the duplicate layer on top of the original planet, and then used a mask to isolate part of the horizon line for that layer. Then I merged those layers, and continued with the cloning process. I used that little bit of rotated horizon to help me create a cleaner finished look.”
Could you explain the steps in particular these, “I rotated the duplicate layer on top of the original planet, and then used a mask to isolate part of the horizon line for that layer. Then I merged those layers”.
Thank you. Its such a fun idea and I love it. But the execution on my part is lacking. My planet is a pano oceanscape from Hawaii. The horizon on the outside of the planet where the circle completes and the two sides come together, don’t match up nicely. Kind of like yours in your example, but mine is worse.
So fun thank you for sharing.
Perri Schelat
I’m glad you are enjoying this tutorial, Perri. :) I’d start by making sure your horizon is perfectly level – rather than trying to fix it later with rotation and cloning. Align the edges with help from a guide (drag down from the ruler and drop a guide near your horizon – you make need to make your rulers visible by clicking View > Rulers.) Then, select the image (Select > All) and rotate it (Edit > Transform > Rotate) until the edges are perfectly aligned. If you use this method, you may need to crop the image or use the clone tool to hide edges.
If your horizon line is just right, it will be easier to finish the image with simple cloning, and you won’t need to rotate the planet later. However, if you want to do it later, it’s not too difficult. I created a duplicate layer (drag the layer to the “new layer” icon at the bottom of the layers palette.) Then, I selected that layer (select > All) and rotated it by 45 degrees or so ((Edit > Transform > Rotate). I drew a selection using the lasso tool and created a mask by clicking on the mask icon at the bottom of the layers palette. Them, I used the black and white paint brushes to refine my mask so that I could target the mask to the place where the horizon was uneven. When I was close to having what I wanted, I flattened the layers, and use the clone tool to make sure the transition was nice and smooth.
Good luck!
can you explain for me how you cleanup your planet
I use a variety of techniques for cleanup, depending upon the image I’m working with. The clone tool is a big help, and I also use the spot healing brush and the patch tool. It takes some experimentation to get used to the different capabilities of each of these tools, but it’s worth taking the time to learn how to use them. Good luck!
I love these but my “world” is not as round as yours- sometimes looks more like an oval. Also, any other ideas for matching both sides? I am not very good at photoshop yet.
Thanks for all your great work.
Keep playing with it, Allie! :) Some images work better than others – I tried several different photographs before I started to get the hang of it. For a more circular “planet”, look for photos with a long, wide horizon. For example – if you you using a photo of mountains, look for a series of small peaks that span the horizon rather than one large peak. For aligning the edges, trying using a guide (drag down from the ruler and drop a guide near your horizon – you make need to make your rulers visible by clicking View > Rulers.) Then, select the image (Select > All) and rotate it (Edit > Transform > Rotate) until the edges are perfectly aligned. If you use this method, you may need to crop the image or use the clone tool to hide edges.
Good luck!
Very good tutorial! I never thought it would be so easy to create this type of picture.
Thanks for sharing!
Thanks for the step by step directions….very easy to follow. Just one question you did not elaborate much on….. How do you turn your photo into 8 bit? Thanks again!
Whoops! Sorry about that. I’ve updated the post to include that information. You can convert to 8 bit by choosing Image > Mode > 8 Bits/Channel.
I really like these, will you be doing any more? and will you be adding any of them to the Print gallery, I’d love to order some.
Thanks
Glad you liked them. Good luck with your Tiny Planets.
Sorry Jax – I won’t be adding these to my print gallery at this time. In the future, I do hope to photograph some larger-size panoramas and create more tiny planets. I may present those for sale if I decide to work with high resolution prints. Although I do not plan to add these to my print gallery, if you are interested in ordering small prints of these tiny planet images, you can contact me directly via email at varina.patel@gmail.com. Thanks so much for your interest.
nice
they turned out nice!!