Visual Wilderness
  • Get Started
  • Shop
    • SPECIAL OFFERS
    • STREAMING SERVICE
    • Browse by Topic
    • Learn To Shoot
    • Post Processing
    • Online Classes
    • eBooks
    • Landscape Photography Guide
  • Blog
    • Blog
    • Guest Photographers
  • About
  • My Account
    • My Account
  • Search
  • Menu Menu
  • 1Shopping Cart
Milkky Way over Overwater Bungalows

How To Make Your Photos “Pop”

April 28, 2017/in Post Processing/by Grant

Sometimes, after I’ve done a lot of work on an image in Photoshop, I find that the image still seems a little flat. When this happens, I frequently use a simple sharpening technique to help make an image “pop.”

If you want to attempt this yourself, you should first merge all of the layers in your image into a single layer above all the others. You can do this by selecting the very top layer and then hitting Ctrl+Alt+Shift+E (Cmd+Opt+Shift+E on a Mac). This new layer will allow you to mask out the sharpening effect in some parts of the image if necessary, or change the opacity to reduce the strength of the effect. It also allows you to delete the layer later if you decide you don’t like the effect.

Man Standing in Ice Cave

With the new, top layer selected, you can now use the Unsharp Mask filter, which can be accessed in Photoshop by going to Filter > Sharpen > Unsharp Mask.  The settings I normally use are:

  • Amount: 5%-30%
  • Radius: 40-100 pixels
  • Threshold: 0 levels

The higher you set the amount, the stronger the effect will be.  By using a large radius of 40 or more pixels, you will not be sharpening the fine details in the photo.  You’ll need to do this separately as part of your final sharpening.  Rather, you will increase the localized contrast in the image and make it “pop.”  This is somewhat similar to what the Clarity slider does in Lightroom, but I think this method produces more pleasing effects.  It can, however, create halos along high contrast edges in the image, such as the border between the foreground and sky. You should inspect the image carefully and mask out any halos.

Milkky Way over Overwater Bungalows

This technique can also cause some highlights to appear too bright or become blown out or some dark shadows to become too dark.  If this occurs, you can again use a paintbrush to mask out areas of the image where the effect is too strong. Alternatively, you can use luminosity masks to more precisely mask out specific image tones. If you’re not familiar with luminosity masks, you can read about them on Tony Kuyper’s website.

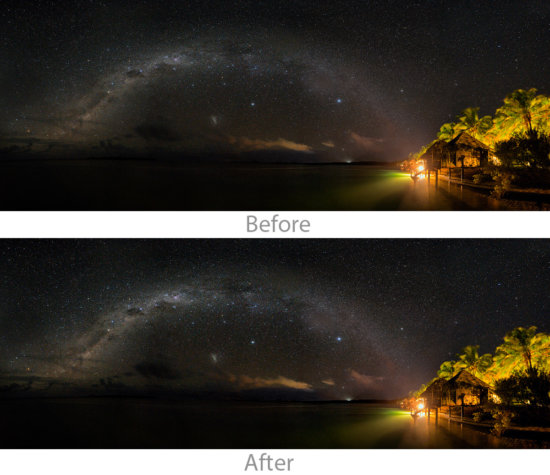
The overall effect is occasional fairly pronounced, as it is in the ice cave image above. More often than not, though, the effect will be more subtle, like it is in the image of the Milky Way. It will not make a bad photo good, but it can add a nice finishing touch to many of your images.

About Author Grant

Grant Collier has been working as a professional photographer since 1996 and has been shooting photos at night since 2003. He is the author of 12 books and has recently released a book called Collier’s Guide to Night Photography in the Great Outdoors. He has also produced a new instructional video called Collier’s Guide to Post-Processing Night Photos.

Website | Facebook| Google+| Twitter

Tags: Photoshop
You might also like
Cover for landscape photography blog about Photoshop Layers & Masks by Jay PatelWhy I use Photoshop Layers & Masks for Nature Photography
Using Colors to Create Depth & Direction
Cover for landscape photography blog article about Photoshop adjustments.Essential Photoshop Skills for Beginner Landscape Photographers
Sample photo for Dodging and Burning for Landscape Photography Tutorial by Josh SnowWhy use Dodging and Burning for Landscape Photography?
Photography Workflow: Lovers
Cover for nature photography blog post about Photoshop Layers & Masks by Jay PatelWhy you should look beyond HDR Software for Nature Photography
5 replies
  1. Mike
    Mike says:
    July 6, 2017 at 12:43 pm

    Cool post but I’m also struggling to see the pop. Both images look very similar! I’m using a Mac to view them.

    • Grant Collier
      Grant Collier says:
      July 19, 2017 at 4:03 am

      HI Mike, check out my reply below with animated gif.

  2. kahi
    kahi says:
    July 5, 2017 at 1:12 pm

    sorry, I don’t see any difference between before and after, neither for the ice cave nor for the milky way…are you sure you uploaded the correct comparison images? Or do you need to pixel peep to 100% to see a difference?

    • Jay Patel
      Jay Patel says:
      July 6, 2017 at 1:21 am

      I can see a clear difference between the two images on three different screen (on my phone, on my monitor and on my laptop screen). While the difference is not glaring as seen by over saturated images…it is certainly there both in terms of contrast and textures.

      I do agree with you that a bit more glaring difference would have made a better example.

    • Grant Collier
      Grant Collier says:
      July 19, 2017 at 4:01 am

      It’s easier to see the difference if you do this on your own images on a separate layer in Photoshop, and then hide and view the layer to see the changes. I probably should have started with images with less contrast and done a stronger adjustment to show the changes more clearly. Here’s a link to an animaged gif that should show the difference better using the same images as above: http://www.collierpublishing.com/IceCave.gif

Comments are closed.

NATURE PHOTOGRAPHY NEWSLETTER

Join 45,000+ Nature Photographers and get the free eBooks, free creativity course & discount codes right in your inbox.

loader

Note: We never share your email address with anyone. More Info.

Blog | Shop | About

 Email Policy  |  Privacy Policy  |  Terms

INFOCUS NEWSLETTER

Join 45,000+ other photographers and get the Free eBooks, Free Creativity Course & Discount Codes right in your inbox.


loader

Note: We never share your email address with anyone. More Info.

All Rights Reserved, © Copyright Visual Wilderness

Do I Need A New Camera?Landscape photography blog cover photo captured using a circular polarizer photography filter in Iceland by Jay PatelPhotography Filter Quick Tips for Landscape Photographers
Scroll to top

This site uses cookies. By continuing to browse the site, you are agreeing to our use of cookies.

OK

Cookie and Privacy Settings


How we use cookies

We may request cookies to be set on your device. We use cookies to let us know when you visit our websites, how you interact with us, to enrich your user experience, and to customize your relationship with our website.

Click on the different category headings to find out more. You can also change some of your preferences. Note that blocking some types of cookies may impact your experience on our websites and the services we are able to offer.

Essential Website Cookies

These cookies are strictly necessary to provide you with services available through our website and to use some of its features.

Because these cookies are strictly necessary to deliver the website, refusing them will have impact how our site functions. You always can block or delete cookies by changing your browser settings and force blocking all cookies on this website. But this will always prompt you to accept/refuse cookies when revisiting our site.

We fully respect if you want to refuse cookies but to avoid asking you again and again kindly allow us to store a cookie for that. You are free to opt out any time or opt in for other cookies to get a better experience. If you refuse cookies we will remove all set cookies in our domain.

We provide you with a list of stored cookies on your computer in our domain so you can check what we stored. Due to security reasons we are not able to show or modify cookies from other domains. You can check these in your browser security settings.

Other external services

We also use different external services like Google Webfonts, Google Maps, and external Video providers. Since these providers may collect personal data like your IP address we allow you to block them here. Please be aware that this might heavily reduce the functionality and appearance of our site. Changes will take effect once you reload the page.

Google Webfont Settings:

Google Map Settings:

Google reCaptcha Settings:

Vimeo and Youtube video embeds:

Privacy Policy

You can read about our cookies and privacy settings in detail on our Privacy Policy Page.

Privacy Policy
Learn More
NATURE PHOTOGRAPHY NEWSLETTERJoin 45,000+ Nature Photographers

Unlock Your Photography Potential! Get Free Webinars, Tips, eBooks, and More Delivered Straight to Your Inbox! 📸✨

We never share your email address with anyone. More Info.

Enter your email address