Photoshop Curves Adjustment for Nature Photography
The Photoshop curves adjustment tool is one of the most important tools in post-processing arsenal for nature photography. When you understand how to use the power of the curves adjustment, you can make selective changes to the color, luminosity, and contrast of your nature photos in a non-destructive way. There is also a curves adjustment available in Lightroom, but using it in Photoshop allows you to use the power of layers and layer masks to very selectively alter your image and therefore, it’s my preferred way of using curves adjustment.
The curves graph is essentially a representation of all the tonal ranges in the image, from black to white. It can be thought of as a histogram with a diagonal line drawn through it, allowing you to change output values as you wish.
Using the Curves Adjustment in Photoshop
There are two ways to access the Photoshop curves adjustment tool in Photoshop: Image-Adjustment-Curves or as a Curves Adjustment layer (either in the top menu or below the layers panel.) You are better served using the Curves Adjustment layer because it puts the changes you make on their own layer with a layer mask already applied, setting you up for an easy and non-destructive way to delicately edit your image.
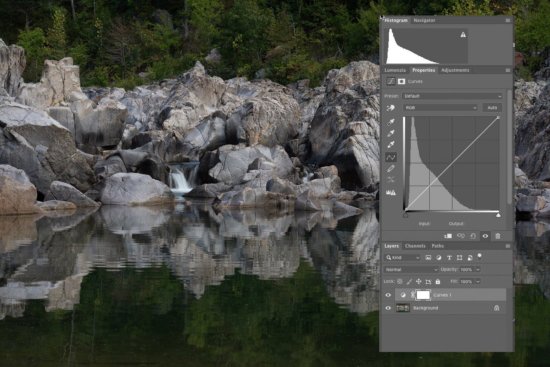
Let’s take a look at an image in Photoshop with a curves adjustment layer added but not altered.
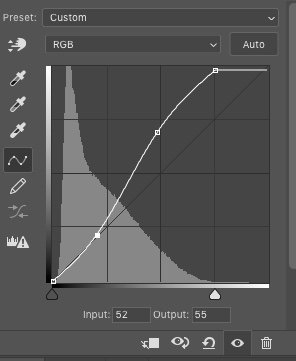
Because the histogram clearly shows that this image is underexposed, we can set a white point using curves to brighten up the image. Simply move the right top part of the diagonal line until it reaches the edge of the curve showing where the brightest pixels are. There is no need to adjust the black point because the edge of the histogram already reaches the left side of the graph.
Note that the brightening of the image was done on the RGB curve. This is where you can do global adjustments to your image. Brighten or darken it, or increase contrast by creating a classic s-shaped curve. You can add points along the line to allow you to change various places along the curve while maintaining the position of the other points.

Photoshop curves adjustment tool with white point adjustment and an s-curve adjustment to brighten up your photo.
Adjusting Individual Color Channels
So far the adjustment we have made have all been to the RGB curve. But realize that Photoshop curves tool also can manipulate individual color channels of red, green, and blue. This allows you to modify the amount of these colors in the image. For instance, if you raise the curve in the red channel, the entire image becomes warmer. The red channel controls red and cyan. The green channel controls green and magenta. And finally, the blue channel controls blue and yellow. The power of these adjustments resides in their use as selective adjustments using Photoshop Layers & Masks.
For instance, if you want to increase the red in a single tree in an autumn image, do the following:
- Add a curves adjustment layer.
- Choose the red channel.
- Raise the curve up to add red to the entire image.
- Because we only want the color on tiny parts of the image, invert the mask with Cmd/Cntrl I. This makes the mask black and hides the adjustment.
- Simply paint on the adjustment where you desire.
I usually use a very low opacity brush, soft-edged and with low flow. With each brush stroke, I build up the effect slowly so that I can get just the effect I want. If I make an error, I can just paint in black and remove the effect from the area where I don’t wish it to be. Pulling down on the red curve increases the amount of cyan in the photograph.
By raising the curve in the red channel, I was able to enhance the color of the trees and the reddish brown rocks. Once completed, the end result more closely resembles the scene as I remember it.
It is important to realize that Photoshop curves adjustment tool lets you make multiple adjustment at the same time. This allows you to make overall tonal adjustment as well as color adjustment in single step. You can then combine this with layer masks and selectively apply these adjustment to your nature photos.
The power of curves lies in their non-destructive way to add subtle changes to the image. You can fine-tune tiny parts of the photograph as well as add global changes until the final photograph tells your story. Explore using curves in your post-processing without fear because they can always be changed with the mask, opacity, or even deleted until you are happy with the end result. For me, I use curves on almost every image that I process.


