Visual Wilderness
  • Get Started
  • Shop
    • SPECIAL OFFERS
    • STREAMING SERVICE
    • Browse by Topic
    • Learn To Shoot
    • Post Processing
    • Online Classes
    • eBooks
    • Landscape Photography Guide
  • Blog
    • Blog
    • Guest Photographers
  • About
  • My Account
    • My Account
  • Search
  • Menu Menu
  • 1Shopping Cart

Print Sharpening in Photoshop for Landscape Photography

August 8, 2018/in Post Processing/by Joshua Snow

When preparing a file for printing, you want to ensure that all the fine detail you worked so hard to enhance and maintain throughout post processing translates to the finished printed image. In this article, I walk you through a technique for print sharpening in Photoshop that I frequently use when preparing a file for printing.

The following steps may differ for you depending on your workflow but, as long as you are working with the highest resolution uncompressed file possible, than it all works the same.

Print Sharpening Workflow

  • With your master file open in Photoshop, duplicate the entire file by selecting Image > Duplicate. This safety measure ensures that nothing accidentally happens to your master file.

    Print sharpening in Photoshop technique

    Print sharpening in Photoshop Technique

  • Once duplicated, close your master file. Create a stamp visible layer atop your layer stack or merge all layers.
  • Press command or Ctrl+J to duplicate the layer (or right-click and select duplicate layer).
Stamp Layer in Photoshop

Stamp Layer in Photoshop

  • With this new layer selected, go to Filter > Other > High Pass and select a radius of around 2 px.
  • Change the layer blend mode to soft or hard light (depending on your file). Hard light may require an opacity adjustment because it will be a very harsh sharpening.
High Pass Menu in Photoshop

High Pass Menu in Photoshop

  • Now, create a stamp visible layer on top of the high pass layer with the following keyboard short cut: Command/CTRL+ Option/Alt + Shift + E.
  • Once generated, select that pixel layer and copy it using the following keyboard shortcut Command/CTRL+ A to select, then Command/CTRL+ C to copy.
  • In your channels pallet, make a new channel and then paste the selection into the new channel using Command/CTRL + V.
  • Go to Filter > Stylize > Find Edges. Once complete, you will see that Photoshop applied black along most of the high contrast edges in the photo. You can use this as a mask to apply to your sharpened layer to prevent over sharpening.
  • Create in Channel for High Contrast Edge Mask in Photoshop

    Create in Channel for High Contrast Edge Mask in Photoshop

  • High Contrast Edge Mask in Photoshop

    High Contrast Edge Mask in Photoshop

  • With your new channel made active by Command/CTRL and clicking on it, return to the layers panel, select your high pass layer and apply this selection as a mask. Now delete the stamp visible layer.

I urge you to use the shift key and click the mask of this layer disabling and enabling the mask while zoomed at 100%. This will allow you to see the benefit of the edge masking! You can experiment with different light blend modes like vivid light, overlay, soft light, and hard light. You can also adjust opacity to suit, but I like to be slightly over-sharpened so that the print retains as much detail as possible.
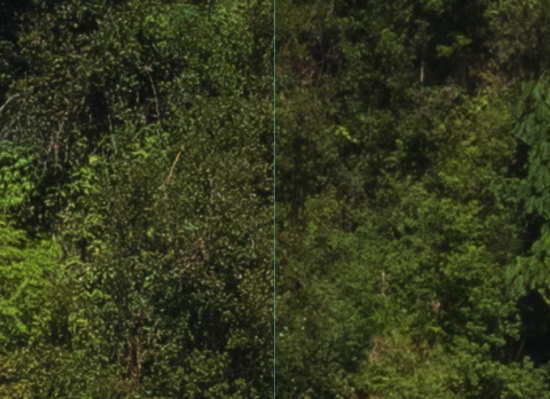
Examples of print sharpening

The left half is sharpening applied through the edge mask at 400% zoom. The right half is all sharpening masked out.

Here is a helpful video showing you step by step everything talked about in this article!

Cover for Prints Sharpening in Photoshop Video by Joshua Snow

Prints Sharpening in Photoshop Video

Feel free to share your own print sharpening techniques in photoshop in the comments below.

About Author Joshua Snow

My Name is Joshua Snow, I am a Fine Art landscape and Night Photographer born in the Appalachian Mountains but raised in the Finger Lakes region of Upstate NY. In 2012 I had reached a weight of over 400lbs and during my journey of weight loss I discovered Photography and re-discovered the creativity that I had locked away while pursuing a career in Mechanical Engineering in the Aerospace field. Fast-forward to 2016 and a life-changing trip to Moab, my girlfriend and I decided we would do whatever it took to live here so that I could pursue my dreams of creating art, traveling the southwest and educating on photography. After a month, we had found a house, jobs and a sustainable future! Now I lead Photography workshops full time, all over the southwest, and here in Moab. My passions are creating art, traveling and teaching. I like to show people how connecting with a landscape can help make you a better photographer just by being there! On my workshops I help you see composition, pre- visualize a scene all the way through to the finished image, post processing from basics to advanced Adobe Lightroom and Photoshop, basic through advanced camera and capture techniques and a whole lot more. I specialize in advanced capture and processing techniques that can help elevate a photo to a work of art, that encompasses your vision, and creativity, but welcome photographers of all skill levels!

Website | Workshops | Facebook | Instgram | 500px

Tags: Photoshop
You might also like
B&W Image converted in PhotoshopDramatic Black and White Conversions in Photoshop
Cover for landscape photography blog article about Photoshop adjustments.Essential Photoshop Skills for Beginner Landscape Photographers
How to create Tiny Planets in Photoshop
Cover for Texture Blending in Photoshop Blog post by Christine HauberCreative Texture Blending in Photoshop for Beginners
Fine Art Photography from Geysir, Iceland by Jay PatelWhy I Use Photoshop Instead of Lightroom for Nature Photography
Photoshop Blending Modes: Lighten

NATURE PHOTOGRAPHY NEWSLETTER

Join 45,000+ Nature Photographers and get the free eBooks, free creativity course & discount codes right in your inbox.

loader

Note: We never share your email address with anyone. More Info.

Blog | Shop | About

 Email Policy  |  Privacy Policy  |  Terms

INFOCUS NEWSLETTER

Join 45,000+ other photographers and get the Free eBooks, Free Creativity Course & Discount Codes right in your inbox.


loader

Note: We never share your email address with anyone. More Info.

All Rights Reserved, © Copyright Visual Wilderness

5 Techniques to Create Dramatic Photos of PiersLake McDonald, Glacier National Park, Montana by Anne McKinnellNature Photography Example from Gulfoss Falls, IcelandGrant Collier6 Traits of a Great Nature Photographer
Scroll to top

This site uses cookies. By continuing to browse the site, you are agreeing to our use of cookies.

OK

Cookie and Privacy Settings


How we use cookies

We may request cookies to be set on your device. We use cookies to let us know when you visit our websites, how you interact with us, to enrich your user experience, and to customize your relationship with our website.

Click on the different category headings to find out more. You can also change some of your preferences. Note that blocking some types of cookies may impact your experience on our websites and the services we are able to offer.

Essential Website Cookies

These cookies are strictly necessary to provide you with services available through our website and to use some of its features.

Because these cookies are strictly necessary to deliver the website, refusing them will have impact how our site functions. You always can block or delete cookies by changing your browser settings and force blocking all cookies on this website. But this will always prompt you to accept/refuse cookies when revisiting our site.

We fully respect if you want to refuse cookies but to avoid asking you again and again kindly allow us to store a cookie for that. You are free to opt out any time or opt in for other cookies to get a better experience. If you refuse cookies we will remove all set cookies in our domain.

We provide you with a list of stored cookies on your computer in our domain so you can check what we stored. Due to security reasons we are not able to show or modify cookies from other domains. You can check these in your browser security settings.

Other external services

We also use different external services like Google Webfonts, Google Maps, and external Video providers. Since these providers may collect personal data like your IP address we allow you to block them here. Please be aware that this might heavily reduce the functionality and appearance of our site. Changes will take effect once you reload the page.

Google Webfont Settings:

Google Map Settings:

Google reCaptcha Settings:

Vimeo and Youtube video embeds:

Privacy Policy

You can read about our cookies and privacy settings in detail on our Privacy Policy Page.

Privacy Policy
Learn More
NATURE PHOTOGRAPHY NEWSLETTERJoin 45,000+ Nature Photographers

Unlock Your Photography Potential! Get Free Webinars, Tips, eBooks, and More Delivered Straight to Your Inbox! 📸✨

We never share your email address with anyone. More Info.

Enter your email address