Travel Photography: Capturing Icebergs in Greenland
Glaciers are like giant rivers of ice, constantly tumbling downward at an almost imperceptible pace, like falling water filmed with a super slow-motion camera. When the ice reaches the sea, massive chunks get pushed off in sudden and dramatic calving events, plunging into the water and becoming icebergs, making their way to open water before eventually succumbing to melting. One of the best places in the world for travel photography is Greenland, and it is easy to see why if you take even just a quick peek at a satellite map: most of Greenland is covered in a massive ice sheet, spawning hundreds of glaciers like tentacles radiating outward, reaching for the surrounding ocean.
Although I’ve photographed ice and wintry scenes plenty of times, this was my first time photographing these frozen behemoths of the sea. It was an amazing travel photography experience! I learned a few techniques along the way for making compelling iceberg photographs, which I am happy to share with you in this article.
#1: Travel to where the icebergs are
Although there are places on land to photograph icebergs, usually you are far away, and you are limited in selecting an angle to photograph your subject. The best way to successfully photograph icebergs is to get into the water with them. Of course, I don’t mean swimming with the icebergs! Instead, sign up for a boat tour, or better yet, hire a private boat (which is what I did). This way, you can get closer to the icebergs, and with a private boat you can more freely explore, find the most photogenic icebergs, and then choose the best angle and position for photography.

Travel photography with a DJI Mavic 2 Pro drone showing the boat I had hired below a massive iceberg – ISO 100, f/8, 1/20 second.
I took things even a step further; I brought my drone with me, launching from the boat and flying the drone into the best spots for photography. This allowed me to more easily find the most promising photography compositions, and I was also able to get above (much higher above, in fact) water level for more interesting perspectives. Another advantage of the drone was that I could fly it into areas that would have been too dangerous for the boat, which greatly enhanced my flexibility when searching for optimal angles for travel photography. Lucky for me, despite a few drone mishaps, my drone survived two weeks of punishing photography with nary a scratch—which is more than I can say for my face (check out the video if you would like to learn more about my drone attack).

Flying above the icebergs with my drone created new photography composition opportunities. DJI Mavic 2 Pro drone, ISO 200, f/4, 1/25 second by Ian Plant
#2: Photograph during the golden hours
Icebergs are very reflective, so they soak up the color of the light hitting the ice or of the sky when the sun is obscured or below the horizon. Accordingly, sunrise, sunset, and twilight are great times for iceberg photography, with the bergs taking on the warm color of sunlight or the pastel colors of twilight. Colorful clouds with interesting shapes can further enhance your photographs, so I often would seek a photography composition that would have the best skies behind my subject. Also, when light was hitting one side of an iceberg, I would try to include the shadow side of the berg as well in the composition, allowing me to create a complementary color scheme juxtaposing the warm sunlight with the blues in the shadows.

The ice was awash in warm, colorful light in Greenland’s Disko Bay just before sunset – DJI Mavic 2 Pro drone, f/5.6@1/125s, ISO 100
#3: Look for icebergs with interesting shapes
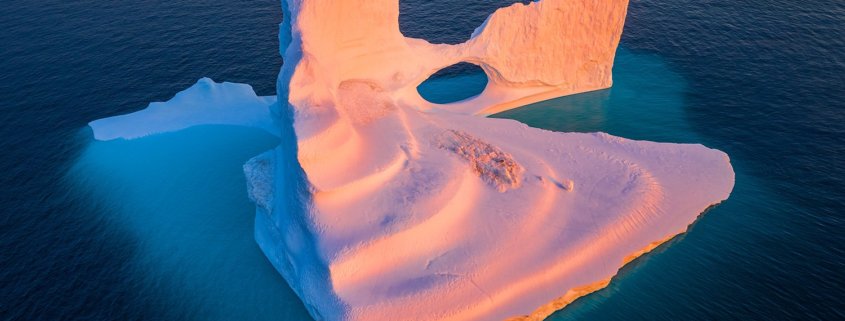
This probably goes without saying, but I’ll say it anyway: if you want to make compelling travel photos of iceberg, not any old iceberg will do. Instead, hunt for icebergs with the most interesting shapes. I spent my time looking for bergs with tall towers of ice or arches carved by water. Generally, I looked for icebergs that had sufficient “verticality,” preferring them to icebergs that looked more like horizontal slabs, but keep in mind that an iceberg’s shape can change dramatically as you travel around it and see it from different angles.

This iceberg revealed many different interesting shapes for photography as I flew my drone around it. DJI Mavic 2 Pro drone, 1/80s@f8, ISO 100
#4: Use ice floes to lead the eye
Getting really close to icebergs is dangerous, as they often partially collapse or flip over without warning. But, a partial collapse can lead to some interesting compositional opportunities. After ice falls off an iceberg, it drifts away as smaller ice floes. By steering the boat into the floes, I was able to use the ice chunks as leading visual elements, encouraging the viewer to explore deeper into the composition and enhancing the overall visual appeal of the photograph.

I waited until the gap in the ice floes was in front of me before triggering the shutter. The resulting shape complements the curving clouds above. Canon 5DIV, Canon 11-24mm f/4 lens, 1/160s@f10, ISO 800
#5: Try to find an interesting background
Although the iceberg itself can be an interesting background feature, I often try to have something else to make the composition more dynamic. As I mentioned above, colorful clouds behind an iceberg can enhance the composition. I also like to incorporate interesting land-based features when I can. Of course, it certainly helps to be photographing in an area where there are large mountains in the background; obviously, your background options might be limited if you are photographing an iceberg in the open ocean.

The jagged peak made a perfect background, so I put the iceberg in the foreground of my composition. DJI Mavic 2 Pro drone, 1/25s@F5.6, ISO 100.
The truly epic majesty of icebergs can’t really be conveyed by words or even photos alone, it is something you should see with your own eyes. While I can’t take you to Greenland in this article, I can do the next best thing: luckily, I filmed my Greenland iceberg photo adventure! The travel photography video below has more tips and techniques for photographing icebergs, as well as plenty of gorgeous scenic footage.
Have you traveled to Greenland to photograph icebergs? If so feel free to share your own tips in the comments below:


