Creative Shutter Speed Tips for Nature Photography
For many nature photographers, shutter speed is often treated as a purely technical setting—something you adjust to get the correct exposure. But shutter speed is far more than that. It is a powerful creative tool that can dramatically alter the mood, energy, and storytelling of your images.
While aperture often gets the spotlight for its role in controlling depth of field, shutter speed quietly shapes the way motion is captured, frozen, or blurred. Whether it’s the silky smooth look of flowing water, the sharp textures of crashing waves, or the dreamlike trails of stars across the night sky, shutter speed is the setting that can turn an ordinary moment into an extraordinary piece of art.
In this article, we’ll explore how to use shutter speed for creative nature photography, with practical tips, field-tested examples, and inspiration for beginners who want to grow their artistic vision.
Why Shutter Speed Matters in Nature Photography
At its simplest, shutter speed refers to the amount of time your camera’s shutter stays open. A fast shutter speed (such as 1/2000s) freezes motion, while a slow shutter speed (such as 15 seconds) captures movement as blur or streaks.
But beyond the technical definition, shutter speed gives you control over how your viewer experiences movement in your photo:
- Do you want to freeze the drama of a crashing wave at its peak?
- Or do you want to soften it into a dreamy blur that conveys calmness?
- Would you rather capture the chaotic detail of flying foam or the minimalist smoothness of a quiet lake?
Your choice of shutter speed is also your choice of mood, energy, and artistic interpretation. That’s what makes it one of the most versatile creative tools in a photographer’s toolkit.
When to Use Fast Shutter Speeds in Nature Photography
Fast shutter speeds allow you to stop motion in its tracks. This is useful for wildlife, action, or abstract photography where the details of fleeting movement are critical.
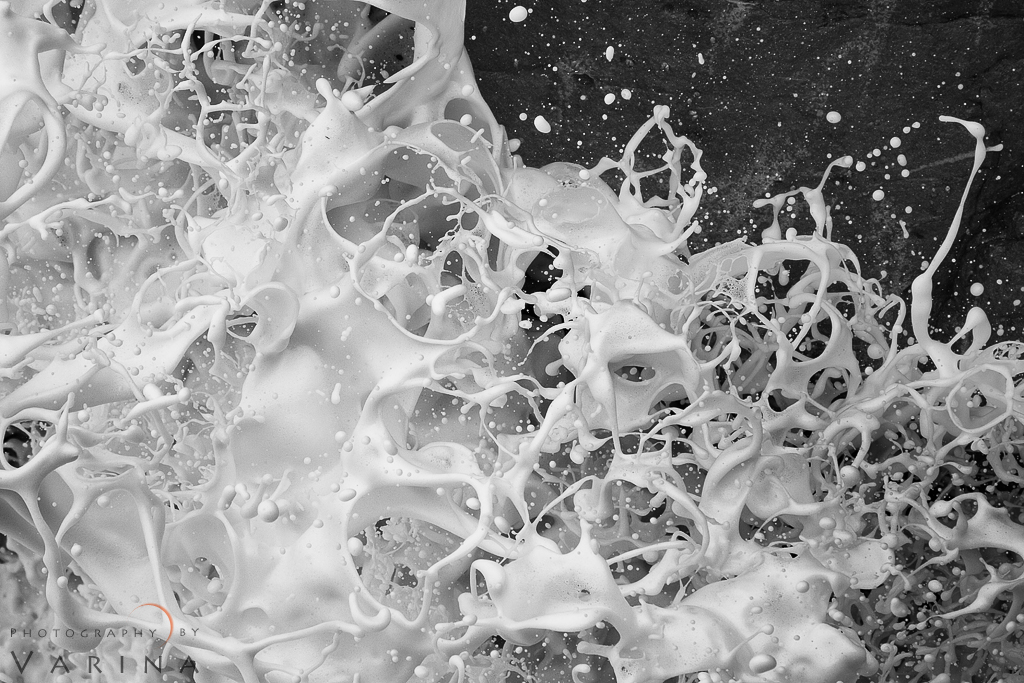
Freezing Exploding Mud Bubbles in Yellowstone
During a workshop in Yellowstone National Park, Jay Patel used a shutter speed of 1/2500s to capture the moment a mud bubble burst. By zooming in close and freezing the explosion, the photo transformed into a minimalist abstract composition—thick white mud filling the frame, with a single bubble acting as the subject.
Getting my high speed subject (exploding bubble) in sharp focus was critical for this nature photo. However the bubble at this particular location always appeared in the same spot. So, Jay focused his DSLR camera where the bubble was exploding and then switched his camera to a manual focus mode. This allowed him to lock his focus on his camera at exactly the right place.
The power of a fast shutter speed here lies in detail. The texture of the mud, the frozen shape of the splash, and the sharpness of the abstract form would have been lost with a slower exposure.
Capturing Crashing Waves in Australia
I used a similarly fast shutter speed to photograph waves crashing against rocks on the Australian coast. The ocean foam, whipped into complex patterns, became a piece of black-and-white abstract art.
Here, continuous autofocus and burst mode were essential to tracking unpredictable wave motion. Shooting in rapid sequence allowed me to choose the most dramatic frame, where liquid forms were frozen into intricate shapes.
Tip for beginners: Use shutter speeds of 1/1000s or faster when working with moving water, wind-blown sand, or wildlife in motion. It gives you the chance to preserve fleeting details and create striking, high-energy images.
When to Use Slow Shutter Speeds in Nature Photography
Slow shutter speeds (typically 1/2 second to several minutes) create blur that communicates energy, softness, or a sense of time passing. Rather than stopping action, you’re painting motion into your frame.
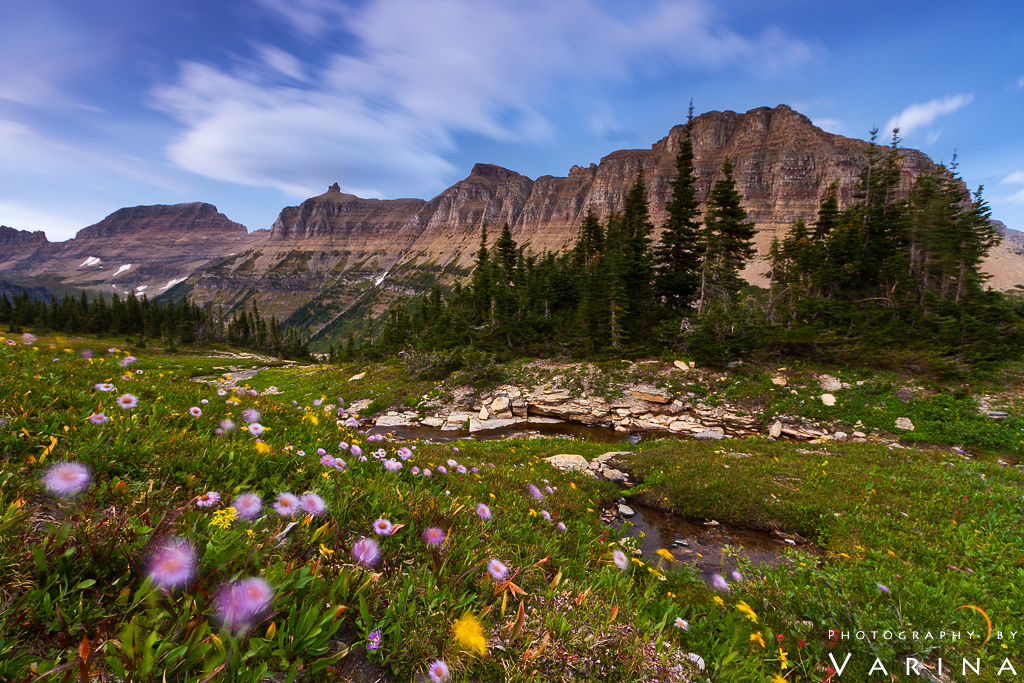
Flowers Dancing in the Wind
In Glacier National Park, I experimented with a 15-second exposure as wind swept across a hillside of purple and yellow flowers. Rather than trying to “fight the wind” with a faster shutter speed, she leaned into it.
The result? A whimsical, storybook image where the flowers blurred into gentle brushstrokes. The long exposure didn’t erase their form completely—it simply softened them enough to create a dreamy atmosphere.
Smoothing Out a Choppy Lake
On another evening in Montana, the alpenglow lit up the mountains, but the lake below was rough and distracting. Using a 30-second exposure, I smoothed out the water’s surface and simplified the composition. The chaotic ripples disappeared, allowing the viewer to focus on the glowing mountain peak.

Using a long exposure to create simple nature photography composition from Glacier National Park in Montana
This is the creative power of shutter speed: turning a distracting foreground into a minimalist canvas that enhances your subject.
Tip for beginners: Use shutter speeds of 1 second to 30 seconds to blur water, clouds, or wind-blown vegetation. A sturdy tripod and neutral density (ND) filters are essential for keeping your camera steady and controlling exposure in bright conditions.
Star Trails and the Magic of Stacked Long Exposures
One of the most mesmerizing uses of long shutter speeds is in astrophotography. By stacking multiple exposures, you can create star trail images that reveal the Earth’s rotation in beautiful circular arcs.
At Arches National Park, I captured the North Star glowing above Balanced Rock by combining 180 separate exposures, each at 30 seconds. This approach avoided the noise that comes from a single, hours-long exposure while still producing smooth, continuous trails.
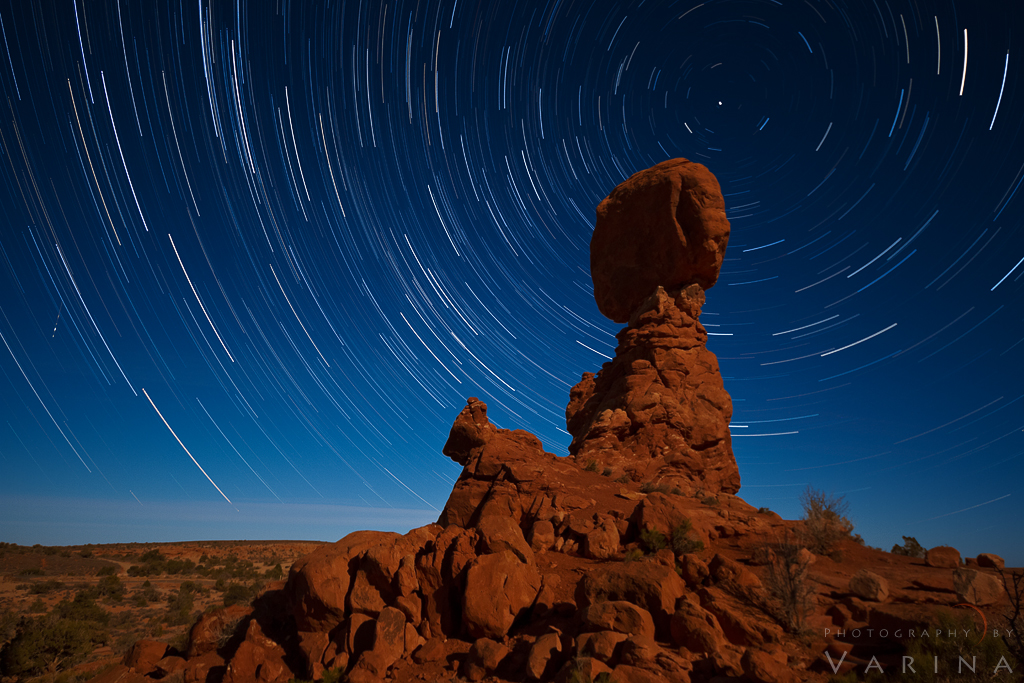
Photo stacked star trail photo from Arches National Park in Utah using multiple camera exposures with 30s shutters speed.
Why it works: Shorter exposures minimize digital noise, while software blending allows for creative control. It’s a great example of how shutter speed, when combined with patience and post-processing, can create images that go beyond what the eye can see.
Blending Creativity: Using Multiple Shutter Speeds in One Photo
Sometimes a single shutter speed isn’t enough to tell the full story. In Australia, I photographed swirling autumn leaves in a pool below a waterfall.
- At 30 seconds, the leaves turned into streaks of color, creating a vibrant abstract pattern.
- But at that exposure, the waterfall itself was overexposed.
- By capturing a second shot at 6 seconds, she preserved the texture of the flowing water.
Later, I blended the two exposures in Photoshop, combining the best of both worlds. This technique shows how creative photographers use shutter speed not only in-camera, but also as part of their post-processing workflow.
Practical Tips for Creative Shutter Speed Photography
- Use a tripod: For exposures longer than 1/30s, a tripod ensures sharpness in your static elements.
- Experiment with ND filters: Neutral density filters allow you to use slow shutter speeds even in bright daylight.
- Switch autofocus modes: For predictable motion (like a bubbling mud pot), pre-focus and use manual mode. For unpredictable subjects (waves, wildlife), continuous autofocus helps track movement.
- Bracket your shutter speeds: Try multiple exposures—fast, medium, and slow—of the same scene. Compare results to discover which effect resonates most.
- Don’t fear imperfection: Motion blur doesn’t have to be sharp to be beautiful. Sometimes “softness” enhances the story.
Common Mistakes to Avoid with Shutter Speed
- Using only “safe” settings: Sticking to standard speeds (like 1/125s) often leads to uninspired photos. Push your creativity by experimenting.
- Forgetting about light conditions: A long exposure at midday will blow out highlights unless you use ND filters.
- Neglecting composition: Motion alone won’t save a weak composition. Frame thoughtfully, then use shutter speed as your creative enhancement.
- Relying too heavily on post-processing: Photoshop blending is powerful, but start with strong in-camera choices first.
Final Thoughts: Shutter Speed as a Creative Choice
Shutter speed is not just a technical setting—it’s a way to express motion, emotion, and vision in your nature photography. From freezing the explosive details of a mud bubble to softening a windy field of flowers into a painterly scene, your shutter speed choices shape how your audience feels when they look at your work.
So next time you’re in the field, don’t just ask yourself: What’s the correct exposure? Instead, ask: What mood do I want to create? What story do I want to tell?
Experiment with extremes. Break your habits. Let shutter speed become your brush, and the natural world your canvas.


