
Mastering Aperture Setting: A Beginner’s Guide
If you’re just starting your photography journey, learning a few essential camera settings can transform your images almost overnight. Among shutter speed, ISO, and aperture, it’s aperture that often has the most profound effect on your photos—especially in landscape photography.
Aperture is more than just a technical setting buried in your camera menu. It’s a creative tool that shapes how your photos look, feel, and tell a story. It affects how much light reaches your camera’s sensor, how much of your scene appears in sharp focus, and how your viewer’s eye travels through your image.
This beginner’s guide to aperture settings will help you understand not only the technical side of aperture, but also its creative possibilities. By the end, you’ll know how to use aperture for sharp landscape photos, artistic depth of field effects, and much more.

Fine Art Photography from Geysir, Iceland using a wide Aperture of F/11
What Is Aperture in Photography?
At its simplest, aperture is the adjustable opening inside your camera lens that allows light to pass through to the sensor. Think of it like the pupil of your eye: in bright light, your pupil contracts (small opening); in the dark, it expands (large opening) to let in more light.
The size of the aperture is measured in f-numbers (or f-stops), such as f/2.8, f/5.6, f/11, or f/22. Each f-stop controls two major things:
- How much light reaches the sensor (affecting exposure).
- The depth of field—how much of your scene appears in sharp focus from front to back.
This second effect—aperture and depth of field—is where aperture truly becomes a creative powerhouse for both beginner and advanced photographers.
Understanding F-Numbers and F-Stops
Here’s where many beginners get tripped up: the smaller the f-number, the larger the aperture opening.
For example:
- f/2.8 = wide opening, lots of light, shallow depth of field.
- f/16 = small opening, less light, deep depth of field.
A good trick is to think of the f-number as a fraction. For instance, f/4 is like 1/4, which is bigger than 1/16. A bigger fraction means a bigger opening. Each full step between standard f-stops (like f/4 to f/5.6) either halves or doubles the amount of light entering your camera. That’s why changing your aperture affects both focus and exposure.
Opening Up vs. Stopping Down
You’ll often hear photographers use terms like “opening up” or “stopping down” when talking about aperture changes:
- Opening up: Using a lower f-number (e.g., f/2.8) for a wide aperture. This lets in more light and creates a shallow depth of field—only a small part of your image is sharply in focus. This is a popular technique in creative uses of aperture in photography, especially for isolating a subject.

Shallow DOF created by aperture setting of f/4 for Wildlife Photography at Grimsey Island, Iceland
- Stopping down: Using a higher f-number (e.g., f/16) for a narrow aperture. This lets in less light but increases depth of field, meaning more of your scene appears sharp.

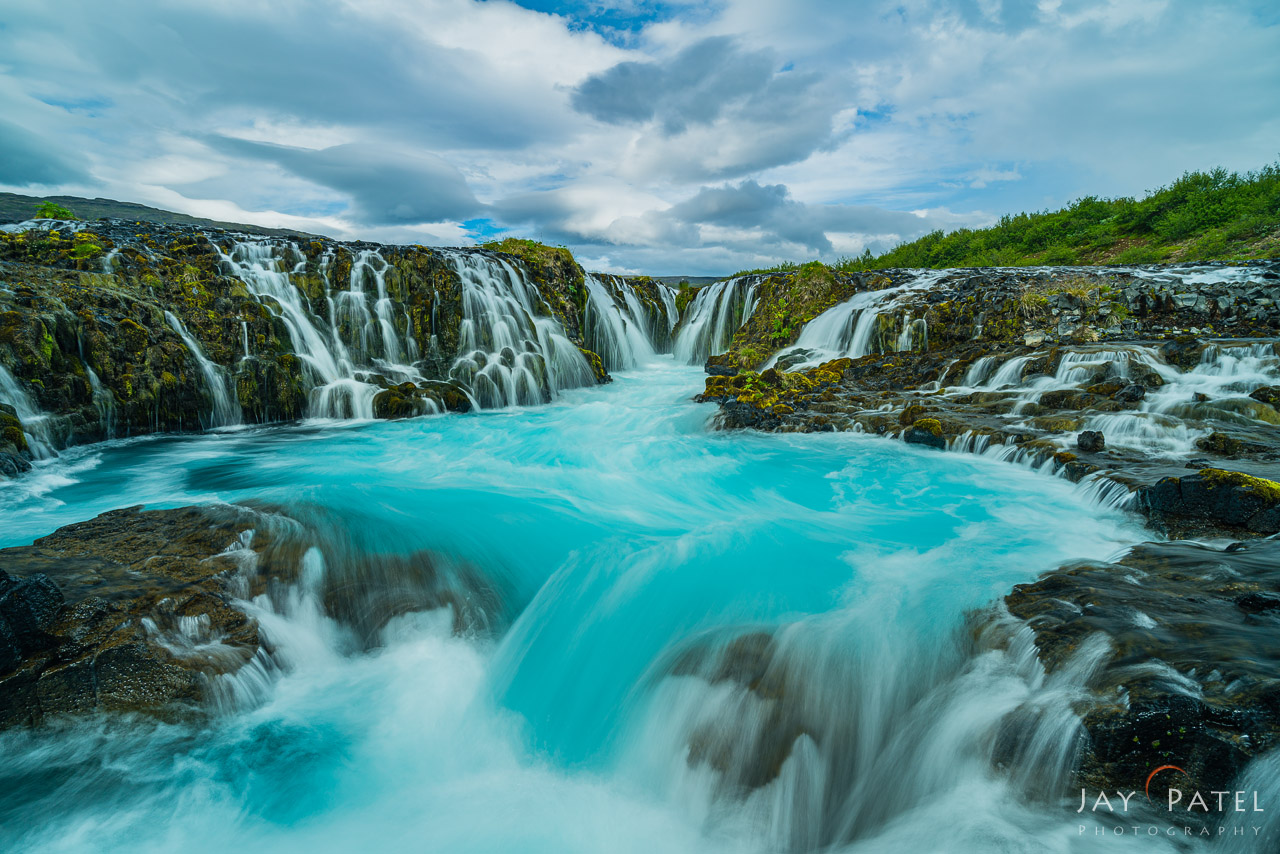
Landscape photography from Bruarfoss, Iceland captured at F/9
This is a common approach in landscape photography aperture settings where you want everything from foreground to background in focus.

Creative Uses of Aperture in Nature Photography
For beginners, it’s tempting to think of aperture only as a technical setting for exposure. But it’s also one of the most powerful tools for creative storytelling.
Here’s how to use aperture for artistic results:
- Isolate a subject with shallow depth of field
Shooting at f/2.8 or f/4 blurs the background and foreground, making your subject stand out. This works beautifully for wildlife portraits, flowers, or any small subject you want to highlight.
Wildlife photography from Everglades National Park, Florida using Aperture setting of f/4
- Tell a complete story with deep focus
Using f/11 or f/16 keeps both the nearest rock and the farthest mountain sharp, making it ideal for landscape photography where every detail matters. - Guide the viewer’s eye with selective focus
Even in landscapes, you can blur parts of the scene to make certain elements more prominent. - Play with bokeh
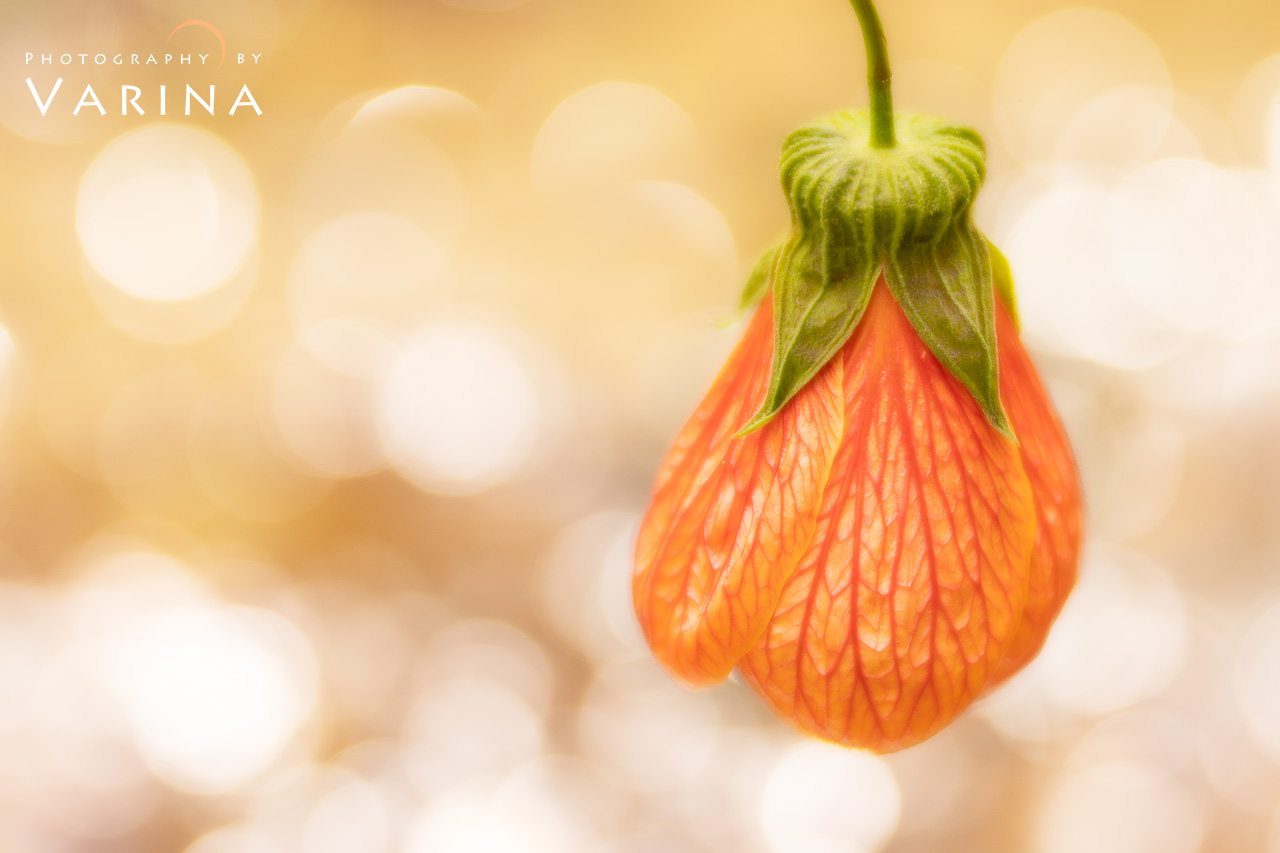
Wide apertures create soft, out-of-focus highlights called bokeh, perfect for artistic backgrounds.
Artistic Bokeh created by shallow Depth of Field (DOF) using a narrow aperture.

The Lens Sweet Spot for Maximum Sharpness
While your lens may offer extremes like f/1.4 or f/22, most lenses are sharpest somewhere in the middle. This is often two to three stops down from the maximum aperture, typically between f/5.6 and f/11.

Landscape photography at Red Sand Beach, Maui, Hawaii using f/7.1 – Close to sweet spot of the lens.
Knowing your lens’s sweet spot can help you choose aperture settings for maximum sharpness in both landscape and portrait work.
How to Practice Aperture Control
Learning about aperture in theory is helpful, but the real progress comes when you start experimenting with your camera in the field. Don’t worry—you don’t need advanced gear or exotic locations to get started. Even your backyard, a park, or a tabletop still life can be a great classroom. Here are some practical steps and exercises to help you master aperture settings:
1. Switch to Aperture Priority Mode
Set your camera to Aperture Priority Mode (marked as A on Nikon/Sony cameras or Av on Canon). In this mode, you control the aperture, and your camera automatically adjusts shutter speed for correct exposure. This setup is perfect for beginners because it allows you to focus on how aperture affects depth of field without worrying about juggling multiple exposure settings at once.
Think of this as your training wheels for understanding aperture for beginners—you’re learning one control at a time.
2. Use Single Point Focus
Switch your autofocus mode to single point focus. This lets you decide exactly where the camera focuses in the frame. It’s a critical step in learning aperture and depth of field because you’ll be able to compare how different apertures affect focus on your chosen subject.
Try placing your focus point on a nearby object (like a flower) while keeping distant background elements (like trees or mountains) in the frame.
3. Photograph the Same Scene at Different Apertures
Choose one subject or scene and photograph it at a variety of apertures. Start wide, around f/2.8 or f/4, then gradually stop down to f/8, f/11, and finally f/22.


Macro Photography using f/32 Aperture Setting

Macro Photography using f/3.5 Aperture Setting
When you review the images later:
- Notice how much of the scene is in sharp focus at each f-stop.
- Pay attention to changes in exposure and how the camera adjusted shutter speed.
- Look for differences in image sharpness—does your lens produce its crispest details at a middle aperture like f/8?
This side-by-side comparison is one of the fastest ways to understand depth of field in photography.
Common Beginner Mistakes
Even after learning the basics, many new photographers fall into the same traps when experimenting with aperture. Being aware of these mistakes will save you time and frustration:
- Always Using the Smallest Aperture (f/22) for Landscapes
Many beginners assume that f/22 is always the best choice for maximum depth of field. While it does increase how much of your scene is in focus, it also introduces diffraction—a softening effect caused by light bending as it passes through a very small opening. This can actually make your image look less sharp, especially when enlarged. - Ignoring the Effect on Shutter Speed
When you stop down to a narrow aperture, you let in less light. To compensate, your camera slows down the shutter speed, which can lead to unwanted motion blur from camera shake or moving subjects (like trees swaying in the wind). - Letting the Camera Choose Everything
Relying too heavily on full auto mode prevents you from really learning how aperture works. The camera may choose “safe” settings, but you’ll miss the chance to experiment with different depths of field. - Forgetting the Creative Side of Aperture
Many beginners treat aperture as a technical setting for exposure only. They miss out on its creative power—like using a wide aperture to isolate a subject or guide the viewer’s eye with selective focus.
Aperture as the Gateway to Creativity
At its core, aperture is one of the simplest concepts in photography: an opening in your lens that lets in more or less light. But in practice, it’s also one of the most powerful tools you have. With a simple turn of a dial, you can decide:
- Whether your viewer’s eye lingers on one sharp subject or roams across a sweeping vista.
- Whether your image feels intimate and dreamy, or expansive and detailed.
- Whether you capture the soft glow of a single flower or the sharp grandeur of a mountain range.
Learning how to control aperture on a DSLR or mirrorless camera is about more than exposure—it’s about unlocking creative freedom.
Your Next Step as a Photographer
As a beginner, it’s easy to feel overwhelmed by all the technical settings on your camera. But mastering aperture is like finding the key that opens the door to creativity. Once you understand it, you’ll see photography in a whole new light.
Remember:
- Don’t be afraid to make mistakes—every missed shot teaches you something valuable.
- Experiment often—shoot the same subject at different f-stops and see how the mood changes.
- Practice with curiosity—aperture is not just a setting, it’s a language for telling stories.
The beauty of aperture is that it grows with you. At first, it helps you take sharper, more technically correct photos. Over time, it becomes a brush you can paint with—blurring, sharpening, revealing, and hiding exactly what you want to express.
So pick up your camera, switch to aperture priority mode, and start experimenting today. Each photo you take is a step toward not just understanding photography, but creating it.
About Author Jay Patel
I could startoff like this – “Seeds of Jay Patel’s appreciation for beautiful places were planted early in his childhood….” but it would get boring really fast. I will just sum it up and say that I am a Landscape and Wilderness Photographer who loves to capture dramatic light. My photographs have been published in various magazines, calendars and advertising materials throughout the world.
Patience is a virtue...unless you are chasing your dreams


