5 Common Hyperfocal Distance Myths Debunked
Hyperfocal distance is an incredibly powerful consent that can allow landscape photographers to get everything sharply in focus. When we get spectacular light at the right location we will often set our camera’s focus using hyperfocal distance. Once the focus is set we can concentrate on being creative with our photography composition and getting the exposure right in the camera.
However not many landscape photographers incorporate hyperfocal distance in their workflow. What do you think about when you hear the term hyperfocal distance? Numbers and complicated math… right? When we talk about hyperfocal distance with our students, we sometimes get a skeptical look or two… and we can understand why. After all, it is a difficult concept to understand. Over the years, it has moved into a theoretical realm. People often talk about what hyperfocal distance is but they seldom use it in practice.
Here are a few myths that may be responsible for creating that perception about hyperfocal distance.
Myth #1: Hyperfocal distance is a difficult concept to use in practice
When you think about hyperfocal distance, what do you envision? The first thing that comes to my mind is complex math with several variables. Most landscape photographers are under the impression that it takes time to run through calculations and set up your camera. They often believe that, if they do try to use it, they may miss that gorgeous sunset or sunrise as the light is quickly changing.
Nothing can be further from the truth. We regularly use this concept to set up our camera’s focus. How? By using a simple four-step workflow that takes less than a minute.
For landscape photographers, the power of hyperfocal distance comes into play when the light conditions are rapidly changing. Once we use our quick four-step workflow, we do not have to think about getting the focusing correct as long as we don’t change the aperture and focal length. So, when the sky is putting on an incredible show, we can concentrate on getting the best possible composition and making use of the available light to get as many stunning landscape photos as possible in a short duration of time.
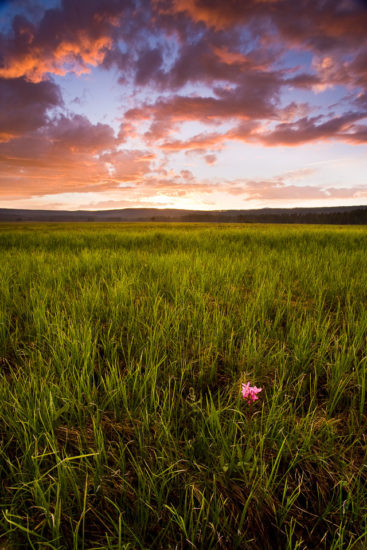
This is exactly what happened when we were out shooting in Yellowstone. The light was fantastic all around us and we were able to set our camera at hyperfocal distance and get several photos using same focal length under changing light conditions.
Myth #2: You need an app to use Hyperfocal Distance
An app (or a table) is invaluable when you first start to learn about hyperfocal distance. We provide our students with a simple chart to look up focusing distance based on aperture and focal length. However, it is not always ideal to use the app or chart. Our workflow involves memorizing focusing distance for two to three different focal lengths and using that knowledge to set up the camera’s focus to get sharp photos.

Focal length: 21mm, Focus set using hyperfocal distance – Moraine Lake, Banff National Park, Alberta, Canada
For example, the above image that was shot at 21 mm, using the hyperfocal distance of 24 mm that I had memorized. Why does this work? Because the acceptably sharp limits for a 24mm is a subset of 21mm focal length.
Myth #3: Full-frame & crop body cameras complicates matters
Most apps recommend that you use different circle of confusion (COC) parameters for full-frame and crop body cameras to account for the different pixel sizes. This creates different hyperfocal distances because the COC for crop body is typically smaller then that of a full frame body. However, it is important to remember that the COC simply defines the acceptable sharpness; there is no reason to NOT use a COC for a crop body camera on a full-frame camera. Using the smaller COC of a crop body on a full-frame camera yields sharper photos and simplifies your workflow.
Myth #4: You need precise distance measurements
Accurate distance measurements do help with your hyperfocal distance workflow, but a distance measuring tool is not necessary. By conservatively estimating distances, you can easily come up with sharp photos. Our Hyperfocal Distance for Landscape Photography Tutorial provides you with a 10-page Advance Workflow Insights PDF that shows you why conservative distance estimates work.
Myth #5: Correct use of hyperfocal distance guarantees sharp photos
It is true that hyperfocal distance allows you to precisely set your focus so that everything in between half the hyperfocal distance and infinity is acceptably sharp. However, sharpness does not depend on focus setting alone. Camera motion, subject motion by wind, quality of your lens, weather, and other factors can greatly impact the sharpness of your photo. If you are trying to use this concept in a forest on a windy day, the trees that are affected by the wind may appear blurry.
Landscape Photography Tip to get Sharp Focus
Just because you are using hyperfocal distance in your landscape photography workflow does not guarantee that your photos will be in sharp focus every time. There are many factors that impact the sharpness of a landscape photo. In addition to using hyperfocal distance, here are a few other things to keep in mind to get sharp focus in landscape photography:
- Use a tripod to keep your DSLR or mirrorless camera steady when you are shooting.
- Use a remote release or a two-second timer to minimize the camera shake when trying to capture long exposure landscape photos.
- If you are using a DSLR camera, you can select the mirror lockup setting as well. When you release the shutter, the mirror inside the camera pops up, the camera pauses for two seconds, and then it takes the photo. This allows the vibration in a DSLR camera to die down before the DSLR camera starts to take your landscape photo.
- Use a single point focus mode rather than letting the camera choose the focusing point for you. Many cameras have multiple focus points, so it’s often possible to focus on a specific point within your photography composition simply by choosing the right focusing point.
- If you are using hyperfocal distance with a narrow aperture, make sure you pay attention to your subject motion and shutter speed. Make sure that your shutter speed is fast enough to freeze the subject motion. If necessary, use your ISO setting to increase your shutter speed.
- For night photography, it may be impossible to use your DSLR or mirrorless camera LCD to set your focus point for hyperfocal distance. If this is the case, try using a flashlight to light your focus point and then switch your camera into manual focus mode. Then turn the flashlight off before you take the shot.
Now that we have debunked these popular myths about hyperfocal distance, are you ready to add it into your arsenal? Our Hyperfocal Distance tutorial shows how we use this powerful concept in practice and come away with sharp photos every time. We share our simple workflow, provide practical tips, and demonstrate how we use this powerful concept in real world situations.


