How to Capture Sharp Landscape and Nature Photos
Let’s face it—every landscape photographer dreams of capturing sharp, breathtaking photos. However, achieving sharp focus in landscape photography can be tricky, especially when you’re starting out. Many photographers ask questions like: “Why do my landscape photos look sharp at first glance, but turn out blurry when I zoom in? What can I do to fix this?”
If this sounds familiar, don’t worry—you’re not alone. I struggled with the same issue as a beginner. Through trial, error, and persistence, I mastered focusing techniques and workflows to consistently capture sharp landscape photos. Here’s my journey and the practical tips I learned along the way.
How I Learned to Get Sharp Focus
It all began in Washington’s stunning Olympic National Park, where I was photographing the beautiful Sol Duc Falls. I was new to landscape photography and was trying to shoot a gorgeous cascade in the Sol Duc Falls in Olympic National Park. My goal was to highlight the vibrant moss in the foreground while keeping the cascading water tack-sharp.

Out of focus nature photo, Olympic National Park, WA
Some landscape photos would turn out great, but many of them looked like the image you see above. I knew I wanted to get close to the foreground moss, but I didn’t know where exactly to set my focus point or which camera settings would help me to get both foreground and background in sharp focus. Despite multiple attempts with different camera settings, focal lengths, and autofocus modes, my results were disappointing.
I had read about concepts like hyperfocal distance and depth of field, but I didn’t know how to apply them effectively in the field. Determined to improve, I spent six months studying and practicing. Slowly but surely, I developed an easy five-step workflow to get my images consistently sharp.

Landscape photography In sharp focus, Olympic National Park, Washington
When I returned to Olympic National Park, my newfound skills paid off. The photo below, featuring a trillium flower with the vibrant forest in the background, was taken with my camera just inches away from the flower. Thanks to proper focus techniques, everything in the frame—from the foreground to the background—was crisp and clear.
Getting sharp focus in nature photography isn’t just about knowing where to focus. It requires a combination of the right camera settings, understanding motion, and mastering techniques for avoiding blur in outdoor photos. Let’s explore common scenarios and practical solutions for sharper results.
Photographing Birds in Flight: Tackling Fast-Moving Subjects

Continuous focus settings – Grimsey Island, Iceland
Photographing birds in flight is one of the most challenging forms of nature photography. You’ll typically use a telephoto lens (200mm or longer), which magnifies even the smallest focusing errors.
Solution: Choose the Correct Focusing Mode
- Set your camera to continuous autofocus (AF-C) to track the bird’s movement.
- Use a wide focusing zone to activate all focus points and makes it easier for your camera to track the moving bird.
- This technique is most effective when photographing birds against plain backgrounds, such as the sky or open water.
Focus Setting for a Moving Gecko
Unlike birds, animals like geckos have unpredictable movement. They might remain still for a moment and then dart away suddenly. This makes getting a sharp wildlife photo of a gecko more challenging then birds in flight.

Click to Play
Solution: Adaptable Focus Techniques
- When the gecko is stationary, use single-point focus to lock focus on its eye or head.
- For motion, switch to continuous autofocus with a small focus area for precise tracking.
This approach helped me capture sharp images of a gecko during my trip to the Big Island of Hawaii.
Landscape Photography in Sharp Focus
For scenes with prominent foreground elements—like flowers or rocks—you can use the hyperfocal distance technique to get everything sharp. Here is a simple workflow that Varina used to capture sharp landscape photo from Death Valley National Park.
- Switch your camera to manual focus.
- Use Live View to magnify and set your focus point at the hyperfocal distance.
- Select a narrow aperture (e.g., f/11 or f/16) to increase depth of field.

Landscape photo captured using hyperfocal distance – Death Valley, California
This method ensures both the foreground and background are sharp, making it ideal for wide-angle landscape photos.
Key Tips for Avoiding Blur in Outdoor Photos
It is important to understand that focus setting is just one of many variables that impacts sharpness of your landscape photos. Besides choosing the right focus setting, you also need to pay attention to the subject motion, camera motion, depth of field, and more. Beyond choosing the right landscape photography settings, here are actionable tips to enhance sharpness and clarity:
Use a Tripod for Stability
You don’t need a fancy or expensive tripod – just something that keeps your camera nice and steady when you are shooting. A sturdy tripod is a must for sharp photos, especially in low-light conditions or when shooting long exposures. If a tripod isn’t available, ensure your shutter speed is fast enough to compensate for camera shake or subject motion. Additionally, take advantage of your camera’s image stabilization feature for handheld shots.


Foreground & Background in sharp focus in Bryce Canyon
Minimize Camera Shake with a Remote Shutter Release
A remote release prevents accidental vibrations caused by pressing the shutter button. If you don’t have a remote release, most digital cameras have a two-second delay. This feature waits two seconds after you push the shutter release in order to minimize camera shake. You just press the shutter and then take your hand away. Two seconds later, the camera takes the picture. If using a DSLR, activate the mirror lockup feature to further reduce internal camera vibrations. When you release the shutter, the mirror inside the camera pops up, the camera pauses for two seconds, and then it takes the photo. This ensures that vibration from the mirror movement does not affect the sharpness in the final photo.
Switch to Manual Focus Setting when necessary
Many cameras automatically adjust focus when you press the shutter button halfway. Landscape photographers often use this technique to lock focus on their subject and then adjust their composition before taking the shot. This method is especially useful for focusing on subjects that aren’t centered in the frame. However, to avoid accidentally shifting focus, it’s essential to disable the autofocus after locking it. Most modern cameras also offer multiple focus points, allowing you to select a specific point within your composition for greater precision.
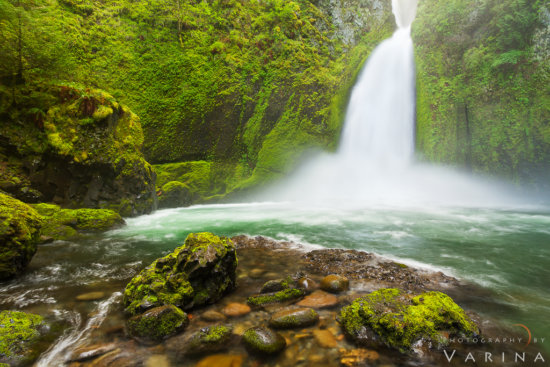
Landscape photo captured with manual focus setting, Columbia River Gorge, Oregon
Pay Attention to Depth of Field
Wide apertures (e.g., f/2.8) create a shallow depth of field, which may result in parts of your photo being out of focus. To ensure sharpness throughout, select a smaller aperture (e.g., f/11 or f/16) for a deeper depth of field. This is crucial when capturing wide-angle landscape photos with both near and distant elements.
Tackle Low-Light Focusing Challenges
DSLR and mirrorless cameras often struggle to focus in low-light conditions. To overcome this:
- Use a flashlight to illuminate a specific object in your scene.
- Lock focus on the illuminated area, then turn off the light before taking your shot.


Conclusion
Achieving sharp landscape photos requires more than just technical knowledge—it takes practice, patience, and an eye for detail. By mastering techniques like hyperfocal distance, using the right focus settings, and understanding how depth of field impacts your shots, you’ll see noticeable improvements in your photography.
So grab your camera, head outdoors, and start practicing. With persistence and these tips in your toolkit, you’ll soon be capturing crisp, stunning landscapes every time. Happy shooting!
About Author Jay Patel
I could startoff like this – “Seeds of Jay Patel’s appreciation for beautiful places were planted early in his childhood….” but it would get boring really fast. I will just sum it up and say that I am a Landscape and Wilderness Photographer who loves to capture dramatic light. My photographs have been published in various magazines, calendars and advertising materials throughout the world.
Patience is a virtue...unless you are chasing your dreams


, USA")


