3 Indispensable Photography Filters for Nature Photographers
If I was going to list the essential shooting gear for landscape photography, the list would contain a camera body, 3 lenses (wide, mid, and zoom), a tripod, and photography filters. Those are the bare bone essentials to dive into the world of landscapes. Some may argue that photography filters are no longer required with how much post-processing has advanced. However, some filter effects simply cannot be recreated in post. As with most photography accessories, the choices among filter brands and types are extensive. Researching what you need can easily become overwhelming, not to mention expensive fairly quickly. It’s a balancing act to determine which photography filters will be the most utilized, thus giving you flexibility in the field without breaking the piggy bank. For me, there are three main photography filters which serve as an excellent starter kit.

Patagonian Sunset with Circular Polarizer and ND Filter by Chrissy Donadi
Before we jump into the specific filters, it is important to know that there are essentially two main types of photography filters. The first are circular filters which screw onto the front of your lens based on a filter size. The filter size will be in millimeters, such as 77mm, which is the diameter of the front of your lens. To find the filter size you need, look on the barrel of your lens for a symbol that looks like a zero with a strike through it, then a number. This is the filter size that you will need to fit the lens. The second type of filters are rectangular filters. For these filters, you will need a corresponding holder that will attach to your lens. Then you slide the filter in and out of the holder.
Circular Polarizer Filter
If you are only going to purchase one filter, then it should be a circular polarizer (CP). CPs are almost always the screw-in variety because you need to be able to rotate them based on the angle of light falling on your scene. These filters work by blocking certain light waves from entering the lens as you rotate the filter. A CP filter affects your images in a few ways. First, it saturates the colors in your scene, particularly noticeable in darkening the blue in the sky. Second, it can reduce reflections and glare from water surfaces or wet surfaces in the scene like rocks and leaves. Last, a CP filter can block one to two stops of light from entering your camera, thus slowing down your shutter speed to produce a softening effect on moving water.
I have a large CP filter which mounts to my rectangular filter holder so I can use multiple filters at the same time. In addition, I have two screw-on CP filters which I have purchased over time. I’ve done this because there are enough times when I’m only using a CP filter. I have two different sizes so I can easily screw them on and off of my main lenses without having to use an adapter ring. An adapter ring is also called either a step-up or step-down ring. They allow one size of filter to either step up or step down and fit another sized filter. Adapter rings are certainly a money saving solution but can be time consuming to use in the field. So if you are purchasing a screw-on filter, try to size it to the lens which you most often utilize.

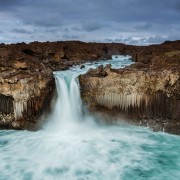
Waterfall captured midday with the use of a circular polarizer filter and a neutral density filter.
Neutral Density Filter
A neutral density (ND) filter is another photography filter that I rarely leave home without. ND filters act like sunglasses for your camera, uniformly reducing the amount of light coming into the lens. With less light entering the lens and reaching the sensor, the camera’s shutter stays open longer to properly expose the scene. In daytime settings, even overcast days at lakes and waterfalls, a low ISO and increased aperture (F-number) won’t be enough produce that smooth, silky water effect. To slow down the shutter enough, you need to use an ND filter. With fast-moving clouds, ND filters can smooth out the clouds producing a dreamlike image.
Over the years, I have found that I gravitate towards my rectangular 6 stop solid neutral density filter (1.8). With the 6 stop ND, I normally can tinker with my ISO and aperture to get my desired effect. I have a rectangular 3 stop (.9) and a 10 stop (3.0) as well. I rarely find use for the 3 stop. However, I will occasionally pull out the 10 stop if I really want to smooth things over. Again, this is suited to my style of photography bur may help if you are looking to purchase your first ND filter.
Last, even though they are called neutral density filters, occasionally some can leave a color cast on your images. It really depends on the brand you choose and the strength of the filter. Strong NDs, such as a 10 stop, will produce a stronger color cast. Therefore, it’s worth reading a few reviews. This was never something I looked at early on in shooting. Over the years, the recurring task of unnecessarily having to deal with color correction while editing has made me zealous about reviewing filter brands before I purchase.

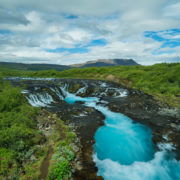
A scene captured using a circular polarizer to adjust for the water glare as well as a 6 stop neutral density filter to smooth out the water and clouds
Soft Graduated Neutral Density Filter
Graduated Neutral Density (GND) filters are necessary in many sunrise and sunset situations, where the sky is much brighter than the remainder of the image. The GND filter is different from the ND filter in that it is based on a gradient. On a rectangular filter, the top of the filter is dark, the middle gradually gets lighter, and the bottom is clear. This allows you to slide the rectangular filter in the holder until you align it with the horizon. Therefore, you are darkening the brightest part of the image protecting that area from overexposure.
The two main categories for GND filters are soft and hard. Soft GNDs have more of a gradual shift from dark to light used when the horizon isn’t perfectly straight. A hard GND has a quick transition area from dark to light. It is beneficial for perfectly straight horizons, like ocean scenes. I have both soft and hard GNDs in multiple strengths. However, the 6 stop (1.8) soft GND is a filter which I use heavily. It is what I opt for if I can’t take all my gear with me. My runner-up is my 3 stop (.9) soft GND filter. The soft GNDs are more versatile because they can be used when the horizon is straight as well as when the horizon is not, such as scenes with mountains and trees. Hard GND filters are only suitable when the horizon is straight.
If you are thinking of adding photography filters to your landscape photography equipment, then start with a circular polarizer, a neutral density filter, and a soft graduated neutral density filter. These three filters will aid in elevating your photos to the next level, At the same time, they will enable you to discover the filters most suited to your style of landscape photography. Happy Shooting!


