When is exposure bracketing necessary for HDR Photography?
As landscape photographers, we often find ourselves in front of a beautiful landscape scene with a wide range of tonal values. There might be shadowy rocks framing very bright waves in a beach scene. Maybe we are photographing a sunrise or sunset, where the sky is fairly bright but the landscape is not well illuminated. Scenes like these often require HDR Photography techniques to create the spectacular landscape photo that you envision.
So how do we know when we can get by with one exposure or when we need exposure bracketing? This is a question I get asked a lot when working with students in the field.
Do I need Exposure Bracketing?
This discussion today is much different than what I would have written just a few years ago. We have seen such incredible advances in sensor technology. Today’s cameras can capture detail in a much wider range of tonal values than they could 2-3 years ago. So perhaps this discussion is even more important now.
Three years ago, I bracketed a lot of my landscape shots–better safe than sorry. My advice then was to just set your camera to bracket three shots, 2 stops apart and deal with it later. Today, I analyze the scene in front of my camera, check my histogram, and bracket when it’s needed. By only doing bracketing when it’s really necessary, I have less culling and less work when I get home. But if I’m only going to bracket when it’s needed, I must know when it’s necessary and for that, I rely on the histogram at the time of capture.
Learn to use Histograms in Photography
You will need to understand the histogram in order to determine if you need exposure bracketing for HDR photography. Here is my field workflow. When I am setting up a shot, I begin with a base ISO for the cleanest image. I choose an aperture based on my desired depth of field, often f8-f16 for landscape shots. I then set the shutter speed as metered by the camera and take a shot. Checking the histogram on the image review will tell me all I need to know about how to proceed. The landscape photo below shows an image with a wide range of values. However the histogram of the scene shows that I have a good camera exposure without any clipped highlight or shadows. By looking at the histogram at the time of capture, I know that I have retained detail in the highlights and the shadows, so I’m ok with one camera exposure to capture the scene.
Compare that histogram to the landscape photo below. This is a scene with very deep shadows as well as brightly sunlit areas. After taking my first exposure and checking the histogram, I noticed that I have over exposed highlight and deep shadows. So this is my indication that I will need to take multiple images at different exposure values in order to capture detail in the shadows and the highlight areas.
If you make it a habit to take a base exposure and check your histogram, you will easily know when you need use exposure bracketing to capture all the details. This habit of checking for over exposed highlight and deep shadows in a single image will serve you well and will insure that you have enough data for successful post processing of a scene with a wide dynamic range.
So how do you proceed when you have determined that need exposure bracketing for your landscape photos? I usually bracket 2 stops apart and take 3 shots. I am careful to check the histograms on the bracketed shots to make sure I have appropriate details in both highlights and shadow areas. Here are the bracketed shots and histograms of the images I captured for the scene above:
Exposure bracketing allowed me to have enough data for post processing so that there was detail in the shadowy parts of the scene, no blown out areas in the highlights and a photograph that more closely resembled what I was able to see with my own eyes. Learn to read the histograms in photography to determine how and when to properly bracket your exposure for HDR photography.
Tips for Exposure Bracketing
So now you know when you need to bracket your exposure in the field to successfully capture high contrast landscape photos. The next step is to make sure that your bracket exposures are free of errors and can be used by HDR software of your choice without extra post processing. Here are the some tips to get the exposure bracketing right:
- I highly recommend that you use a tripod for exposure bracketing. This will line up your landscape photos perfectly because you aren’t moving the camera between exposures. It will also make for a simpler post processing workflow.
- Use high speed auto exposure bracketing features on your camera, so that bracketed exposures are captured as quickly as possible. Taking the shots manually will take more time and you run the risk of introducing unwanted motion or changing lights in your exposures.
- Use remote release or 2 sec timer along with high speed auto exposure bracketing mode on your camera. This will allow hands off operation of the camera for all bracketed exposure. This will prevent you from accidentally introducing camera motion during exposure bracketing.
- Spend some time learning to read histogram in photography. This will allow you to determine the amount of exposure bracketing that is necessary to capture all the details in your photo.
Post Processing Tips for HDR Photography
You’ve done a good job of capturing that beautiful landscape photo and you’ve loaded the images onto the computer and imported them into Lightroom. Now what? There is some specific work that must be done to combine the bracketed exposures to produce a final image. Here are some post processing tips to HDR photography that will improve your workflow:
- When I make my initial cull in Lightroom, I mark the bracketed exposures that I intend to combine into one image. I often take multiple series of bracketed exposures marking the bracketed exposure that I intend to use makes it easy to find them.
- I use Lightroom to create HDR photography. I find that LR does a great job of combining the bracketed exposure and it has the distinct advantage of creating an HDR RAW image plus it keeps the new blended image next to the original shots. However there are many different HDR software options available for landscape photographers. Find which ones produce the look and feel of the landscape photos that appeal to you and try to use that software.
- It is possible that even though you have captured 3 bracketed exposure, you can get away with just two of these exposure to create the final landscape photo. I have found that Lightroom does a slightly better job using 2 shots instead of 3. So I often choose a camera exposure with good highlight detail and one with good shadow information based on the histogram and blend them in Lightroom.
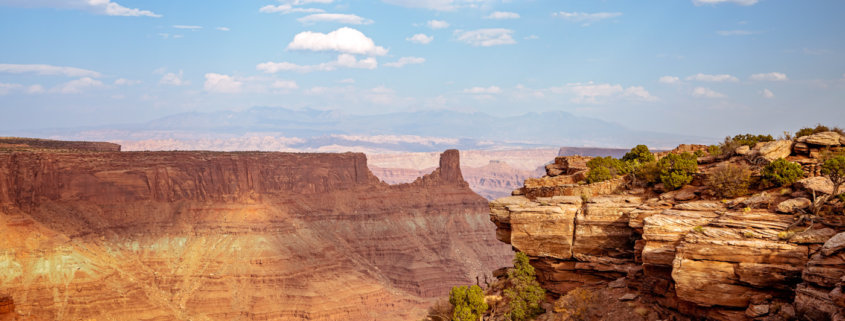
Take a look at this incredible scene at the Dead Horse Point State Park. A quick check of the histogram in back of my camera showed me that I had to use exposure bracketing to capture all the details in the highlights and shadows. I use a tripod, a remote release and high speed autobracketing to capture 3 exposures 2 stops apart:
As is often the case, I only needed two bracketed exposure to create finished HDR landscape photo. The dark exposure was too dark to yield any useful information. I combined camera exposure with 1/40s and 1/10s shutter speed using Lightroom to create the final image that you see below:
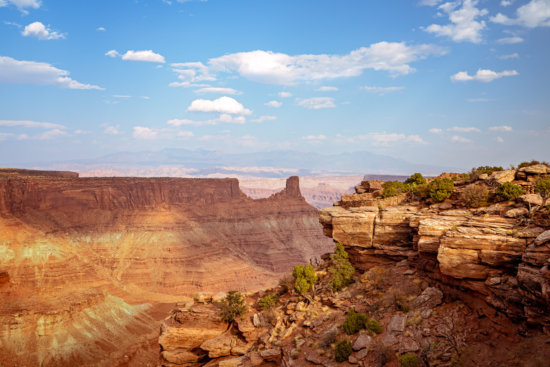
Landscape photography form Dead Horse Point – HDR created in Lightroom combined with some Photoshop edits.
I’ve often heard the expression “It’s all about the light” and I have to admit, it really is! When we are out in the field looking for that special scene that will yield a winning photograph, we are really looking for dramatic light that complements a pleasing composition. A critical part of this series of steps is knowing when to bracket your exposures so that you have enough information create jaw dropping landscape photos. By learning to read histogram in photography and knowing when to use exposure bracketing, you will increase your chances of success when photographing high contrast landscapes.

