5 Practical Photoshop Tips for Creative Post Processing
When it comes to post processing for nature photography, most photographers usually follow a particular pattern or workflow with which they’re comfortable. I’m no stranger to this habit. When I took my first digital images, I was lost on how to approach them on the computer. I typically only applied the same few adjustments in Photoshop to each and every photo. As time went on, I started to learn and experiment with creative post processing using Photoshop layers and masks.
This allowed me to greatly diversify my portfolio of fine art prints. I was no longer restricted to what mother nature provided for me because I can use my Photoshop skills to create something with a strong visual appeal. Over time I learned new Photoshop tips and tricks posted by reading photography articles and by watching Photoshop videos. I would also watch hours of Photoshop video.
If you find yourself bored with the same routine, as I did, here are some Photoshop ideas on how to approach your nature photo editing sessions with a touch of flair.
#1: Use Photoshop Layers & Masks to Add Textures
I’ve been doing this for years and have been able to create my own unique, pieces of artwork using Photoshop layers and masks. In Photoshop, you need to add a texture (another image) as a layer to your existing nature photograph. You can copy and paste one photo onto another or use the move tool to drag the texture on top of your photo.


Nature photo before creative post processing


Creative post processing to add textures to the sky using Photoshop layers and masks.


You can also have fun with layer blending modes or add a layer mask in Photoshop to bring out portions of your original image while leaving most of the texture visible. With the above image taken from my kayak, there was a lot of empty space. It was a great candidate for adding creative textures using Photoshop layers and masks! The possibilities are endless!
#2: Convert to Black and White
Sometimes, you head out to the field in search of great light, amazing sunrises and sunsets but are left a bit disappointed. If the colors let you down, perhaps concentrating on contrast could lead to an awesome black and white opportunity. Godafoss in Iceland is a spectacular nature photography location that is on everyone’s bucket list. The blue green colors of the water at this location results in a breathtaking travel photo. However recent rains had left the water looking rather muddy and unappealing.
As much as I tried to pull some great color out of it, let’s just say this photo did not do justice to the location.


Nature photography example before Black and White Conversion – Godafoss, Iceland

Black and white photography using NIK SilverEFex plugin for Photoshop – Godafoss, Iceland


But when I converted to black and white using NIK’s Silver Efex Pro, I suddenly fell in love with it. The textures, contrast, curves, and lines all came together. I used NIK’s toner capabilities to add a touch of blue and silver to the final image. No one prefers the dull colors at this iconic location, the black and white one just sang to me!
#3: Turn Nature Photo into a Fine Art Painting
These days, you have your pick of programs to help make your images painterly. Personally, I prefer a couple of Topaz products to accomplish this. Topaz Simplify and Topaz Impression are my “go to” paint programs. They’re user-friendly and can be used to pick a preset or to get your inner painter going with all the sliders, brush types, and strokes. You can even save your own favorite painterly look and apply it to other images. Topaz can be used as a stand-alone program with Topaz Studio or as a plug-in for Photoshop and Lightroom.
The following image from Magnolia Plantation and gardens in Charleston, SC has already been processed using Photoshop. I very easily could have stopped here. Live oak trees, however, can sometimes look too “busy” due to the endless amount of very tiny leaves.

Nature photography from Magnolia Plantation and Gardens


Nature photography from Magnolia Plantation after creative post processing.


To break through the chaos, I sometimes use Topaz Simplify or Impression to apply a painterly look to smooth out the tiny details and focus more on the my nature photography composition and color as seen in the image above.
#4: Learn to Create a Panoramic Landscape
Sometimes, the traditional 2×3 ratio just doesn’t grasp the entirety of the landscape before you. While sometimes “less is more”, other times… more is more. Just go for it.
Luckily, Lightroom now has this feature built in. It’s no longer an arduous process within Photoshop to put a panoramic image together. The PhotoMerge tool has HDR, Pano, and HDR Pano. Just make sure all the images you’ve brought into Lightroom to put together are treated the same with regard to their RAW processing. If you change the white balance on one of them, you must make the same change to all of them. If you don’t, they won’t line up or fit quite right and Lightroom may refuse to put them together.
It’s pretty rare, but sometimes Lightroom just doesn’t do a decent enough job putting the pano together. That’s where the power of Photoshop layers comes into play. Here’s what you do:
- After opening all the images in Photoshop as layers (which can be done directly from Lightroom), select all the layers by clicking on the top layer, holding the shift key, then clicking on the bottom layer.
- Go to Edit-Auto Align layers.
- When that process is done, go back to Edit and click on Auto Blend Layers.
- Select Panorama.
Sometimes, this simply does a better job than Lightroom. It also gives you the editing power to fill in any gaps or areas where the images didn’t line up properly utilizing the available layers.
I don’t usually stick to any predetermined ratio when it comes to my pano images. I’ll take as many as I see fit to create what I want, as seen here in the following image from the Blue Ridge Parkway in western North Carolina.

Panoramic Landscape created in Photoshop from Blue Ridge Parkway by Kate Silvia
#5: Experiment with different Photoshop Plugins
Most programs today are available for free trial periods, so what is there to lose in giving them a go?!
My favorite programs for creative post processing software programs are Topaz Impression, Glow, and Simplify, NIK Color Efex Pro2 and Silver Efex Pro2, and Skylum’s Luminar. There are a ton more on the market but I have used NIK software for over a decade, Topaz for about six years, and Skylum since its inception. I’m basically a kid in a candy store with this software. Many of these programs are available as Photoshop plugins. This allows you to use combine creative power of these plugins with Photoshop layers and mask to create spectacular special effects. So many possibilities, so little time!
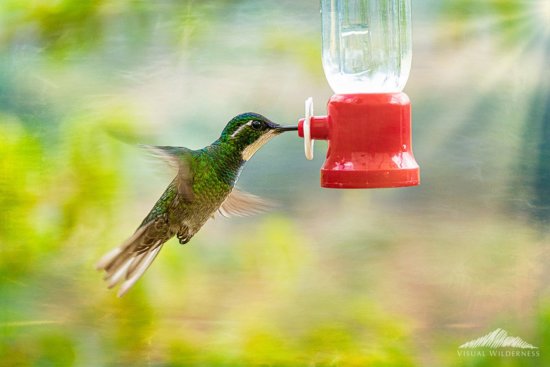
The following humming bird from Costa Rica was featured in my Creative Post Processing Tutorial.

Hummingbird in Flight before creative post processing
Hummingbird in flight after creative post processing using Photoshop layers & masks


I added textures, painterly effect and sun flare to convert this image into an artistic portrait of a humming bird using plugins and Photoshop layers and masks.
Being creative can seem like a daunting task. You may even think that you’re not good at it. But I can tell you from experience, EVERYONE can be creative. You just have to be willing to try new things. With digital, we have endless opportunities to experiment with programs, techniques, and different looks, all from the comfort of your computer or tablet. Most of all, have fun!
Best light to you all!
About Author Kate Silvia
Kate is a professional landscape photographer and educator based in Charleston, SC. Her intense passion for the natural world is matched only with her desire to share that passion with her students. "Being a great photographer is not about what kind of camera you own. It's about studying the light, crafting a great composition, and expressing your vision through practice and education"


")


