5 Mistakes to avoid to get Sharp Focus for Nature Photography
All nature photographers have expressed frustration with blurry images at one time or another. Let’s face it, getting everything in sharp focus is complicated. Sure anyone can memorize different focus modes and focus setting available on their camera, but using these focus settings to produce a sharp photo is not simple. Getting the right focus for nature photography requires you to go beyond memorizing the focus setting on your camera.
The reason for this is pretty simple. There is no simple cookie-cutter workflow that will grantee sharp focus for nature photos. Pro nature photographers will tell you workflow for getting sharp focus depends upon scene you are trying to capture. Here are few tips to keep in mind when you are trying to get the sharp focus:
#1: Not knowing Where to Focus
One of the most important decision nature photographers will face is where to set your focus point. While the camera manuals tells you all about focus modes and focus settings, they seldom give you advise on how where to focus. The reason is quite simple…there is no easy answer to the question where should I set my focus point?
So what about the rule of thumb says that I should focus third of the way in to get everything in sharp focus? This is correct and this rule will work in some cases, but it will not always give you the results you want. When I first started in to nature photography I too relied on this simple rule to set my focus point, but I quickly learned that this rule did not result in sharp focus. I have to learn that every situation is different and your choice of focus points will be determine by what you are trying to accomplish.
Here is how pro nature photographers determine how and where to focus in some common situations:
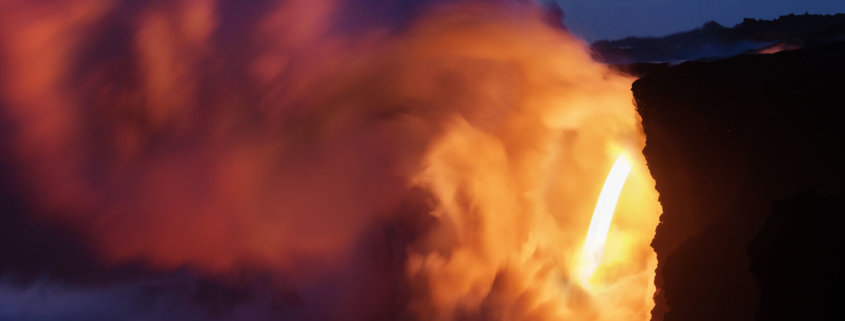
- I rely on hyperfocal distance workflow to everything in focus when I am shooting with a wide angle lens as seen in image #1 above
- When photographing a moving subject like this Hawaian Gecko who move in an unpredictable fashion, I relied used a single point focus to and camera focus tracking mode to get a sharp focus on Gecko’s eyes.
- When photographing an exploding bubble at Myvatn in Iceland I used a manual focusing mode. I first focused my camera on place where the bubble were exploding and then change my camera to a manual focus mode so my focus remains locked on that point.
So when you are out in the field think about what camera modes and setting you have available to you and how to use them to get sharp focus.
#2: Not knowing where Not to Focus
Knowing the limitations of your camera’s focusing sensor helps you avoid areas on which you shouldn’t focus. For example, camera focusing sensors have a hard time locking onto a low contrast area. Trying to focus on a texture-less sky results in your camera hunting for focus. Similarly, thermals (wavy lines you see on the horizon) caused by hot surfaces also throw off a camera’s focusing sensors. We discuss this in more details in our In Sharp Focus tutorials that were filmed in Hawaii.
You can see the wavy lines of the thermals in Image #1 above rising just above the rocks. When I tried to focus get a focus lock near the thermals my camera’s focus sensor was confused. The resulting image were all out of focus (Image #2). To get a correct focus lock, I focused on the cooler rocks just to the right of the lava falls (Image #3) and then set my camera to manual focus. After taking the photo, I zoomed in and made sure that the details in my photo near the rocks was in sharp focus.
#3: Expecting instantaneous Focus Lock
One of the things that most camera manuals leave out is the fact that focusing in your camera is not instantaneous. It takes finite amount of time for camera to lock on to your subject. The exact amount of time depends upon a number of things including the subject you’re trying to capture, ambient light, your camera’s focus sensor, the maximum aperture of the camera lens, and more. If you fire a shot before it’s focused, you come away with nothing more then out of focus blurry images.
Some cameras can be configured to not take the shot without getting a focus lock, but in this case you may simply miss the shot instead of capturing a out of focus photo. If you have ever tried to catch a wave crashing against the rocks or the exploding lava in the Hawaii or an insect with a long lens, you’ve run into this limitation.
One of the best ways to get around the limitation is to set the camera’s focus ahead of time. If you are trying to photograph a humming bird in flight, set the focus of the hummingbird feeder and wait for the hummingbird to come to it. This allows you to avoid the focusing delays and capture photos like the one above.
#4: Not using the Plane of Focus
Plane of focus is a plane that run parallel to your camera’s sensor and is located at the point where you set your camera’s focus. So, when you focus your camera at a certain distance the elements present at the plane of focus will be in sharp focus. As you move toward or camera or away from your camera the elements in the photo will start to get blurry. The exact amount of blur will depend upon focal length of your camera lens, focusing distance and your aperture.
So if you want to maximize the sharpenss for nature photography it is best to align your subject with plane when possible. This is critical if you are shooting with a telephoto lens or macro lens because of narrow depth of field. In this short video, Varina offers a bit of simple advice for making the most of a shallow depth of field.
#5: Ignoring Subject Motion & Shutter Speed
We all know that depth of field and focus are related….however to get sharp focus for nature photography you also have to pay attention to the subject motion and your shutter speed. It is true that you will need to get your focus settings correct to get a sharp image, whether it is part of the image or the full image depends on what you are trying to accomplish. However, you need a fast-enough shutter speed to overcome the motion of the camera, the motion of the subject, or both.

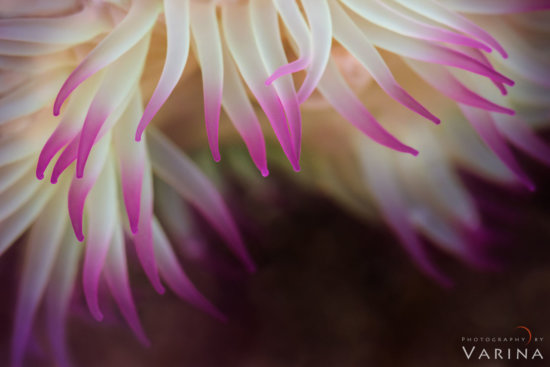
Sea anemone photographed at high shutter speed to freeze the motion of tentacles, Redwood Forest National Park, CA
One of the common mistakes that beginner nature photographers make is to select a narrow aperture to maximize the depth of field. This results in a very slow shutter speed and blurry photo due to subject motion. This is exactly the challenge Varina faced when shooting this sea anemone in Redwood Forest National Park. Varina used ISO 3200 to be able to capture this sea anemone using 1/100s. This shutter speed allowed her to freeze the motion of the tentacles of sea anemone.
As you can see from the examples in this article, getting the right focus is more than just knowing your camera’s focus settings. It’s about developing a solid focusing workflow that uses creativity and technical knowledge to choose the optimum focus settings for any given situation. This is exactly what our upcoming In Sharp Focus course is all about. Filmed in the diverse terrains of Hawaii, this course shows you how to develop your focusing workflow to get sharp images every time.
What pitfalls did you run into when trying to get sharp focus for nature photography? We would love to hear from you. Feel free to share your own experiences in the comments below.


