Autofocus & Manual Focus Setting for Nature Photography
There’s nothing worse than thinking you nailed a killer shot only to get home and find out that you actually screwed up the focus. In contrast to many other kinds of photographic mistakes there’s absolutely nothing you can do in post to fix a focus setting error. Therefore it’s absolutely critical that you achieve good focus in the field. Over the past 10 years of shooting nature photos I found myself gravitating toward a few autofocus and manual focus settings that help me achieve sharp photos with a minimum of effort on my part.
Manual Focus Mode
For someone who is interested primarily in landscape photography I use manual focus setting more often than not because I find that it gives me better and more accurate results than autofocus. Here’s what I do to achieve sharp focus every single time.
Hyperfocal Distance Technique – “Set It and Forget It”
If you use a wide-angle lens much of the time you can use the hyperfocal distance method. Most photographers (including you) will have developed a style where many of their shots use the exact same focal length, a foreground subject at the exact same distance from their camera, and a background subject at the same distance from the camera. Even though the subject matter may change these attributes of the photos stay the same. For example I frequently shoot photos at 18 mm with a foreground subject 2 to 3 ft in front of my camera, a background subject far enough away to essentially be at infinity, and a horizon about 1/3 of the way from the top of the frame.


Get sharp focus with Hyperfocal Distance technique | Focal Lenght 11mm

Close Foreground objects | Focal Length: 12mm


Rushing waves in foreground captured with wide angle lens | Focal Length: 12mm


Different subject matter but all essentially the same photo taken with manual focus setting
I like to shoot at around f/8 or f/9 because it’s the sharpest spot on my lens. And once upon a time I calculated that at 18mm and f/9, my hyperfocal distance is 4 feet. This is absolutely perfect for these kinds of scenes because it means the scene will be in focus from 2 feet to infinity. So whenever I go out shooting with my 18 mm lens I can pre-dial the focus to that exact spot of 4 feet, set my aperture to f/9, and know in advance that any kind of compositions I find that follow my typical pattern will automatically be in focus. Which gives me one less thing to think about in the field.
How to make this method work for you? First, look at your portfolio and figure out if you have a pattern when it comes to shooting wide-angle photos. If you see the same situation popping up over and over again in your images take a look at which f-stop and focal length you commonly use and calculate the hyperfocal distance for that situation. Then simply dial that focus distance in on your lens and go to town.
Precise and Painstaking Method: Manual Focus with Live View
The set-it-and-forget-it method works wonderfully with a wide-angle lens because it makes focus and depth of field much more forgiving. However, when I need more precision with my focus (like when I’m using a telephoto lens, or a different focal length than I’m used to, or if I’m photographing a scene that doesn’t fall neatly into my pattern above) then I’ll use manual focus setting with camera’s live view. Since camera’s live view gives you a preview of exactly what the camera is seeing you can use it to tell if your focus is good or not. Here’s how it works:

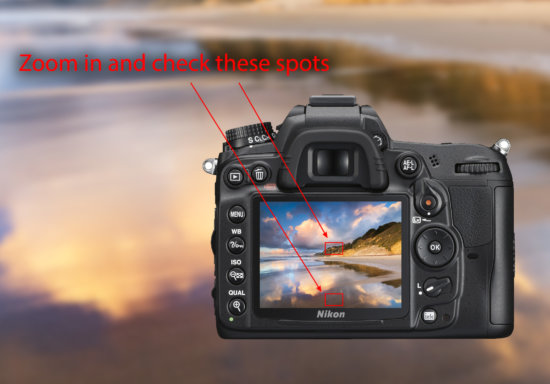
Manual Focus Setting with Liveview – Where to check your focus?
Enter live view on your camera, then adjust the focus of your lens until your scene looks sharp. Then zoom into the live view playback on your camera, and specifically check out the focus and details in your immediate foreground, as well as the distant background. If either of those is out of focus then you know you need to make an adjustment to either your focus distance and/or your f-stop. For example if your foreground is sharp but your background is soft then you either need to push your focus a little farther out or stop down to get a deeper depth of field (or both! The only way to know for sure is through trial and error).


Manual Focus Settings: Check for Sharp Far Field Focus

Manual Focus Settings: Check for Sharp Near Field Focus


This manual focus method takes a little practice to perfect but once you have it it’s by far the most accurate and precise focus method that I know.
Note that this manual focus setting technique works best on a tripod because you need stability and consistency to pull it off. Also, Canon users must press the depth of field preview button in order to see the actual focus for a scene in live view.
Autofocus Setting
Those manual focus techniques work great for 90% of the situations I’m in, but if I’m shooting a telephoto lens without a tripod, taking photos of people, or even using my wide-angle lens with a shallow depth of field, then I’ll switch over to autofocus setting and let the camera do the work for me. In particular I found that one specific autofocus technique has helped me nail more shots:
Back Button AutoFocus
Back button autofocus is when you use a button on the back of your camera, like the AF-ON button, to set the focus for your photos, instead of using the shutter button. There are a couple of really good reasons for doing this. The first is that it separates the two functions of focusing and releasing the shutter, and gives them dedicated buttons. This makes it less likely you’ll accidentally do one thing when you meant to do another, like take a picture when all you wanted to do was focus. Or more often, accidentally refocus when you simply want to take a picture.


Autofocus on your subject using Back Button Focus Setting & then recompose the photo.

With Back-Button focusing the subject remains in sharp focus when taking the photo

Without back button focus setting the subject may be out of focus


What this means is that with back button focus setting you can set the focus for your nature photo then recompose and shoot as much as you want without (accidentally) changing the focus. As long as you don’t change the distance between you and your subject your camera will stay in sharp focus and you can shoot to your heart’s content. This is much handier and much less tedious than focusing every single shot on the subject, half pressing the shutter button, then recomposing and firing the shot. It also works great for things like timed shots and selfies, where you can set the focus in advance then enter the frame afterward and you don’t have to worry about trying to refocus.
Back button focus setting also allows you to use the central focus points in your camera, which are the most accurate and powerful, to focus on your subjects. Then you can recompose and you don’t have to worry about your focus changing or trying to track your subject by manually moving the focus point around.
Back button focus setting does take a bit of getting used to but it’s ultimately so handy that it’s well worth the week of frustration until your fingers remember that a different button focuses now.
Note for Nikon users: Back button focus setting works best if you change your shutter release type to Release, instead of Focus.

Back Button Focus Setting for Nikon Users
And if you have any of your own favorite focus techniques please share them in the comments!
About Author Joshua Cripps
Joshua Cripps started making remarkable photos while he was still in the womb. His first significant image, titled Sonogram, was praised for its graininess, deliberate blurring of details, and gritty black and white mood. Earning two thumbs up from his parents, this photo only hinted at things to come. Since then Josh has won countless awards and accolades, including more than one “Certificate of Participation,” dozens of “Good Sportsmanship” plaques, and the coveted “Busy Bookworm” award. His mantel long ago collapsed under the weight of gold-painted, plastic trophies.
Currently Josh spends over 700 days every year in the field seeking out the finest landscapes on earth. He has a mighty beard and sings in a rich baritone. Hiking at least 45 miles to capture every photo, Josh ensures that every image he crafts represents the very heart of the wilderness. While you were reading this Joshua Cripps did 93 push-ups, won more awards, and became internationally re-renowned.


I recently viewed a webcast in which the presenter said that hyperfocal distance was an outdated practice, since it was intended for use with smaller prints, such as those made with film cameras. Now that larger prints are common with high resolution digital cameras, hyperlocal distance is inadequate for producing sharp images. What do you know about this?
Short Answer: This is not the case.
Long Answer: That depends upon what you are trying to accomplish. You can always reduce your COC that is used to determine hyperfocal distance to get sharper photos for larger prints. However are some point your lens limitation (sharpness of the lens), environmental factors (such as haze and wind that reduces clarity and create motion blur) will dominate the overall sharpness. So hyerfocal distance (or focus stacking) has to be used in conjunction with other factors to get the sharpness you are looking for.
Thanks for the tips. I use bbf with a lot of benefit as almost every time press the button full when trying to recompose. BBF has helped. But how do I set the shutter release type to Release? I use Nikon d3300. Kindly guide.
Thanks.
Along with the most excellent tips and techniques, your sense of humor/wit (About Author) will always keep me coming back for more! Keep doing what you are doing my friend!!
Sony and Fuji cameras now the days have focus peaking, which helps me to focus foreground and background in sharp. One draw back of that is if the scene is dark in foreground and sky has light then it only shows the focus peaking lines outskirts of the bright parts only. If you know how to get focus peaking marking on dark side too please share. Only way I am doing that kind of situation is zooming in a on the dark part of the subject to make sure it is sharp.
Thank you for the info on back button focusing. My newly bought (used) 5D classic has a hair trigger, this will make focusing, composing and shooting much better for me. Thanks again!!