
Focus Settings: 5 Common Mistakes To Avoid
Nature photography demands more than just being in the right place at the right time—it requires technical mastery to capture truly stunning images. Among the most critical elements of this craft is accurate focusing. Whether you’re photographing a grand landscape at sunset or a bird in flight, focus can make or break your shot.

Focus set using hyperfocal distance to get everything sharply in focus at Panamint Valley, Death Valley National Park, California by Jay Patel
Many photographers—beginners and even seasoned shooters—struggle with getting consistently sharp images. If your nature photos often look just slightly soft or fail to highlight your subject effectively, the issue may not be your gear but how you’re using it. This article explores five common focusing mistakes to avoid in nature photography and how to fix them to create crystal-clear, impactful images.
Why Focus Matters in Nature Photography
In nature photography, focus isn’t just a technical requirement—it’s a storytelling tool. Your focus decisions guide the viewer’s attention, enhance emotional impact, and define visual hierarchy within your image. For example, a sharply focused flower against a blurred background creates intimacy and drama, while a landscape with full depth of field invites viewers to explore every detail.
Moreover, nature photography often deals with challenging environments—moving wildlife, changing light, and complex scenes with varying depth. Mastering your focus technique ensures your creative vision is translated with precision. It helps maintain image quality, eliminates distractions, and gives your compositions clarity and punch.
1. Using the Wrong Focus Mode
One of the most frequent focusing mistakes in nature photography is using the wrong autofocus (AF) mode. Modern digital cameras offer several focus modes, and knowing when to use each can significantly impact image sharpness.
- Single AF (AF-S / One Shot AF): Ideal for stationary subjects like landscapes, flowers, or still wildlife.
- Continuous AF (AF-C / AI Servo AF): Best for moving subjects such as birds in flight or animals on the move. This mode continuously adjusts focus as your subject moves.
- Automatic AF (AF-A / AI Focus): Lets the camera decide between single or continuous mode, but often fails in complex scenarios.

Single Point Focus Setting was used make sure that the eye of the Hummingbird is sharply in focus. Bird Photography by Varina Patel
Use Back-Button Focus for More Control
A powerful technique to improve your autofocus workflow is back-button focusing. Instead of half-pressing the shutter to lock focus, you assign focusing to a separate button—usually labeled “AF-ON”—on the back of your camera. This decouples focusing from the shutter release and gives you greater control in challenging nature photography scenarios.
Advantages of back-button focusing:
- Instantly switch between single and continuous focusing by how you press the button.
- Prevents accidental refocusing when recomposing your shot.
- Allows you to quickly disengage autofocus and fine-tune with manual focus if needed.
For example, when photographing wildlife, you can track a bird in flight using AF-C with back-button focus, then release the button to lock focus as the bird lands—without having to switch modes or recompose. In landscape photography, back-button focus allows you to lock in critical focus once, then shoot multiple exposures without the camera refocusing each time.
In dynamic nature scenes, relying on default settings often leads to out-of-focus results. Choosing the correct focus mode based on your subject’s movement can dramatically increase your success rate.
2. Letting Your Camera Choose the Focus Point
Another common mistake in nature photography is letting the camera decide where to focus. In fully automatic or wide-area AF modes, your camera often locks focus on the area with the highest contrast—this might be the background trees, distant mountains, or even a patch of sky—missing your actual subject entirely.
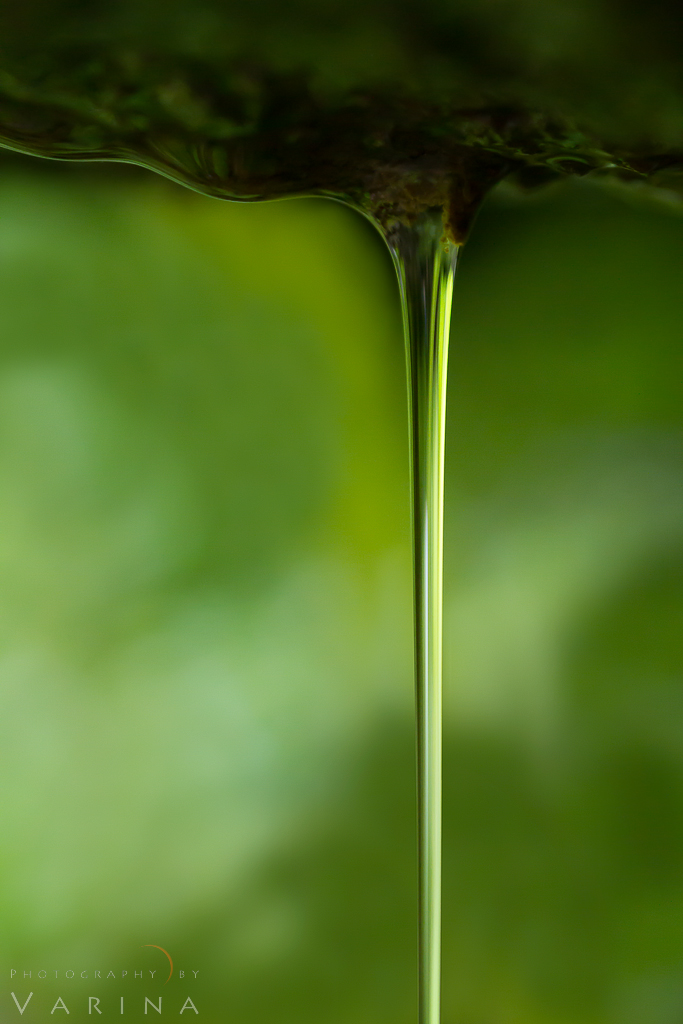
Manual Focus Setting was with a Macro Photography Lens to capture the steam of water sharply in focus by Varina Patel.
To improve your focus accuracy, it’s critical to manually select your focus point. Use single-point AF or zone AF to choose where your camera locks focus.
- Use single-point AF or zone focusing to manually select the exact area you want in focus.
- For landscapes, calculate the hyperfocal distance using apps or depth of field tables.
- For macro or close-up work, pre-focus manually at a specific spot.
By actively choosing your focus point, you can avoid one of the most frustrating and easily preventable focusing mistakes.
3. Not Understanding Depth of Field
A common misconception in nature photography is that everything needs to be in sharp focus. While maximizing depth of field (DOF) has its place—especially in grand scenic shots—creative use of shallow focus can be far more powerful in certain contexts.
Shallow depth of field is particularly effective in wildlife and macro photography, where isolating your subject from the background creates visual impact and directs viewer attention. Not everything has to be tack-sharp—what’s out of focus is just as important as what’s in focus.
Key concepts to remember:
- A wide aperture (f/2.8 to f/5.6) produces shallow depth of field—perfect for subject isolation.
- A narrow aperture (f/11 to f/16) provides deep focus—ideal for landscapes with foreground interest.
- DOF also changes with focal length and distance to subject.
The “One-Third Into the Frame” Myth
A widely circulated rule of thumb says to focus “one-third into the frame” to achieve front-to-back sharpness. While this may occasionally work with certain wide-angle scenes, it’s not a reliable method. The effectiveness of this approach depends on your lens, sensor size, aperture, and composition.

Focus was set at Hyperfocus distance to capture to create tac sharp image. Elakala Falls, Blackwater Falls State Park, by Jay Patel
In some cases, focusing one-third into the scene can cause the foreground to fall out of focus, especially if you’re using a longer focal length or shooting with a relatively shallow aperture. This becomes especially problematic when you have critical elements in the extreme foreground, such as flowers or rocks leading into the scene.
Instead of relying on generalizations, use hyperfocal distance as your guide, and always zoom in on your LCD screen to check focus after taking the shot.
Pro Tip: Use your camera’s depth-of-field preview or focus peaking to visualize the zone of sharpness before pressing the shutter.
4. Focusing in the Wrong Place
Even if your settings are perfect, placing focus on the wrong part of your frame can ruin a great composition. For instance, focusing on the background in a wildlife shot or the far mountain in a landscape with a strong foreground leads to visual disconnect and softness where it matters most.
In wildlife photography, always aim for the eye—it’s the most expressive and essential element for connection.
In landscapes, focus at hyperfocus distance when using wide lenses and narrow apertures for general front-to-back sharpness. Focusing directly on the foreground element when it’s a key visual anchor may result in other parts of the images being blurry.
Remember, where you focus affects how viewers engage with your photo. Be intentional about it.
5. Not Using Manual Focus When Needed
Autofocus is impressive, but it has limitations—especially in low-light conditions, when shooting night landscapes, or when working with macro subjects. These are times when switching to manual focus is the smarter choice.
Many photographers avoid manual focus because they find it tricky, but modern cameras offer several tools that make it easier and more precise:
- Focus Peaking: Highlights in-focus edges in real-time, great for fine-tuning.
- Digital Zoom / Magnified View: Allows precise focusing on critical details.
- Split-Screen / Focus Assist Functions: Available in mirrorless and DSLR live view modes.

Manual Focus using a headlamp was used to ensure that both the foreground and the stars are sharply in focus. Northern Lights in Egilsstaðir, Iceland by Jay Patel
Manual focus is especially useful when:
- Shooting the Milky Way or stars.
- Photographing small insects or flowers at close range.
- Working with foreground elements that AF systems struggle to lock onto.
Pro Tip: Practice manual focus with your primary lens ahead of time, so you’re comfortable when it matters most.
In Summary
Focusing mistakes are among the easiest to overlook—and the most frustrating to discover during editing. But by recognizing and correcting these five common errors, you can dramatically improve the technical quality and artistic impact of your images.
To recap:
- Choose the right focus mode for your subject.
- Don’t let your camera choose focus points—take control.
- Understand that depth of field is a creative choice.
- Always think about where to focus within your frame.
- Learn to use manual focus when autofocus falls short.
Nature offers endless photographic opportunities, but the environment rarely gives second chances. By sharpening your focus technique, you can turn fleeting moments into unforgettable images—and elevate your nature photography from good to extraordinary.
About Author Jay Patel
I could startoff like this – “Seeds of Jay Patel’s appreciation for beautiful places were planted early in his childhood….” but it would get boring really fast. I will just sum it up and say that I am a Landscape and Wilderness Photographer who loves to capture dramatic light. My photographs have been published in various magazines, calendars and advertising materials throughout the world.
Patience is a virtue...unless you are chasing your dreams


