Essential Macro Photography Equipment for Beginners
Macro photography allows you to slow down and discover the unseen. At high magnification, the camera reveals features we can’t see otherwise. It’s both exciting and motivating, allowing your inner explorer mindset to wake up and enable you to take a small break from everyday life. Macro photography becomes a pretext for long walks and slow pace exploration. It develops patience, endurance, and an eye for details. However, macro photography is a challenging photographic genre in terms of technique, composition, and photography equipment. And if you want to take better macro photos, you’ll need to invest money in essential photography equipment for capturing amazing macro photos. However, it is worth it.
How does macro photography gear differ from other genres?
Macro photography means taking life-size or very close to life-size photographs. In other words, the subject’s size is equal to or smaller than its size on the sensor, achieving a magnification of 1:1 up to 10:1. For example, if you photograph a 10 mm subject with a 5:1 magnification, it will take 50 mm on the sensor. Considering that a full-frame sensor has 36 mm, you’ll have only a part of your subject in the frame.

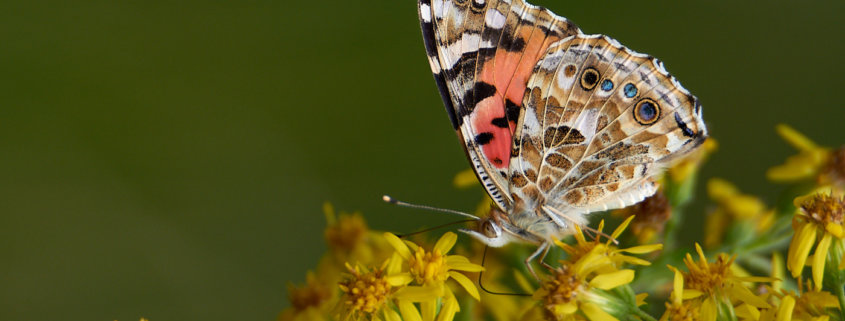
Macro Photography with a Telephoto Lens: Butterfly on yellow flowers – Focal Length: 600mm | Camera Exposure: f6.3, 1/800s @ ISO 220
The camera lens dictates magnification, and that’s your first challenge in terms of photography gear. A standard 18-55 mm kit lens offers a magnification of 1:3, making it impossible to take good macro photos. You can get close enough to take a close-up photo but not a macro one. To achieve at least a 1:1 magnification, you need dedicated photography gear such as macro photography lenses, extension tubes, macro filters, and more.
Another concern is the loss of light at high magnification. As magnification increases, the light intensity decreases. That’s because you look at a smaller area and inevitably see less light. This is physics, and you can’t do anything about it. But to achieve well-exposed macro photos, it sometimes requires you to use a flash. The built-in flash of your camera may be an option. Yet, it isn’t the best one because it’s placed behind the lens and provides a harsh and unidirectional light. When you take photos from very small distances, the lens can block the light from the built-in flash. Also, high-intensity light can wash out the subject or create strange reflections. Thus, you’ll need to consider using dedicated macro flash units or at least an external flash for taking professional macro photos.
Essential Macro Photography Equipment
Good macro photos have two qualities: a high magnification ratio and sharpness for the area in focus. To achieve the first one, you need a lens that provides at least 1:1 magnification. To achieve the second one, you need gear that enables you to take photographs in low lighting conditions, in uncomfortable positions, or enables you to capture moving subjects. This includes a macro flash, a diffuser, or a flexible and light tripod.
Any professional or enthusiast-level camera works for macro photography. The most significant investment comes in the form of lenses. The good news is you only need one or perhaps two lenses. My advice is to go step by step. Don’t buy all the gear from the beginning. See how it goes with what you have and add new equipment when you feel the need.

Macro photography with a water droplet on a Chrysanthemum Tranquility – Focal Length: 90mm | Camera Exposure: f6.3, 1/160s @ ISO125
Camera Lenses for Macro Subjects
As macro lenses cost anything between $300 and $2000, make sure you choose the right one for you. Below you’ll find the most important aspects to consider when choosing a macro lens:
- Magnification – This is the main criteria for obvious reasons. You’ll find many macro lenses with a 1:2 magnification ratio. Even though they’re marketed as ‘macro’, they won’t get you life-size magnification. You need a lens with at least a 1:1 magnification ratio or higher. So look beyond the naming and check the technical parameters.
- Aperture – To fight against the loss of light at high magnification, dedicated macro lenses have wider apertures than other lenses. Large apertures allow more light to enter the camera and help you take sharp photos in low lighting conditions. Look for camera lenses with maximum aperture setting of f2 or f2.8.
- Minimum focus distance – The minimum focus distance is related to focal length and dictates how close you can get to a subject and still be able to focus. You’ll find 30 mm macro lenses able to focus at 9.5 cm and 180 mm macro lenses able to focus at around 50 cm. The choice between a wide-angle macro lens and a telephoto one is yours. They provide the same magnification and aperture but a different “working distance.” Base your decision on your subjects and photography style. For example, if you photograph still subjects, you can get as close as you want. But if you photograph insects or details of animals, you might scare them if you get too close. In this situation a macro photography lens with longer working distance would be a better choice.
- Focus – Some macro lenses have autofocus; others have manual focus. Due to the small size of your subject, it’s hard to get the exact area you want in focus with either of them. Macro photographers still debate which focus mode they prefer. I sometimes find the manual focus more efficient because it allows me to be in control. I set the focusing ring and then slightly move the camera back and forward until the area I want is sharp.
- Image stabilization – Camera shake is the biggest enemy of macro photography. Some macro lenses provide optical stabilization, which reduces the lens’s vibration. So if you can spare a little bit on the lens, go for one with image stabilization. It enables you to avoid some camera shake issues, when you shoot without a tripod. Most lenses with image stabilization allows you to use a few stops of lower shutter speed and still get sharp photos. So, it is definitely recommended.
- Weight – Weight is another issue. Telephoto lenses such as Canon EF 180mm f3.5L Macro USM Lens weigh around 1 kg. Wide-angle lenses such as Sony 30mm F3.5 Macro Photography Lens weigh around 150 g. Lighter gear suits me better in my outdoor adventures. But I need that “working distance”; thus, for me, a 90 or 105 mm 1:1 macro lens is an excellent choice in terms of magnification and usability. As I don’t carry a tripod all the time, I also prefer lenses with optical stabilization and large apertures.
Filters and other alternatives to macro lenses
One way to avoid buying expensive macro photography lenses is to use a macro filter. They work similarly to a magnifying glass. You attach them to your regular lens, and they multiply the magnification of the lens up to 10x or more. You can buy them in sets with different multiplication factors and costs around $20. However, macro filters can cause distortions, color fringing, and blur.
Another way to achieve the magnification ratio you need is to use extension tubes. Extension tubes come between the camera and your regular lens and reduce the minimum focus distance, thus increasing magnification. You can even stack two or three of them together as they’re usually sold in sets. They cost around $100. On the negative side, when you have a lens with a short focal length, adding an extension tube may take all of your working distance. Besides reducing the working distance, extension tubes can be difficult to work with. Also bear in mind that they are less effective at producing higher magnification as the focal length increases.
The great thing about extension tubes is that you can begin with using them on a regular lens. However, they also work with a dedicated macro lens, allowing you to achieve higher magnification ratios like 3:1 or 5:1, when combined with a 1:1 macro lens.
There are also lens reverse rings that allow you to reverse the regular lens and use them as a magnifying lens. They work well with wide-angle lenses. However, you can only use the lens in manual mode; the automatic lens control is lost. Thus, even if macro photography lenses are expensive, they usually are the best choice you can make.
Flash and diffusers
Since I’ve started to use flash, I need a tripod less often. Flash allows me to take photos in all weather conditions and at any time of the day. This is really helpful because many flowers look amazing at dawn and many insects are active either in the morning or in the evening. Flash also permits me to use smaller apertures. This results in a deeper depth of field and having a larger part of the subject in focus. With more light in the scene, I can increase the shutter speed and freeze movement. Speed is crucial when working with impatient bugs.
You can try the built-in flash and see if it works for you. If you use telephoto lenses and have a longer “working distance”, built-in flash might work very well. But if you want control over the direction and position of the light, use an external flash or a dedicated macro flash.
You can choose between a ring flash, a twin macro flash, and a twin macro flash with flexible arms. The first two are mounted on the front of the lens. The ring flash lights up the subject with front lighting, while the twin macro flash offers a bit more flexibility, as you can control the strength of each of the flashes. The twin macro flash with flexible arms is mounted on the camera via a hot shoe. The flexible arms allow you to direct the light where you need it, no matter whether you want a front lit or side lit shot, or perhaps even back lit depending on your working distance and your subject. Twin macro flash units can be triggered together or individually. Once you have a macro flash, a brand new creative path opens up.
To soften the hard light from the flash, remember to use a light diffuser to make the light softer, evenly distributed, and more natural-looking. This is the least expensive item for macro photography, but it makes a big difference. You can do it yourself with white paper or plastic.
If you use natural light, you can soften the sunlight with a cheap circular diffuser disc. Position it between the sun and your subject when taking macro photos in harsh sunlight. Often you can get a circular diffuser disc that is bundled with an equal sized reflector disc. Reflectors can help you direct, or reflect sunlight to the specific parts of your subject, that you want to illuminate a bit more, without adding flash. Using natural light is by far the cheapest, as you only have to add a diffuser/reflector disc to your macro setup. However, since you can only add a little extra light with a reflector disc, it doesn’t quite match adding a macro flash system, that gives you more flexibility and allows you to get enough light to capture insects in flight.
Tripods for Macro Photographers
You will find a tripod useful from time to time. Make sure it is versatile, has independent moving legs, and can get close to ground level. You’ll often need to place the camera parallel with the subject, and many subjects are near the ground, so a removable or rotating center column is essential. Don’t forget about weight because you’ll carry your macro photography equipment all day long, and every gram counts.
Comfortable Camera Bag
For outdoor photography, I usually recommend a backpack. Macro photographers spend a lot of time walking at a slow pace, looking for potential subjects. You need to be organized, fast, and silent. Thus, having everything mounted on the camera and the rest in a camera bag works best for me.
Getting started with Macro Photography Equipment
Exceptional macro photography requires very good control of sharpness, clarity, and good exposure. It’s very easy to miss a shot. If you want to take professional photos, I recommend you consider buying dedicated macro photography equipment. You don’t have to rush out and get everything at once, but each item will get you closer to the desired results. So prioritize an excellent macro photography lens first. I always use dedicated macro lenses, and I wouldn’t make a compromise here. The results are far better than with any other magnification system. But in the beginning, you only need one camera lens, and it can be a used camera lens in good condition.
and a dedicated macro flash system second if you want to dedicate yourself to macro photography. The addition of flash boosts the possibilities for the types of shots you can get away with in macro photography. A twin macro flash with flexible arms is probably the most complicated item you’ll have to use. Macro photography shares many techniques with portrait photography. You’ll have to learn how to illuminate the subject to flatter its features and use flash in creative ways.
If you use the built-in flash and a DIY light diffuser, you can still take beautiful photos without spending extra cash. A versatile tripod costs around $200. You can do without a tripod and stabilize the camera in other ways (e.g., rocks, standard tripods, directly on the ground, etc.). If the choice is between a tripod and a dedicated macro flash, I will choose the flash without hesitating. However, this is my opinion, and other macro photographers might disagree with me.
A Final Word
Macro photography isn’t a technical challenge you can solve only by buying dedicated macro photography equipment. The most important piece of macro photography equipment you need is commitment, creativity and desire to learn. You need to engage with your subjects and enjoy watching them. You need to be friendly and patient. Only then you’ll need macro lenses, external flash units, and special tripods. So before buying the gear, see if you’re made for this type of photography and ready to tell the stories of tiny objects.
And remember that learning to use your macro photography equipment will require practice. You’ll have to use the camera in one manual focus mode, and learn the limitations of your camera lens and camera. At first, many subjects will walk away before you set up your gear, but you’ll have fun in the process anyway.


