
How to Overcome Depth of Field Limitations in Nature Photography
As landscape photographers, we are often obsessed with one thing: sharpness from front to back. We love those sweeping images where a flower in the foreground is as crisp as the mountain range on the horizon. Achieving this kind of sharpness allows viewers to explore the entire frame without distraction, creating a sense of immersion in the scene.
Most of the time, this isn’t hard. You can stop down to an aperture like f/11, focus carefully, and—voilà—everything looks tack sharp. But every now and then, you’ll find yourself in a frustrating situation: no matter how far you stop down or where you set your focus point, your entire scene simply won’t fall into focus.
This limitation is tied to the physics of depth of field (DoF). Fortunately, there are several effective techniques that can help you overcome this problem and still walk away with stunning images. In this article, we’ll explore four practical solutions for overcoming depth of field limitations in landscape photography—plus some creative ideas for when perfection isn’t possible.
Why Depth of Field Limitations Occur
Before diving into solutions, it’s helpful to understand why DoF sometimes falls short, even with the best lenses.
- Aperture limits: Even if you stop down to f/16 or f/22, you may still not achieve enough DoF to keep both an ultra-close foreground and distant background sharp.
- Distance to subject: The closer you are to your foreground, the shallower your depth of field becomes, and the harder it is to keep distant objects sharp.
- Focal length: Longer lenses compress space and reduce DoF, making it more difficult to achieve sharpness throughout the scene.
- Diffraction trade-offs: Stopping down too far can reduce sharpness because of diffraction, so blindly choosing the smallest aperture isn’t always the answer.
The good news? Depth of field limitations don’t have to ruin your shot. Here’s how to take control.
1. Back Up from the Foreground
One of the simplest—and most overlooked—solutions is to back away from your foreground subject.
When you get too close, your camera needs to cover a massive range of focus, from just a few inches in front of the lens to infinity. This often exceeds what even small apertures like f/22 can handle.
Backing up changes the relationship between your foreground and background. By increasing the distance to your nearest subject, you reduce the depth of field demand on your lens.

Achieving maximum sharpness by backing away from foreground subjects.
👉 Example (above): Let’s say you’re photographing wildflowers just a few inches from your lens with mountains in the distance. At that close range, no aperture will render both sharp. But if you take a step back and recompose, you might find that f/11 or f/16 is suddenly enough to achieve front-to-back sharpness.
2. Zoom Out for Greater Depth of Field
Your choice of focal length has a direct effect on depth of field. Wide-angle lenses inherently give you more depth of field at the same aperture than telephoto lenses.
This isn’t just because wide lenses “hide” blur better—it’s physics. A 14mm lens at f/8 will give you far more focus range than a 50mm lens at f/8, even if both are focused on the exact same spot.
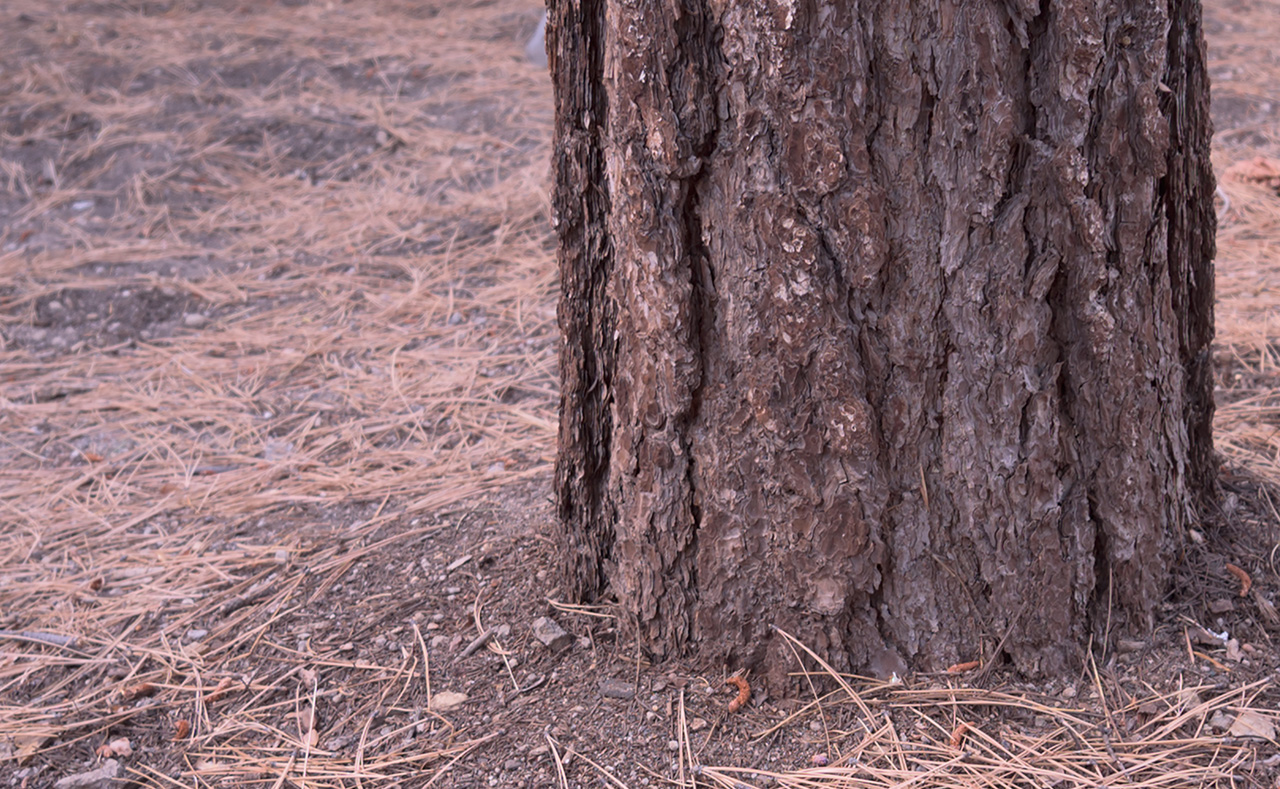
👉 Example (Below): Take two images of a forest scene at f/2.8—one at 24mm and one at 14mm. The 14mm shot will render the background significantly sharper, even with the same aperture and focus point.


14mm. Pine needles in background are noticeably sharper.

24mm. Pine needles in background are noticeably softer.

This is why many landscape photographers rely on ultra-wide lenses when they want sharp images with both strong foregrounds and distant horizons.
3. Master Focus Stacking
Sometimes, no combination of aperture, distance, or focal length will get everything sharp in a single frame. That’s where focus stacking comes in.
Focus stacking is a post-processing technique where you take multiple images of the same composition, each focused at different points, and then blend them together to create a single sharp image.
How to Focus Stack for Landscapes
- Choose your aperture wisely: Use your lens’s sharpest aperture (often f/8 to f/11).
- Take multiple shots: Start by focusing on the closest part of your scene (foreground), then gradually shift focus deeper into the frame (mid-ground, background).
- Process consistently: Apply identical edits to all images in Lightroom or your RAW processor.
- Blend in Photoshop: Import as layers, then use Edit > Auto-Align Layers and Edit > Auto-Blend Layers to merge them into one flawless photo.
The result is a breathtaking image with perfect sharpness from front to back, no matter how challenging the scene was.


Image #1: Foreground Focus

Image #2: Midground Focus

Image #3: Midground Focus #2

Image #4:Background Focus
Perfect Depth of Field in Final Focus Stacked Image


👉 Pro Tip: A sturdy tripod is essential for focus stacking in landscape photography. It keeps your composition consistent so that alignment and blending are seamless.
4. Embrace Shallow Depth of Field Creatively
Here’s a refreshing perspective: what if you stop fighting the limitations of depth of field and instead embrace them?
Not every landscape image needs razor-sharp detail from corner to corner. Sometimes, using a shallow depth of field intentionally can create a more artistic and powerful photo.
Example (below): Imagine a field of wildflowers where the blossoms in the foreground are crisp, while the mountains behind them fade into a soft blur. Rather than being a failure of DoF, the blur becomes a storytelling device, isolating your subject and creating mood.

In this photo background details are just slightly soft, making it appear that DOF was not enough.

But in this photo the background details are obviously and deliberately blurred which helps highlight the flowers in the foreground.


This approach works especially well in intimate landscapes or nature close-ups where the goal is less about documenting a scene and more about evoking emotion.
Beyond the Basics: Other Tips for Maximizing Depth of Field
The four core methods above will solve most DoF problems, but let’s expand with a few extra tools and techniques:
- Use hyperfocal distance focusing: Learn to calculate or use apps to set focus where depth of field extends from half the focus distance to infinity.
- Be mindful of diffraction: Don’t assume f/22 or f/32 is always sharper—often f/11 is the sweet spot.
- Experiment with tilt-shift lenses: These specialty lenses let you change the plane of focus, extending sharpness without extreme apertures.
- Plan your compositions (when possible): Sometimes moving a foreground element slightly further away is all it takes to make depth of field achievable.
Final Thoughts
Depth of field limitations are one of the most common challenges in landscape photography. We’ve all been there: standing in front of a perfect scene only to discover that no combination of aperture and focus point can render everything sharp.
But instead of feeling frustrated, remember you have options:
- Back up to reduce the distance between foreground and background.
- Zoom out to take advantage of wide-angle depth of field.
- Focus stack to achieve flawless sharpness in post-processing.
- Embrace shallow DoF creatively, turning limitations into artistic choices.
By combining these strategies with additional techniques like hyperfocal distance, tilt-shift lenses, and mindful composition, you’ll be well equipped to overcome DoF limitations in your landscape photography.
At the end of the day, depth of field isn’t just a technical hurdle—it’s also a creative tool. Mastering it will not only improve your technical skills but also open new doors for storytelling and artistry in your images.
Original Article Published in Nov 2017.
About Author Joshua Cripps
Joshua Cripps started making remarkable photos while he was still in the womb. His first significant image, titled Sonogram, was praised for its graininess, deliberate blurring of details, and gritty black and white mood. Earning two thumbs up from his parents, this photo only hinted at things to come. Since then Josh has won countless awards and accolades, including more than one “Certificate of Participation,” dozens of “Good Sportsmanship” plaques, and the coveted “Busy Bookworm” award. His mantel long ago collapsed under the weight of gold-painted, plastic trophies.
Currently Josh spends over 700 days every year in the field seeking out the finest landscapes on earth. He has a mighty beard and sings in a rich baritone. Hiking at least 45 miles to capture every photo, Josh ensures that every image he crafts represents the very heart of the wilderness. While you were reading this Joshua Cripps did 93 push-ups, won more awards, and became internationally re-renowned.


