How to use Histograms in Photography
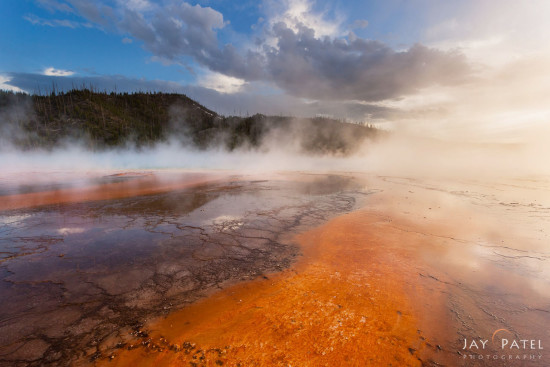
Lower Geyser Basin, Yellowstone National Park Wyoming (WY), USA
Let face it, there is no such thing as a perfect exposure due to unpredictable nature of landscape photography. Sure, you can get close sometimes. But more often than not, you have to make trade offs in order to do so. By using your knowledge of histograms in photography and photography filters, however, you can achieve an exposure that is just about ideal. You can also use histograms to determine how to fine tune some post processing parameters.

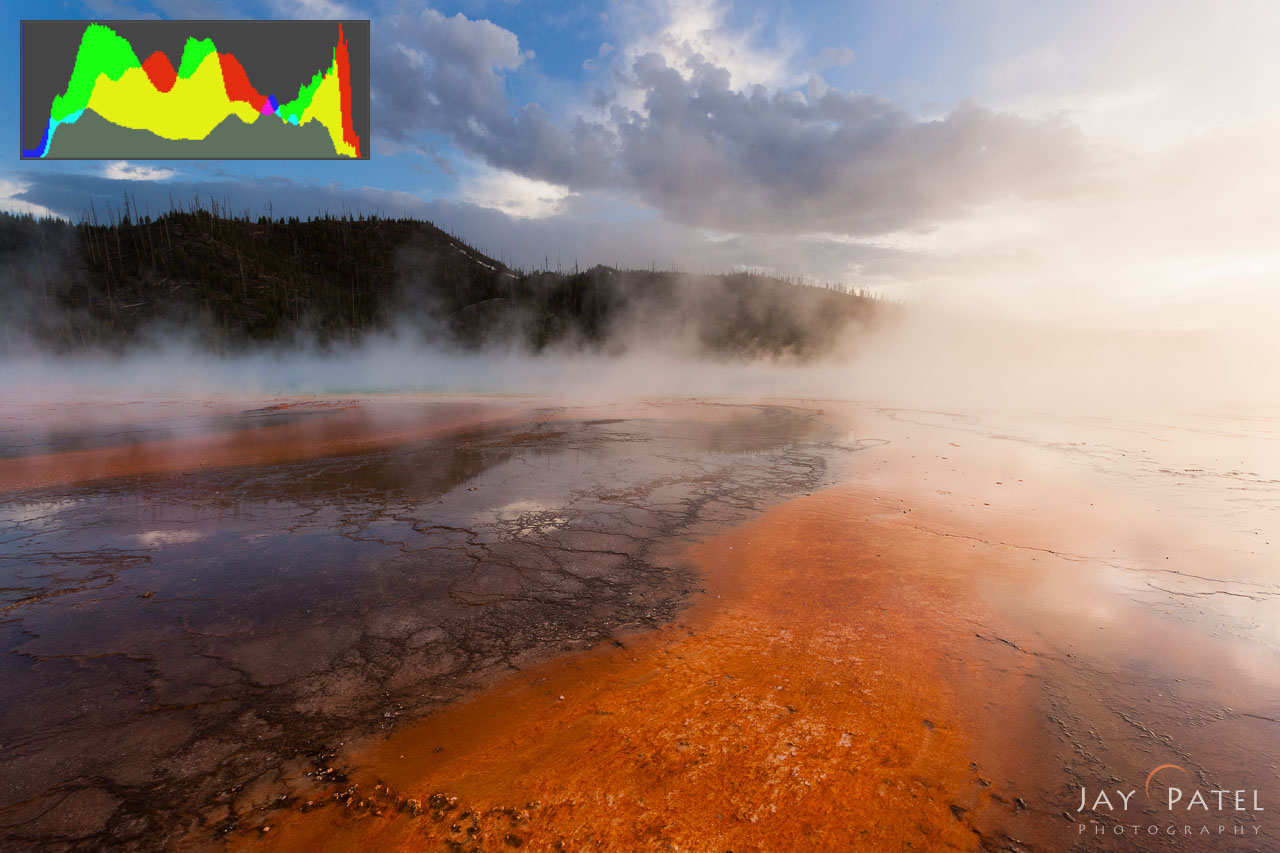
Midway Geyser Basin, Yellowstone National Park Wyoming
So, when I see breathtaking images like this one, my first question is usually something like:
How did the photographer choose such a perfect exposure for this scene? Or is it heavily Photoshopped?
#1: Use Camera Histogram to Set Your Exposure
Backlit images like this one are almost always difficult to expose. You have to deal with an extreme dynamic range of light, and that makes it extremely difficult to capture accurate colors and details in every part of the landscape photo. When I shot this photo, I used a combination of information from my histogram in photography and GND filters to get as close to a perfect exposure as possible.


Under Exposed Scene as seen from in camera histogram

Over exposed scene as seen from in camera histogram


When I first started shooting this scene, I intentionally underexposed the image, as you can see on the left from the camera histogram. I knew that I could process the image later and recover the shadow details in Photoshop; however, the resulting image would be too noisy. Instead of choosing this approach, I decided to keep a close eye on my histogram in camera. Then, I adjusted my exposure until the shadow areas had sufficient detail and the highlights were not completely blown out, as seen in the image on the right. The result was much better.
Now I was closer to the image I wanted. However, the colors in the sky and the details in the highlights were still pretty washed out. To get my camera exposure closer to perfection, my next step was to add a simple GND photography filter. So how could I determine which type of GND filter to use?

In camera histogram with 1-Stop Soft GND Filter – Sky perfectly exposed but highlights are still a bit over exposed.

In camera histogram with 2-Stop Soft GND Filter – Sky is too dark by the highlights have good details.

Once again, I had to make a tradeoff. For the first image, I used a 1-stop soft GND filter. As you can see, the camera exposure for the sky looks nearly perfect; however, the highlights are still a bit overexposed, washing out some of the details. My first instinct was to use a stronger GND filter to restore the highlight details, but by using a 2-stop GND filter, the sky and the mountains got unnaturally dark. Ultimately, I decided to go with a 1-stop GND filter. Then I could apply minor tweaks in post-processing using my knowledge of photography histograms.
So, I achieved my ideal camera exposure for this scene by using histogram in photography and the right GND photography filter. To help you master these skills for yourself and finally leave the guesswork out of choosing an exposure, we are offering our Histogram Exposed Course. This course takes you into the field with us. From the field, we will teach you how to read and use the histogram on the back of your camera step by step. It also includes real-life case studies that will show you how to follow our simple, 4-step workflow. Then, you can easily start exposing your own images with confidence.
#2: Histograms to Fine Tune Post Processing
Now that you know how to capture a photo with an ideal exposure, it’s time to apply your knowledge of histogram in photography to fine tune post-processing that will help your images to truly shine. One of the most frequently asked questions by landscape photographer is:
How do I know the right amount of post processing magic for my photos? What parameters should I adjust to fine tune my images?
How much time you need to spend in post will depend upon the choices you make in the field. Earlier in this article, we discussed my decision to use a 1-stop soft GND photography filter to achieve a near-perfect in camera exposure. By darkening the highlight areas of my image, a GND filter allowed me to choose a camera exposure that could capture more shadow details. Thereby, it minimized the noise in the darkest areas in my landscape photo.
Using histograms to analyze what adjustments are needed is the key to my post-processing workflow. For this particular shot, I needed to restore contrast in the washed-out highlights. Also, I needed to brighten up the shadow details in the mountains. The mountains had been darkened as a result of using a soft GND filter.
My first step was to restore the details in the highlights. To do this, I used a simple brush tool built into the Adobe Camera Raw converter panel. This allows me to apply my chosen exposure adjustments only to the highlight areas of the image.

Using histograms in photography & Masks to apply local corrections to the highlights in RAW Converter.
As you can see, this tool allowed me to reduce the highlights in my image by 1.2 stops and restore the washed-out details. I then turned my attention to the shadow areas in the mountains.

Using histograms in photography & Masks to apply local corrections to the shadows in RAW Converter.
Here, I used the same brush tool I had used before. But I bumped up my exposure by 0.55 stops and added a bit more contrast in order to bring out the mountain details.
The final product you see below was created by applying a minor s-curve adjustment. The adjustment helped me to boost contrast and color saturation throughout the image. You can find this adjustment under the tone curve tab found in Adobe Camera RAW or Lightroom.
Finished image created by using Histograms in photography and GND Photography Filters.
By getting an ideal exposure in the field, I was able to streamline my workflow and drastically reduce my time in post-processing. To learn more about the processing techniques I used, check out our Post Processing Tutorials.
Do you use histograms as part of your landscape photography workflow? If so feel free to share your own experiences in comments below.
About Author Jay Patel
I could startoff like this – “Seeds of Jay Patel’s appreciation for beautiful places were planted early in his childhood….” but it would get boring really fast. I will just sum it up and say that I am a Landscape and Wilderness Photographer who loves to capture dramatic light. My photographs have been published in various magazines, calendars and advertising materials throughout the world.
Patience is a virtue...unless you are chasing your dreams


