In-depth Night Photography Tutorial to capture Moonbows
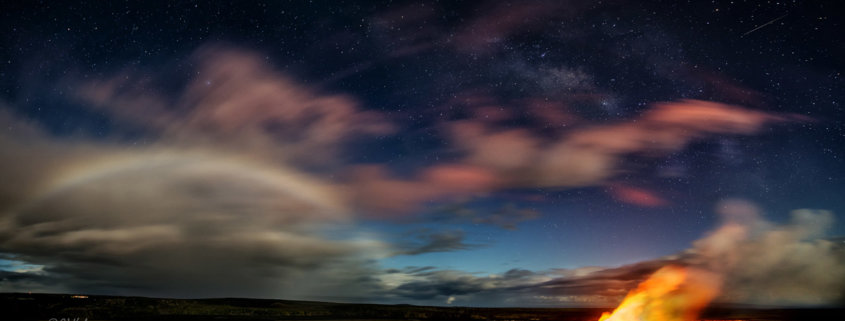
Rainbows are beautiful things to behold and are generally quite rare. But there is a rainbow so elusive that many do not know it exists and most have never actually seen one. This rainbow can only be captured by the light of the moon… it’s a moonbow or lunar rainbow. This particular rainbow is a perfect subject for night photography. It is visible to the naked eye but can be vividly captured on a film or digital camera using a long exposure. This is one of those night photography phenomena where the camera can out-perform the human eye. On a really bright night, your eyes see a silver band with maybe the faintest color. Depending on how bright the night is, the camera can capture almost all the rainbow’s colors.
Timing to capture Moonbow
First, how do you even find a lunar rainbow? Think of how many rainbows you see in the course of a 30-day month. Now consider that you only have roughly 8 to 10 days to see a lunar rainbow in that same period of time. This is a very short window. Also, just like with daytime rainbows, lunar rainbows require certain conditions. The sun or moon must be bright and unobstructed and at a 45-degree angle to moisture in the sky for a rainbow to appear. The moon is only bright enough to produce a good rainbow 8 to 10 days a month. Rainbows are hard enough to find in the daytime but at night, it’s even more difficult.
When selecting on a location, first determine at what time the moon rises or sets. Second, determine the direction that it rises or sets in order to set your composition accurately. Finally, considering that you’ll be shooting close to a full moon, determine at what time the sun rises or sets. It’s simple to gain this information using apps, our phones, or websites. When shooting a lunar rainbow, the moon will be behind you and the sun will be preparing to rise in front of you. Obviously if the light coming over the horizon from the sun gets too bright, you’ll lose your moonbow.
A more difficult way to find a moonbow that can produce some amazing results is to search for one at the edge of a rainstorm. If you’re shooting after the sun sets and the moon rises, you’ll be looking for compositions where the rain is in the west and it’s clear in the east. As it gets darker, it’s harder to tell where there is clear weather but look for stars or, when the moon comes up, its light can also help. If you are shooting at moonset, this is reversed. You are looking for clear skies in the west with moisture in the east. This procedure is difficult because it requires moving and composing on the fly in whichever location you encounter a rainbow.
Photography Location
I suggest scouting during the days for possible locations along a road you may be traveling and then do some nighttime scouting to determine whether or not there’s too much light pollution. City lights that are too bright will blow out your sky before you can expose for the moonbow. A good way to test for light pollution is to go out on a moonlit night and expose for the landscape by moonlight. If the landscape can be captured brightly and you don’t notice major light pollution, the location should be okay.
We’ve probably all heard the phrase “No rain, no rainbows”. Without trying to be a “negative Nancy” on such a positive outlook on life, let me say that phrase is a lie. Living in Hawaii (the land of rainbows), I can tell you that rainbows do occur without rain. You just need to find a waterfall. This makes hunting for moonbows quite easy. Find a waterfall that creates enough mist that is orientated in the right direction, show up at the right time on a clear night, and you’ve got your moonbow. There are many famous waterfalls around the world that have already been found to have moonbows… such as the majestic Yosemite falls in spring under the full moon.
Photography Equipment & Camera Exposure
Ok… so now you’ve found a lunar rainbow. What equipment do you need to capture it? The most important tools are a wide lens, a tripod, and your camera. The cool thing about shooting under moonlight is that you don’t need the best low-light camera or the fastest wide-angle lens. I personally like to use a camera lens that is 16mm or wider; 14mm is ideal and a 14mm/2.8 is a dream.
Camera exposure times for these rainbows are shorter than when shooting for the stars; ISO is also not as high. For example, I sometimes shoot at f3.5/10Sec. @ ISO 800. These exposure settings can be achieved pretty noise free on most digital SLR’s. Also, if shooting film, push the film to 400 ISO and increase the exposure time remembering to calculate for reciprocity failure for the duration of your exposure and you’ll have a completely noise-free image. Many films push two stops from ISO 100 to ISO 400 without much effect to the image grain.
Some more optional photography accessories that I always like to have are a cable release camera to avoid camera shake and a circular polarizer to intensify the rainbow (or drive you mad trying to figure out why you’re not getting the rainbow in your shot).
Focus Setting for Moonbow
How do you actually achieve the shot? First, I set up and get my camera focused. I use hyperfocal distance for the camera lens at the aperture I am shooting to get the sharpest image (there are field calculator apps that can help with this). Make sure everything in your night photo is in sharp focus by capturing a test exposure and zooming, If necessary make adjustments to your focus settings as needed.
Photography Composition
My next step is to refine my photography composition for night photography. To do this, I raise the ISO high enough to capture noisy one-second exposures as aids to check my photography composition. I shoot, look at the screen, and then recompose as needed. This allows me to see things that I may not have with my eyes in the dim conditions. Once I work out my night photography composition, I drop the ISO to around 800 to 1600 and make any adjustments I need to get proper exposure. Remember, unlike the sun, the moon’s exposure values will vary from night to night. The the camera exposure settings you used for night photography on one night may not work the same for the following night.
Using a Circular Polarizer Filter
Finally, after completely all of these steps, now comes the potentially mind-numbing part. I put a circular polarizer on my lens. If the circular polarizer is set wrong, the rainbow completely disappears or is only half visible in the shot. If this happens to you, don’t panic; just turn the circular polarizer. If the rainbow is completely gone in your frame, turn the circular polarizer 180 degrees and it will likely be close enough to perfect. Otherwise, the best way to dial it in is to turn it a ¼ turn at a time, then expose until it is at its best polarization for the rainbow.
Note that the polarizer, on average, causes the loss of about 1.5 stops of light. You’ll need to compensate for this by increasing your exposure time, increasing your ISO, or opening up your aperture. Increasing the exposure or ISO causes more noise (not a problem with a good low light camera that can handle 6400 ISO without noise). Opening the aperture causes a few other issues:
- You’ll need to rest your hyperfocal distance (if you are as picky as I am to get it right in camera).
- If your camera lens is not fast enough, opening the aperture is not an option.
- Depending on the camera lens, this opening up can cause overall softness and bad corners.
I personally take all in-camera decisions for night photography very seriously as I do not settle for less than a great shot. I like the challenge of getting it right in my camera rather than making it right on the computer during post-processing. If you find that the benefit you’re getting from the circular polarizer causes you to gain noise or lose sharpness, you’ll need to decide what benefits your final frame the most… the polarization or the extra stops of light. If you need the extra light due to a slow lens or a camera that does not perform as well in low light, don’t be afraid to lose the circular polarizer. These are decisions that night photographers in search of one amazing photos must make.
The amazing thing about lunar bows is how unique and mind-blowing of a shot you can get right in-camera in one frame with no composite. You can take pride in a pure photo that is so amazing that people think it was created on a computer.
Now… put the mouse down, the laptops away, and grab your cameras and tripods and go capture some amazing shots straight from the night photographer’s main tool… the camera.


