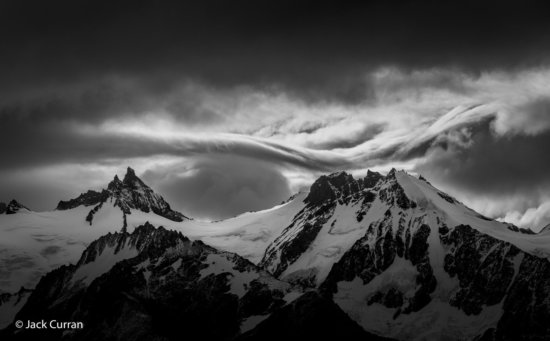
Black and White Landscape Photography for Beginners
Black and white landscape photography has a timeless quality that continues to captivate photographers and viewers alike. By stripping away color, images are reduced to their most essential elements—light, shadow, texture, shape, and emotion. For beginners, black and white landscape photography can be both challenging and incredibly rewarding, as it encourages a deeper way of seeing the natural world.
Black and white landscape photography is the art of capturing natural scenes using light, shadow, texture, and contrast instead of color to convey mood, depth, and emotion.
Unlike color photography, where vibrant hues can carry visual interest on their own, black and white landscape photography demands intention. Every decision—from exposure and composition to post-processing and printing—plays a critical role in how the final image communicates mood and story. Learning this approach early can dramatically improve your overall landscape photography skills.
In this guide, you’ll learn the fundamentals of black and white landscape photography for beginners, including equipment choices, pre-visualization techniques, fieldwork strategies, post-processing workflow, and printing considerations. Whether you shoot with a DSLR or mirrorless camera, this article by Jack Curran will help you build a strong foundation and develop a more intentional photographic vision.
Equipment for Black and White Landscape Photography
One of the most common misconceptions among beginners is that black and white landscape photography requires specialized or expensive gear. The truth is that any modern DSLR or mirrorless camera is more than capable of producing high-quality black and white images when used thoughtfully.
Cameras and Lenses
When getting started, your existing camera system is likely all you need. Personally, I use Canon 5DsR cameras, but the principles apply universally across brands.
For lenses, versatility matters more than perfection:
- Wide-angle lenses (16–35mm) are ideal for expansive scenes, foreground emphasis, and dramatic skies.
- Standard zoom lenses (24–105mm) provide flexibility for general landscape compositions.
- Telephoto zoom lenses (100–400mm) allow you to isolate distant details, compress perspective, and simplify complex scenes—an especially powerful technique in black and white photography.
Using different focal lengths helps beginners learn how composition and perspective influence tonal relationships in black and white landscapes.
Filters for Black and White Landscape Photography
Filters remain highly relevant in digital black and white photography, especially when working with long exposures and high-contrast scenes.
I use the Haida M10 filter system, including:
- 1-stop, 3-stop, 6-stop, and 10-stop ND filters
- A circular polarizer
Neutral density filters help manage exposure in bright conditions, smooth water, and emphasize cloud movement. Polarizers reduce glare and enhance tonal separation, which can be invaluable when converting color RAW files into black and white images later.
Special Tools for Pre-Visualization
In addition to camera gear, I rely on two simple yet powerful tools:
- A Tiffen black and white viewing filter
- A handheld black frame
These tools allow me to preview scenes without color and isolate compositions before ever raising the camera. While they may feel old-school, they are incredibly effective for training your eye to see in black and white.
Shooting in RAW for Black and White Photography
Almost all of my black and white landscape photography is captured in color using RAW format. This approach preserves the maximum amount of data and tonal information, which is critical during post-processing.
I convert my images to black and white using Adobe Lightroom Classic, where I can control individual color channels, contrast, highlights, shadows, and tonal transitions. Shooting RAW gives you flexibility similar to using colored filters in traditional large-format film photography—only now, those decisions happen in post-production rather than in the field.
For beginners, this workflow provides creative freedom while minimizing technical limitations.
Pre-Visualization in Black and White Landscape Photography
Pre-visualization is one of the most important skills to develop when learning black and white landscape photography. It involves imagining how a scene will translate into tones, contrast, and mood before pressing the shutter.
While many photographers rely on live view or electronic viewfinders, I prefer a more analog approach using my handheld monochrome viewer and black frame. Live view can sometimes lock you into a single focal length or perspective, whereas pre-visualization tools encourage exploration.
That said, setting your camera to black and white preview mode can be an excellent learning exercise—especially for beginners. Just remember that this preview is not the final image. It’s only a starting point.
Avoiding Creative Lock-In
One risk of relying too heavily on the camera’s black and white preview is developing fixed expectations. Many photographers assume that what they see on the screen is the final result. In reality, black and white landscape photography truly comes to life during post-processing and printing.
I encourage photographers to ask themselves:
- How will contrast be shaped later?
- Where will highlights be protected or enhanced?
- How will shadows contribute to mood and depth?
Pre-visualization works best when combined with a clear post-processing vision.
Also, when doing this, I want folks to think about the following: How do you intend (with purposeful intent) to use your post-production tools to finalize the image? Many people lock into what they see on screen and then have a predisposed set of expectations. But the truth for me is that it is just the beginning. I combine pre-visualization in field with my vision for how it will evolve when I’m thinking about the post and the final print.
Using Pre-Visualization in Low Light Conditions
One of the greatest benefits of pre-visualization occurs in low-light environments, such as pre-dawn hours or moonlit landscapes. By temporarily increasing ISO, you can reveal shapes and textures that are otherwise invisible to the naked eye.
This technique has helped me photograph landscapes well before sunrise, allowing me to compose thoughtfully long before the light peaks. For beginners, this approach builds confidence and improves compositional awareness in challenging lighting conditions.
Fieldwork Techniques for Black and White Landscape Photography
Fieldwork is where vision and technique come together. While I shoot in color, I think entirely in black and white when working in the landscape.
I look for:
- The flow of light
- A broad range of brightness
- Strong contrast and transitions
- Emotional or atmospheric elements
Before setting up my camera, I often place my backpack on the ground and walk through the scene with my monochrome viewer and black frame. This slows the process and allows me to truly explore compositional possibilities.
Exposure Strategy
I typically underexpose slightly in-camera to protect highlight detail. Highlights are far more difficult to recover than shadows, especially in black and white photography.
In post-processing, I open up the shadows selectively and address any noise issues as needed. Modern software makes noise reduction far less of a concern than it once was, especially when used thoughtfully.
This deliberate approach results in cleaner files with better tonal control.
Printing Black and White Landscape Photography
Printing is an often-overlooked but essential part of black and white landscape photography. A photograph is not truly complete until it exists as a physical print.
Having spent over 30 years printing in a traditional silver darkroom, my expectations for print quality are exceptionally high. I print all my work, mat and mount each piece, sign editions in pencil, and include certificates of authenticity.
Printers and Paper Choices
I currently use:
- Epson P800
- Epson 9900 (44-inch)
My preferred papers are baryta and fiber-based fine art papers, primarily from Hahnemühle, including Photo Rag and Fine Art Rag. These papers offer extraordinary tonal depth, from rich blacks to luminous whites—ideal for black and white landscape photography.
I use Epson’s Advanced Black and White (ABW) mode and custom ICC profiles, though every image requires testing and refinement. Beginners should expect a learning curve here, but the rewards are well worth the effort.
Finding the Right Balance Between Whites and Blacks
A common misconception is that black and white photos must be dark and dramatic. In reality, white space plays an equally important role.
There is nothing wrong with large areas of white or light tones in a black and white landscape photograph—if they are used intentionally.
When functioning as negative space, white can:
- Define a focal point
- Isolate a subject
- Create visual balance
- Enhance emotional impact
However, if the subject lacks strength, excessive white space can overwhelm the image. Balance is key, and the story you want to tell should always guide tonal decisions.
Workflow for Black and White Landscape Photography
Beyond basic composition, successful black and white landscape photography relies on what I call the Presence Elements:
- Range of Light
- Contrast
- Flow of Light
- Transitions
- Mood and Drama
- Tension
- Luminosity
When evaluating a scene, I look for at least three or four of these elements. The more present they are, the stronger the potential image.
Post-processing plays a critical role in enhancing these elements. Many of my original files were captured under flat, overcast conditions. Through careful editing, I bring out depth, texture, and drama that were not immediately obvious in the field.
As beginners develop post-processing skills, they naturally begin to visualize these outcomes before pressing the shutter—a turning point in photographic growth.
Conclusion: Learning to See in Black and White
Black and white landscape photography is not just a stylistic choice—it is a way of seeing. For beginners, it provides an opportunity to slow down, refine composition, and develop a deeper understanding of light and form.
By mastering pre-visualization, working deliberately in the field, embracing post-processing, and committing to printing, photographers can create images that are timeless, expressive, and deeply personal.
If you’re new to black and white landscape photography, don’t rush the process. Walk the landscape. Observe the light. Imagine the final print. With patience and practice, black and white photography will transform not only your images—but the way you experience the natural world.
To learn more about Jack and his work, visit his inspirational website and explore a lifetime dedicated to the art of black and white landscape photography.
Original Article Published in Nov 2019.


