3 Simple Techniques for Manual Exposure Blending
Have you ever photographed a scene where you just couldn’t fit it all in? I’m talking about light… epic, dynamic light. The kind you just aren’t sure how to manage or capture. I love this kind of light… very intense and coming from just outside the frame or sometimes even in the frame. This creates an incredibly dynamic scene which most, if not all cameras may struggle with. This is where exposure blending may come into play.

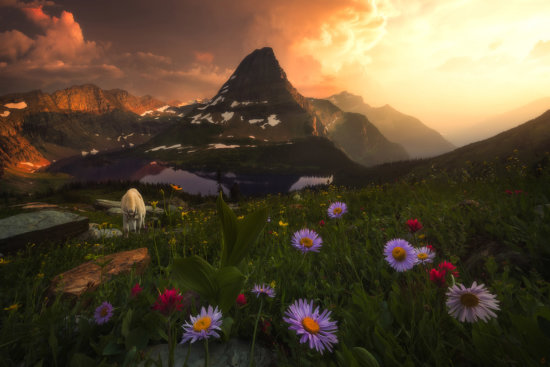
Nikon D850, 14-24, 3 stop soft grad filter, ISO320, ƒ/8, 14mm, 8 images for focus, and multiple exposure.
In-Camera Exposure Blending Using a GND Filter
One option for handling this intense light is to use a graduated neutral density filter. For example, a 3-stop soft graduated neutral density filter dropped in from the top so the most dense part is over the brightest part of the image. Many times this is the answer to harnessing the light and containing it within the histogram.
Bracketing Your Shots
But sometimes this light is simply too intense and, even with a filter, you’re forced to bracket. Today, most cameras on the market have a built-in automatic bracket function. This function can be customized to how many frames above and below your metered frame and how many stops of light they are apart. However, the real challenge once you’ve captured all of the “data” is compiling it all together in a natural, harmonies way. Where both the highlights and shadows are contained within the walls of the histogram.
Once you have all the bracketed images here are three simple techniques to create stunning natural looking high dynamic range landscape photos.
#1: HDR in Lightroom
Years ago there was one really popular photo trend called HDR, or High Dynamic Range. Although this trend erred slightly on the unrealistic side and didn’t offer very realistic results back then, today’s programs (such as Adobe Lightroom) can merge these bracketed frames within the raw converter and yield fairly realistic results. It is definitely the easiest way for beginners to merge these dynamic scenes.
Adobe Lightroom HDR:
- Once you’ve imported your photos, within the develop module, right-click all of the frames you’ll include and select Photo Merge>HDR.
- Select Auto Tone to help create a more evenly-toned merged image.
- Select Auto-Align, especially if there was possibly some movement.
- Select a de-ghost amount, low or none if there was little to no movement, medium to high if there was movement within the scene. This helps prevent semi-transparent artifacts in areas where things have moved from frame to frame.
- Click Merge.
#2: Blending Two Images in Photoshop
To blend two images in Photoshop, follow these steps:
- Adjust the “highlight frame” so that the mid-tones match the dark frame. This typically involves lifting exposure and lowering highlights. (If you bracketed 3 frames 3 stops apart, you can use the darkest – highlight frame – and lightest – shadow frame – they would subsequently be 6 stops apart. So if you pull exposure down 3 stops and up 3 stops, they will match. )
- Adjust the “Darks frame” so that the mid-tones match the light frame. This is usually just a raising of the exposure.
- Highlight both frames, right click>Open as layers in Photoshop.
- Place the “Highlight Layer” on top, and apply a mask.
- Using your gradient tool, set from foreground to background color (white to black in this case), click slightly above the horizon, and pull down while holding shift (this locks it at 90º) to just below the horizon. This reveals the sky and conceals the foreground of the sky frame.
You’ve now blended the two cleanest parts of each frame together!
#3: Using the Blend-If Panel
The third technique is more advanced but fairly easy.
Using the “Blend-If” panel:
- Open your set of images from Lightroom into Photoshop as layers by using step 3 above.
- Make sure your darkest layer is on top.
- Turn off all layers, except the bottom two.
- Double click to the right of the layer name text.


Blend-If Options Panel in Photoshop
- The “Blend-If” dialogue box appears. Holding option (Mac) or Alt (PC), click the upper black slider and drag it all the way to the right. You will see in real time that it is concealing the darker parts of the layer revealing only the properly exposed portions through. This is an excellent technique if a majority of the shot is exposed properly and you only need to recover a small portion of highlights.


Manual Exposure Blending with Blend-If Options Panel in Photoshop
- If you have more than two layers, turn on the upper ones that we turned off in step 3 and repeat step 5. If the effect is too strong you can lower the opacity of all of the adjusted layers.


PRO TIP: When facing the sun, its not realistic to have all highlights completely recovered, so leaving a small portion of highlights coming from the source of light can offer more realistic exposure blending!
Just like that you’re ready to get out and shoot some EPIC light!
About Author Joshua Snow
My Name is Joshua Snow, I am a Fine Art landscape and Night Photographer born in the Appalachian Mountains but raised in the Finger Lakes region of Upstate NY. In 2012 I had reached a weight of over 400lbs and during my journey of weight loss I discovered Photography and re-discovered the creativity that I had locked away while pursuing a career in Mechanical Engineering in the Aerospace field. Fast-forward to 2016 and a life-changing trip to Moab, my girlfriend and I decided we would do whatever it took to live here so that I could pursue my dreams of creating art, traveling the southwest and educating on photography. After a month, we had found a house, jobs and a sustainable future! Now I lead Photography workshops full time, all over the southwest, and here in Moab. My passions are creating art, traveling and teaching. I like to show people how connecting with a landscape can help make you a better photographer just by being there! On my workshops I help you see composition, pre- visualize a scene all the way through to the finished image, post processing from basics to advanced Adobe Lightroom and Photoshop, basic through advanced camera and capture techniques and a whole lot more. I specialize in advanced capture and processing techniques that can help elevate a photo to a work of art, that encompasses your vision, and creativity, but welcome photographers of all skill levels!


