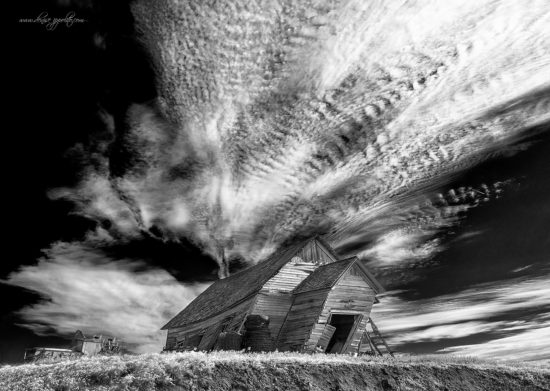
Dramatic Black and White Conversions in Photoshop
The above image was processed in Photoshop; the conversion was not done in Nik and I will tell you why… stay tuned.
First of all, to create the above image I need to start with the capture.
With many of the DSLR cameras, there are several different picture styles to choose from. To select a picture style using a Canon 5D Mark III, for example, locate the paint brush icon on the back left of the camera and then select Picture Style. When I’m out in the field and working with RAW images, I use the Monochrome picture style to determine whether or not a B&W conversion will work for a selected photo. Because I’m working with RAW captures, when I convert photos in Lightroom/ACR (Adobe Camera Raw), the image automatically returns to color. I only use the monochrome feature in the field as a guide for B&W photos.
Several factors influence my decision to go with a B&W image. The first is contrast. In bright light, my groups will often hear me say, “When the light is not right… think tight or think B&W.” Why tight? Because working tight (close in to your subject) often allows you to control the light. Why B&W? Because of contrast. Contrast is the key to dramatic black and white images. The next time you’re out and the light seems a bit bright, you’ll now know what to do.
Two other factors are the sky… a dramatic sky often does well in B&W; and the subject itself… whether or not it would lend itself nicely to a B&W look.
Now for the fun part… the processing. I consider a B&W conversion an art form of its own. There are many plug-ins that can do the conversion for you but oftentimes you’re left with very noisy images. In the above image, I didn’t need to apply any noise reduction because I controlled each step of the conversion myself.
- I start my processing in Lightroom/ACR. I make adjustments to the white balance, set my black and white points, adjust the clarity, open up the shadows a bit, tone down my highlights, and/or complete other necessary tweaks to prepare my image as I would with any other image before bringing it into Photoshop.
- Once in Photoshop, I duplicate my layer. Next I go to Image> Adjustments > B&W. For a dramatic effect like in the image above, I usually select the High Contrast Red Filter from the preset drop-down menu. Then I go into each color channel individually and move the sliders until I am happy with the look.
- Since I don’t know the image you will be working on, I can’t advise you specifically. But I can tell you that if you scroll through the presets, find one that you like and use it as a starting point, you can then fine-tune each channel. You’ll most likely end up with a nice base B&W image that can be further tweaked.
- Depending on the outcome, sometimes I duplicate my layer and go to Image> Adjustments> Equalize for a little more punch. I often increase the brightness, but you can use your own judgement. I also like to go into Selective Color and adjust the Neutrals. To do so, go to Image> Adjustments> Selective Color. Once inside the dialogue box, select Neutrals from the colors drop-down menu. Then slide the black channel to the right until you’re happy with the look. I also use Auto Tone and/or Auto Contrast at approximately 20%. Auto Tone and Auto Contrast are hideous at 100%, so be judicious. The most important thing to remember is to make small adjustments on layers and reduce the opacity or use a layer mask to control each adjustment. I suggest trying to do your own B&W conversions. You may be surprised at how good you are at creating your own B&W images.
Feel free to share your own processing techniques in the comments below.
About Author Denise Ippolito
Denise Ippolito is a full time award winning professional photographer, workshop leader, and artist living in New Jersey. Denise travels extensively presenting slide lectures and seminars and teaching photography and Photoshop. Her workshops feature a variety of subjects including: avian, flower, landscape and creative photography.
Denise’s love for nature started at an early age; she has always felt very passionate about wildlife. Knowing, that every living being, depends on the human race to conserve and preserve our natural environment. Through her photography she hopes to broaden awareness and inspire others to share her love for our planet and its resources.
In 2017 Denise’s image titled, Snow Globe was selected as the First Place "Winged Life" category winner for the BigPicture: Natural World Photography Competition. Her image of a Moseley's Rockhopper Penguin was selected as the "Birds" Category Winner in the prestigious Nature's Best 2016 Windland Smith Rice International Awards Competition. In 2015 she also won the Category for "Art in Nature" in the Nature's Best 2015 Windland Smith Rice International Awards Competition.
In 2010 and again in 2014, Denise received a Highly Honored award in the prestigious Windland Smith Rice Nature's Best competition. Also in 2014 one of her images was selected as part of the People's Choice Awards Top 50 Images in the BBC Wildlife Photographer of the Year Competition. She has also won several PSA (Photographic Society of America) awards. Her images have been published in the Wall Street Journal, magazines and books, sold as greeting cards, calendars and featured in a Sierra Club Documentary. Most recently, Denise appeared in an episode of Xploration Awesome Planet for Fox 5 television.


