Visual Wilderness
  • Get Started
  • Shop
    • SPECIAL OFFERS
    • STREAMING SERVICE
    • Browse by Topic
    • Learn To Shoot
    • Post Processing
    • Online Classes
    • eBooks
    • Landscape Photography Guide
  • Blog
    • Blog
    • Guest Photographers
  • About
  • My Account
    • My Account
  • Search
  • Menu Menu
  • 1Shopping Cart
Cover for night Photography blog post about photo stacking by Joshua Snow

Night Photography Tips for Photo Stacking

May 23, 2021/in Post Processing/by Joshua Snow

Night photography presents exciting opportunities for a landscape photographer to capture spectacular photos in the cloudless skies. With the technology advances in digital cameras over the last decade, night photography has grown rapidly in popularity. Today, landscape photographers can capture the night sky, the Milky Way, and northern lights with relatively inexpensive photography equipment.

Even if you have a fast wide angle lens with maximum aperture of f2.8 or higher, you are likely to use a high ISO setting on your camera to capture night photos. This introduces noise in your night photos. Pro photographers often rely on photo stacking technique and post processing to reduce the noise introduced by high ISO settings. Photo stacking workflow for night photography requires a number of different steps. Here are a few important lessons to successfully use photo stacking technique for night photography to produce a cleaner, brighter, and better photo of the Milky Way and the stars.

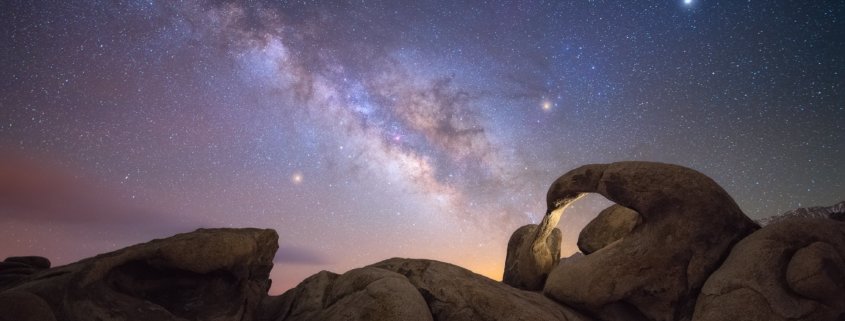
Milkyway Night Photography using Photo Stacking by Joshua Snow

Sky: ISO 10,000, ƒ/2.8, 14mm, 15 seconds~15 frames stacked in Starry landscape Stacker, Foreground: ISO 10,000, ƒ/2.8, 14mm, 30 seconds

Why Photo Stacking for Night Photography?

The technique covered in this article is called photo stacking, not for focus or perspective, but for noise. Digital noise is generated by using a high ISO setting on DSLR and mirrorless cameras to capture the low light after dark. This increased noise due to high ISO setting is random so, put simply, this technique adds up a bunch of noisy night photos and averages them out to create a much cleaner photo.

Noise comparison for Night photography by Joshua Snow

On the left: One single exposure at ISO10000, ƒ/2.8, 15 seconds – On the right: 15 frames stacked in Starry landscape Stacker. |

The main reason you may want to try this is if you’re creating large fine art prints because noisy photos do not print well. Sometimes night photos usually print 1-1/2 f-stops to 2 f-stops darker than they appear on your LCD or your monitor. To adjust for this, you must adjust your camera exposure by selecting an even higher ISO setting which increases the noise even more.

Photo stacking for night photography will dramatically reduce the noise if you’re willing to put in a little extra work. I promise… it’ll be worth it! Before we start, the following are some things you’ll need…

  • Intervalometer, or cable release
  • Sturdy camera tripod
  • DSLR or mirrorless camera
  • A small LED panel or lantern if you want to add artificial light to part of your landscape

Fieldwork for Photo Stacking

The photo stacking technique for night photography must start in the field. Take between 10-15 consecutive frames with camera exposure settings for night photos you are trying to capture. For example, aperture of f/2.8, shutter speed of 15-20 seconds with ISO setting 10,000 (I know it seems high but this ISO setting allows you to lower your shutter speed for sharper stars). The goal is to use a low shutter speed and get the sharpest stars possible… with consecutive camera exposures with no gaps in between. Otherwise, photo stacking is more difficult when trying to align all of the frames (remember the earth is always rotating). It is prudent to make sure that any in-camera high ISO noise reduction or long exposure noise reduction is turned off. While you’re at it, make sure image stabilization on your camera lens is also off. You don’t want the camera lens trying to steady itself while on a tripod or it can actually have an inverse effect.

Blur in long exposure for night photos by Josh Snow

Night Photography with blurry stars caused by image stabilization and/or motion of the stars..

If you’re using any artificial lighting to light up the part of your landscape, play with that to avoid over-exposing or causing hot spots on the landscape of your night photo. An alternative is to take a second set of camera exposures at a longer shutter speed specifically for the artificially lit landscape and blend it in.

Histogram in photography showing details in the shadows by Joshua Snow

Camera’s histogram of a night photo captured at ISO10000, ƒ/2.8, 15 seconds.

Once your exposure setting is locked in you will need to set your camera’s focus. Depending on how far you are from anything in the foreground, you can usually lock your camera’s focus at infinity. I usually use a bright star in live view, zoomed in 10x or more, and adjust the focus manually (using the focus ring on my camera lens) to make sure that all the stars are as round as possible.

Once you’ve done all of this… selected your night photography composition, locked your focus and set your camera exposure, and locked your camera down solid… you’re ready to take photos. Using a remote release takes between 10-15 frames (or more for better results) but I suggest starting here. Post post-process difficulty will increase with the number of frames your computer has to use to create a final night photo.

Post Processing for Photo Stacking

Basic Post Processing

When you’re back home in your digital darkroom, import your photos to your computer. Make your basic adjustments using your favorite RAW converter for the Milky Way and artificially lit landscape as needed. If you’re in Adobe Lightroom, make sure you turn sharpening off, but leaving color noise reduction on. This makes the finished stacked image look better. Once you’ve done all this, export the files as Tiffs, with no re-sizing or sharpening, to a location on your computer. Make sure you make a note of this location because you’ll need these photos in the next step.

Photo Stacking

Post processing for effective stacking for night photography doesn’t require a third party software but it really helps when trying to align, stretch, skew, and rotate frames to account for wide angle distortion and earths rotation.

If you’re on a Mac, I highly suggest Starry Landscape Stacker. It can be purchased in the App store. I have been using this software faithfully for more than three years and have created hundreds of print worthy images like the one below. For you PC users, you have a few choices to perform photo stacking for your night photos but the most convenient (and free) is “Sequator“.

In any case, take the time to thoroughly and precisely mask the sky from the foreground for night photography as outlined in the tutorials. Your finished product will be all the better for it. This technique takes a little practice and you may find you’re happy with a single frame from the set and don’t want to go through stacking. That’s ok! Its all about what you want out of your photos. Being out there under the stars is special no matter what.

Night photography photos stacking software.

Photo stacking software for Night Photos used to create foreground masks (in blue).

Here are a few night photos (below) created using the photo stacking workflow. For both these night photos I used different camera exposure for the sky and the foreground. I then stacked multiple images together using Starry Landscape Stacker and Photoshop.

  • Night Photography using Photo Stacking from Death Valley National Park bu Joshua Snow

    Sky: ISO10000, ƒ/2.8, 24mm, 15 seconds~15 frames stacked in Starry Landscape Stacker.

  • Night Photography using Photo Stacking from Colorado by Joshua Snow

    Sky: ISO10,000, ƒ/2.8, 14mm, 15 seconds~15 frames stacked in Starry Landscape Stacker Foreground landscape: ISO6400 rising moon helped illuminate), ƒ/2.8, 14mm, 30 seconds~10 frames stacked in Photoshop

As you can see that with a little knowledge and some practice, capturing stellar night images will be more than just a shot in the dark. You may find you’re happy with a single night photography frame from the set and don’t want to go through the process of photo stacking. That’s ok! It’s all about what you want out of your photos. Being out there under the stars is special no matter what.

About Author Joshua Snow

My Name is Joshua Snow, I am a Fine Art landscape and Night Photographer born in the Appalachian Mountains but raised in the Finger Lakes region of Upstate NY. In 2012 I had reached a weight of over 400lbs and during my journey of weight loss I discovered Photography and re-discovered the creativity that I had locked away while pursuing a career in Mechanical Engineering in the Aerospace field. Fast-forward to 2016 and a life-changing trip to Moab, my girlfriend and I decided we would do whatever it took to live here so that I could pursue my dreams of creating art, traveling the southwest and educating on photography. After a month, we had found a house, jobs and a sustainable future! Now I lead Photography workshops full time, all over the southwest, and here in Moab. My passions are creating art, traveling and teaching. I like to show people how connecting with a landscape can help make you a better photographer just by being there! On my workshops I help you see composition, pre- visualize a scene all the way through to the finished image, post processing from basics to advanced Adobe Lightroom and Photoshop, basic through advanced camera and capture techniques and a whole lot more. I specialize in advanced capture and processing techniques that can help elevate a photo to a work of art, that encompasses your vision, and creativity, but welcome photographers of all skill levels!

Website | Workshops | Facebook | Instgram | 500px

Tags: Night Photography
You might also like
When To Use High ISO for Nature Photography Blog Post by Kate SilviaNight Photography of Stars with Moonlight
Cover for Night Photography Blog post by Grant CollierA Beginners guide for Night Photography
Night photography of Northern Lights by Clint BurkinshawNight Photography Guide for capturing Northern Lights
Cover for Milky Way Photography blog post for beginners by Austin James Jackson.6 Practical Milky Way Photography Tips for Beginners
Landscape photography with Belt of Venus, Turret Arch and the La Sal Mountains in Moab, Utah by Grant CollierMagical Landscape Photography at Twilight Hour
Cover for Milky Way Photography Blog for Beginner by Jay PatelAn In-depth guide for Milky Way Photography for Beginners

NATURE PHOTOGRAPHY NEWSLETTER

Join 45,000+ Nature Photographers and get the free eBooks, free creativity course & discount codes right in your inbox.

loader

Note: We never share your email address with anyone. More Info.

Blog | Shop | About

 Email Policy  |  Privacy Policy  |  Terms

INFOCUS NEWSLETTER

Join 45,000+ other photographers and get the Free eBooks, Free Creativity Course & Discount Codes right in your inbox.


loader

Note: We never share your email address with anyone. More Info.

All Rights Reserved, © Copyright Visual Wilderness

Top 5 Spring Photography Tips to capture Compelling PhotosCover for spring photography blog post by Joshua SnowCover for Macro photography blog post by Peter DamEssential Macro Photography Equipment for Beginners
Scroll to top

This site uses cookies. By continuing to browse the site, you are agreeing to our use of cookies.

OK

Cookie and Privacy Settings


How we use cookies

We may request cookies to be set on your device. We use cookies to let us know when you visit our websites, how you interact with us, to enrich your user experience, and to customize your relationship with our website.

Click on the different category headings to find out more. You can also change some of your preferences. Note that blocking some types of cookies may impact your experience on our websites and the services we are able to offer.

Essential Website Cookies

These cookies are strictly necessary to provide you with services available through our website and to use some of its features.

Because these cookies are strictly necessary to deliver the website, refusing them will have impact how our site functions. You always can block or delete cookies by changing your browser settings and force blocking all cookies on this website. But this will always prompt you to accept/refuse cookies when revisiting our site.

We fully respect if you want to refuse cookies but to avoid asking you again and again kindly allow us to store a cookie for that. You are free to opt out any time or opt in for other cookies to get a better experience. If you refuse cookies we will remove all set cookies in our domain.

We provide you with a list of stored cookies on your computer in our domain so you can check what we stored. Due to security reasons we are not able to show or modify cookies from other domains. You can check these in your browser security settings.

Other external services

We also use different external services like Google Webfonts, Google Maps, and external Video providers. Since these providers may collect personal data like your IP address we allow you to block them here. Please be aware that this might heavily reduce the functionality and appearance of our site. Changes will take effect once you reload the page.

Google Webfont Settings:

Google Map Settings:

Google reCaptcha Settings:

Vimeo and Youtube video embeds:

Privacy Policy

You can read about our cookies and privacy settings in detail on our Privacy Policy Page.

Privacy Policy
Learn More
NATURE PHOTOGRAPHY NEWSLETTERJoin 45,000+ Nature Photographers

Unlock Your Photography Potential! Get Free Webinars, Tips, eBooks, and More Delivered Straight to Your Inbox! 📸✨

We never share your email address with anyone. More Info.

Enter your email address