Why you should look beyond HDR Software for Nature Photography
“Why should I learn to use Photoshop Layers and Masks? Can’t HDR (High Dynamic Range) software do all of that for me?” Well… if somebody will hand me my soapbox, I’ll step up and answer that question.
Here we are in the digital age. It’s an era of high-speed internet, smart phones, and instant gratification. We want quick solutions. Click-of-a-button answers. But post processing for nature photography isn’t always that easy. With nature photography, it’s important to remember that sometimes we have to slow down, take a moment, and think about the details.
For whatever reason, more and more photographers today are abandoning the ART of post processing. Instead, they’re jumping directly to software plugins or specialized programs that process images with just few sliders. Consider the HDR software that’s available today. It’s easy enough, right? Simply choose your preset and whamo. It’s all done for you. And, I admit, it’s cool stuff. Varina and I even use some of this technology, in conjunction with Photoshop.
But what if you want to create something specific? What if your artistic vision falls outside the scope of the software’s ability to create a finished nature photo for you? When you get to the point where presets aren’t enough, you need to learn how to use Photoshop Layers & Masks. Take the time to really understand the software’s functionality. If you do this, you’ll find that you are no longer limited with what you can do in creating stunning photos. Here are few reasons why we use Photoshop Layers & Masks to process our nature photos.
Controlling Polarization Using Photoshop
It’s incredibly easy to blend images into a single finished image with a broad dynamic range with any HDR software. As a photographer, you don’t have to do a lot of thinking. You simply play with the sliders until you are happy with the results. But what if you want to achieve something more complicated such as blending a polarized camera exposure with an unpolarized camera exposure, for example?
I took the first image (below) without a polarizer. Notice the clear reflection in the water. I took the second photo below with a circular polarizer. Notice the rich tones in the rocks and trees behind the pool. To get to the final image, I selectively blended the two images below using Photoshop Layers and Masks.


Image #1: Camera exposure WITHOUT circular polarizer to capture reflections in the pond, Calf Creek Falls, Utah

Image #2: Camera exposure WITH circular polarizer to minimize glare on wet surfaces, Calf Creek Falls, Utah
With a working knowledge of Photoshop Layers and Masks, I can blend dynamic range like most HDR programs do, but I can also do so much more. I can blend images with different color balances. I can work with polarized and non-polarized images. I can target adjustments so that they only affect the areas where they are needed. Take a look at the final image below from Calf Creek Falls.

Finished Photo: Calf Creek Falls, Grand Staircase-Escalante, Utah created using Photoshop layers & masks
Controlling White Balance in Nature Photography
As much as I love to shoot Glen Canyon Recreational area around Paige, Arizona, this is a challenging place to get a good photography composition. To create an interesting photography composition for the following shot, I used a small puddle of water to catch the reflection in the sky. As you can imagine, this was certainly not an easy shot to process.

Creating point of interest with nature photography composition at Paige, Glen Canyon Recreational Area, Arizona
Initial Challenge
My first challenge was to capture the photo. As soon as I looked at the histogram on the back of the camera, I knew that I needed to use exposure bracketing to capture the entire dynamic range. The question was, how much exposure bracketing was necessary? For this photograph, I then adjusted the bracketing amount based on my camera histogram for each of the three exposures. My objective was to capture enough details in the highlights and shadows to be able to successful blend the exposures in Photoshop. In the end I came away with three bracketed camera exposure that were 1.3 f-stops apart.
My Second Challenge
Once I captured the actual photos, I was then faced with my second challenge. I manually blended different camera exposure to bring out the colors, contrast and details in every part of the image . Then, I processed the +1.3 f-stop camera exposure a second time to bring out the details in the reflections on the puddle of water. I created an additional blending layer for the “portal” using the Photoshop layer masks as shown below.


+1.3 f-stop camera exposure processed for the reflections – Paige, Glen Canyon Recreational Area, Arizona

Photoshop mask to blend the reflections


The Photoshop layer and masks allowed me to make adjustments only to the reflected surface, leaving the rest of the image unaffected. I adjusted the edges of the mask to create a smooth blend between the textures of the rock and the puddle. My final task was to make minor targeted adjustments to the image in Photoshop. I used my Wacom Intuos 5 tablet and stylus to adjust the overall contrast and to make small corrections to the sky and the portal as seen in the image below.

Photoshop Layers and Mask workflow for Nature photography from Glenn Canyon Recreational Area, Paige, Arizona
HDR software would allow me to combine camera exposures for dynamic range. But I needed to go beyond that to control the white balance. You can still use HDR software to combine camera exposures, but it takes more to successfully control the white balance and fine tune your images to produce spectacular results.
Selective Exposure Blending with Photoshop Layers & Masks
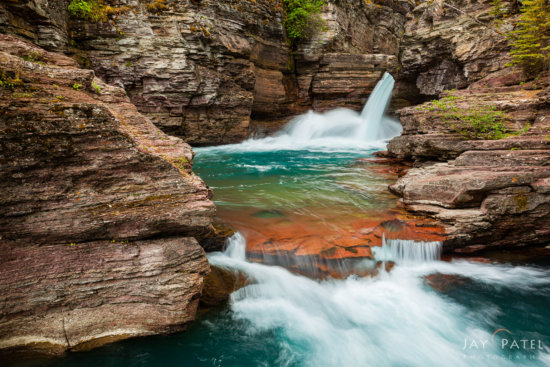
HDR software works great for overall images, but what if you want to blend only specific areas of the image? Here’s an example from St. Mary’s Fall in Glacier National Park.

Landscape photography created with exposure blending in Photoshop using layers and masks – Glacier National Park, Montana
Because I was shooting on an overcast day with soft light, a single camera exposure was able to capture all the details in the photo. However the highlights in the waterfalls which were far too overexposed (but not clipped) based on the histogram on my DSLR camera. I was confident that I could restore the highlight in the post processing. First I used Lightroom to process the photo for the midtones and shadows (Image #1 below).

Image #1: RAW Format file processed for the shadows – Notice that the highlights are over exposed.

Image #2: Camera exposure for highlights in the flowing water – Glacier National Park, Montana


I then used Lightroom processed the RAW format file for the highlights in the rushing water (Image #2 above). You can see incredible amount of details in this highlights, but the shadows are under exposed and lacked the details and contrast. A HDR software would have blended the entire image. Using Photoshop layer and masks I was able to precisely control where and how much blending occurs. Photoshop Layer and Masks gives me the ability for manual exposure blending and also apply additional adjustment to fine tune the image. Furthermore, I can make these adjustments using a non-destructive workflow in Photoshop. Photoshop also allows me to turn the layers on and off to see exactly what effect they have on one another and on the final landscape photo. I can also refine Layer and Masks in Photoshop to correct my mistakes. I often save the image as a PSD or TIFF file – with all those Photoshop layers and masks intact – and return to it a few days later to make final corrections with fresh eyes.
There’s no doubt that HDR software has evolved and become very sophisticated. It’s certainly a tool that can help you with exposure blending. But (here comes the soapbox again briefly)… it is still important to learn how to manually blend images using Photoshop layer and masks to fine tune your photos. Simply relying on a one-click solution will likely be limiting to your nature photography. You can take your photos much further creatively when you learn to step away from the single click and into a more manual blending process.
About Author Jay Patel
I could startoff like this – “Seeds of Jay Patel’s appreciation for beautiful places were planted early in his childhood….” but it would get boring really fast. I will just sum it up and say that I am a Landscape and Wilderness Photographer who loves to capture dramatic light. My photographs have been published in various magazines, calendars and advertising materials throughout the world.
Patience is a virtue...unless you are chasing your dreams


