Tips for Creating the Perfect Sunstar for Landscape Photography
Incorporating the sun in your landscape photography can provide some stunning visual benefits. Compositionally, the sun can serve as a strong point of interest, drawing the viewer through a scene as the eye follows the sun’s light to its source. When foliage or flowers are backlit, they tend to glow with exciting luminosity and color. Light shining through moving elements can emphasize the dynamics of an image. With the sun visible in a scene, these benefits become possible, but they involve some distinct challenges. In addition to having to manage a high dynamic range within the overall scene, there is the issue of presenting the sun itself in a manner that is aesthetically pleasing. One solution to this problem is to render the sun as a shining star, which is essentially what it is! Here are some tips for how to go about it.

Afternoon Delight by Erin Babnik
#1: Use a small aperture and a quality lens
Not all sunstars are created equal. Most camera lenses will produce a more elegant sunstar at their smaller apertures, such as f/22. In the samples below, note how as the lens stops down, the rays of the sunstar consolidate more. At very wide apertures (not pictured), rays may not appear at all, while apertures in the middle of a lens’s range may create a sunstar that appears frayed and somewhat busy. At f/22, the rays produced by this lens (the Canon EF 16-35mm f/2.8L) are long, slender, and simplified. Of course, different lenses produce different qualities of sunstars so you may want to purchase your lenses accordingly. It’s a good idea to search for samples of sunstars that a lens can produce as part of your purchasing research.

Three sunstars created with the Canon EF 16-35mm f/2.8L lens set at different apertures. A f/13, many of the star’s rays appear frayed, with multiple spikes appearing alongside the main ones. At f/22, when the lens is completely stopped down, the rays consolidate into 14 elegant spikes.
#2: Hide part of the sun
Although it’s possible to create a sunstar when the sun is completely visible, the result is often quite emphatic, allowing the sun to overwhelm a composition. Hiding part of the sun behind the hard edge of another element can take some of the power out of it and allows the rays produced by your lens to be more visible.

Sunstar created in a rain forest – Embrace by Erin Babnik
#3: Size matters
When it comes to including a sunstar in your landscape photography, sometimes less is more. Even a tiny sunstar twinkling in the distance can be quite effective in some compositions, providing just enough emphasis to indicate the source of the light and to delight the eye when it gets there. A larger sunstar tends to attract a lot of attention, so it is usually best to place larger sunstars where they help to emphasize other strong points of interest rather than where they compete with them. You can do this by placing a larger sunstar against large elements and by keeping the rays of the sunstar from interfering with delicate details. You can control the size of a sunstar by hiding more or less of the sun behind another element.

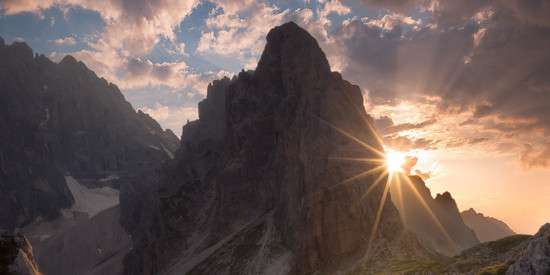
Landscape photography with Sunstar by Erin Babnik
#4: Shoot a sunless exposure to remove flare
The colored circles and polygons of lens flare that accompany a sunstar can be distracting in landscape photos; they can be used to creative effect, but often detract from more interesting qualities of the scene. Simply removing lens filters and cleaning your lens’s front element can do a lot to reduce flare, but usually some flare still appears along with a sunstar.
In order to edit out these anomalies in post-production, it’s helpful to have an exposure of the scene where they do not exist. If you shoot an extra exposure with the sun obscured, then you will have the option to blend in ‘clean’ parts of the scene over those areas with distracting flare. For example, if there are some clouds in the sky, you may catch a moment when they diffuse the sun enough to prevent flare. Alternatively, you can cover the sun yourself with your finger, which is at least useful for removing flare in more distant parts of the frame. Blending out flare very close to a sunstar can be tricky, but if you have the ‘clean’ exposures, then at least you have the option to try.
With these tips in mind and the right lens, you easily create a near perfect sunstar for landscape photography. If you would like to share suggestions for lenses that produce particularly attractive sunstars, please feel free to include them in the comments. And as always, other comments on the topic are very welcome as well!
About Author Erin Babnik
Erin Babnik is known for her ambitious and expressive style of photography and for her adventurous approach in the field. Her dedication to the medium of photography evolved out of her years working as an art historian and archaeologist, photographing in museums and in archaeological sites throughout Europe and the Middle East for the purposes of teaching and research. She subsequently spent years producing photographs on assignment and for licensing, all the while expanding her personal photographic excursions to increasingly remote outdoor locations. She now works as a full-time landscape photographer, traveling extensively from home bases in both California and Slovenia and teaching photography workshops on both continents. Erin also draws upon her background in art history in her writing about photography, which appears in a variety of publications.


Thank you so much Erin, you really opened my eyes on this subject. I was wondering what makes some of your photos (and photos from other photographers) so special and sunstar is a part of the answer.
I was already reducing aperture to create stars on the city lights, but I wasn’t really aware that we can do the same with the sun itself and that we can also take so much influence on it with a even smaller aperture.
As you said, I also realized that the lens and how it is built is playing a great role in this. I almost thought this wonderful and very precise stars were added in photoshop but now I know they’re for real :)
I always tell everyone that it is not the gear but the know how that makes great photos, but on this one I have to admit that gear is relevant.
A friend of mine owns the nikon 16-35 f4 and do really great sunstars at f22. I would like to step up with full frame equipment and I think the canon 24-70 f2.8 ii and its very precise sunstars would be great for me.
Until then, I already started to shoot for sunstar and it’s really exciting to place the sun where you want it to be and fire the shots before it’s gone. To optimize the quality, I first shoot at f22 to create the cleanest sunstar possible. I then shoot at around f8 because the sharpness at f22 is not good at all with my lens. As shooting towards the sun always implies great dynamic range, I end up with a lot a shots, but eh, that’s part of the game!
Thanks again, I hope to read other great tips from you in the future