
An In-depth guide for Milky Way Photography for Beginners
At the time of this writing we are nearing the end of the 2020 Milky Way season. While technically one can see portions of the Milky Way year-round, it roughly the period between March and October that the bright core of the galaxy rises above the horizon. As such, this article will focus mainly on necessary essentials for a successful Milky Way photography, not only in terms of gear and accessories but a few valuable field techniques as well.
It is often said that the best photography equipment is that which you have with you at the time. This is certainly true. Nonetheless, there are certain items for night photography that are essential, and others simply preferred. But for those exploring this exciting genre for the first time, simply evaluate what you currently own and consider how to best employ it as you contemplate recommendations in this article. You can later consider some of these suggestions as you add to, or upgrading your gear, with starry night photography in mind.

Milky Way Photography by Craig McCord
Photography Equipment to Shoot Milk Way
Is my Camera Good Enough?
DSLR and mirrorless camera technology, specifically regarding sensors, has come a long way in the last 6 or 7 years. Today’s DSLR and mirrorless cameras can handle high ISO settings far better than in the past. Full-frame digital sensor cameras may have an edge over APS-C sensors because of they have larger pixels and have slightly better dynamic range. However, with advances in the recent and growing number of APS-C sensor cameras, the difference is becoming much less a concern.
So, what should you really look for in a camera for Milky Way Photography? I would say research sensor capability in term of ISO of at least 6400 or more, which should be easy these days. It is not as much the megapixels as it is the sensor’s ability to handle and control noise at high ISO settings. If I were shopping today for a camera knowing I wanted to get into Milky Way Photography, I would recommend considering a full-frame body. This gives you the advantages of both the details capturing ability of the lager pixels and the higher ISO light performance. A number of camera manufacturers are producing cameras capable of quality night photography performance. If you own a recent APS-C sensor camera system, you will likely do just fine. Do not be afraid to put it through its paces.

Milky Way photography in the Desert
How should I choose my Camera Lens?
This is an important question. Night photography, whether Milky Way, star trails or night sky features, must have the sky as a dominate element. As such, a wide angle lens is most desirable, if not imperative. Certainly, there are occasions where a normal or even a moderate telephoto could be used, but the focus here is more toward the more common and popular applications.
When considering a wide angle lenses for this purpose, consider two important factors: a focal length of 24mm or wider; and a wide aperture of f/2.8 or faster. These are both important. The focal length because it will allow a larger area of the sky to be included in your composition and the aperture will allow sufficient light capture at appropriate ISO settings for the Milky Way Photography.

Milky Way over the Grand Tetons National Park with clouds to add a bit of drama.
I often advise those contemplating a new lens to purchase the best glass their budget can afford. My admonishment, I explain, is that the best and most expensive camera available will produce image quality that is somewhat a function of the optical quality of the lens. That said, you do not have to use cost as the barometer for quality, particularly for night photography.
If an expensive 24mm camera lens with f/1.4 aperture may performs quite poorly in night photography because of its poor chromatic aberrations between f/1.4 and f/2.0. Conversely, expensive wide angle lenses from Rokinon or Samyang come with high quality optics with very little or no chromatic aberrations at its widest aperture. In fact, every night photographer I know that does a considerable amount of Milky Way photography owns at least one of these lenses. However, these camera lenses are totally manual. This may take a little getting used to, but the quality and moderate expense combine to make them a valuable consideration.
Other than my thoughts on the camera lenses above, I do not like to make specific recommendation because options are continually changing. A few years ago, the camera lenses choices for Milky Way photography were more limited. Now however, camera and third-party manufacturers are keying in on the growing popularity of night photography. My advice would be to do your research for an informed decision.
Exposure for Milky Way Photography
Controlling Noise for Night Photography
Exposing for the Milk Way photography is really is not complicated. The most common error I observe during my workshops is under exposure. Beginner night photographer are hesitant to use ISO settings high enough to ensure proper results, fearing they will interject too much noise. The result is often an image too dark. Then when trying to compensate in post processing more noise is introduced than would have been the case if an appropriate higher ISO were used during the initial capture.

Night photography with light painting at ISO 6400
Exposure Settings
Realize you are capturing a photo of the Milky Way. There is very little light except for the stars in some cases. This is what mandates a fast camera lens, f/2.8 or faster as I mentioned earlier. You will be shooting wide open or maybe stopped down from f/1.4 to f/2.0, depending on lens. This will allow you to collect sufficient light within the constraints of the two remaining factors.
Even at a wide-open aperture you are likely to need to set your ISO between 3200 and 6400 during the darkest of night, 1 ½- 2 hrs after sunset to 1 ½ – 2 hrs before sunrise depending on your location.
You have your ISO and aperture set so now what determines the length of your exposure? Understand that your light meter is of no use during Milky Way photography to determine proper shutter speed. There is an easy rule of thumb here. It is based on the need to capture the stars as points of light. Remember the stars are moving through the sky. Well, really it is earth rotating. But the point is you do not want to set your shutter speed so star look as sharp as possible. So the shutter speed for Milky Way photography is based on the focal length of your camera lens.
A common rule is what is called the “500 Rule”. Expressed in a formula: 500/focal length = max exposure time. This is based on a full-frame sensor, so if you have a cropped sensor, you need to adjust by multiplying your crop factor by your lens focal length (1.5 x 16mm= 24mm). Then use the result in the 500 rule. Good news is you only have to do this once and you will always know what the max time is for that given lens.

Camera histogram for Milky Way photography
Also, learn to use your histogram. Beginner night photographers often tend to underexpose because they rely on their LCD to gage their camera exposure. Remember that it going to be quite dark and your eyes have adjusted, and you are now looking at an backlit LCD. You may think your exposure is beautiful and perfect. Trust me…it likely is not. Your histogram should look somewhat as in figure to the left. If you are all bunched up to the left, you are under exposed. I tell people there are two rules in exposure, and they are especially true in night sky photography.
- Rule#1: Trust your histogram.
- Rule#2: When in doubt, refer to rule #1.
Focusing Setting for Milky Way Photography
One of the most unnerving challenges at night is obtaining accurate focus. There are several techniques to use but it is important that your stars be rendered as points of light. So, it is crucial that you know where infinity is on your lens. This can vary from lens to lens and many can focus beyond infinity. Auto focus will often be of no use in the dark. Sure, you could auto focus on the moon if it is out but during Milky Way photo sessions, you will not likely have this option available. So, what do you do?
One method is to autofocus on something like the horizon when you still have light. Then, using gaffer tape, tape down your focus ring so you cannot accidently move it during your night session. Once secured, turn off your autofocus. If you have the capability, it is also a good idea to program your focus away from your shutter to a back button on your camera. Touching your shutter button and activating your auto focus will absolutely drive you crazy during a night session.
")
Milk Way photography focus set using the rim of the volcano – Volcanoes National Park, Hawaii (HI)
Another method of focus, and my favorite, is to magnify your LED to 10x and find a bright star to focus on. Rotate your focus ring slowly back and forth until you can see the star at it smallest point. Then you can tape it down again as described above.
Third method is to set your focus at hyperfocal distance. This method is particularly useful when in Night photo of Mt. Hood shown above where there is close foreground you are trying to capture.
In many cases once you have your focus set, you do not need to change it. But it is imperative you disable your camera’s autofocus, less you become quite frustrated when you have to refocus in the dark. If you have to change your focus setting after dark, there is a simple trick you can use to reset your camera focus setting at infinity or at hyperfocal distance using two piece of gaffer tape.


Focus setting marked at infinity using gaffer tape on your camera lens for Night Photography.

Focus adjusted for a foreground element. Marking allows easy return to infinity focus.

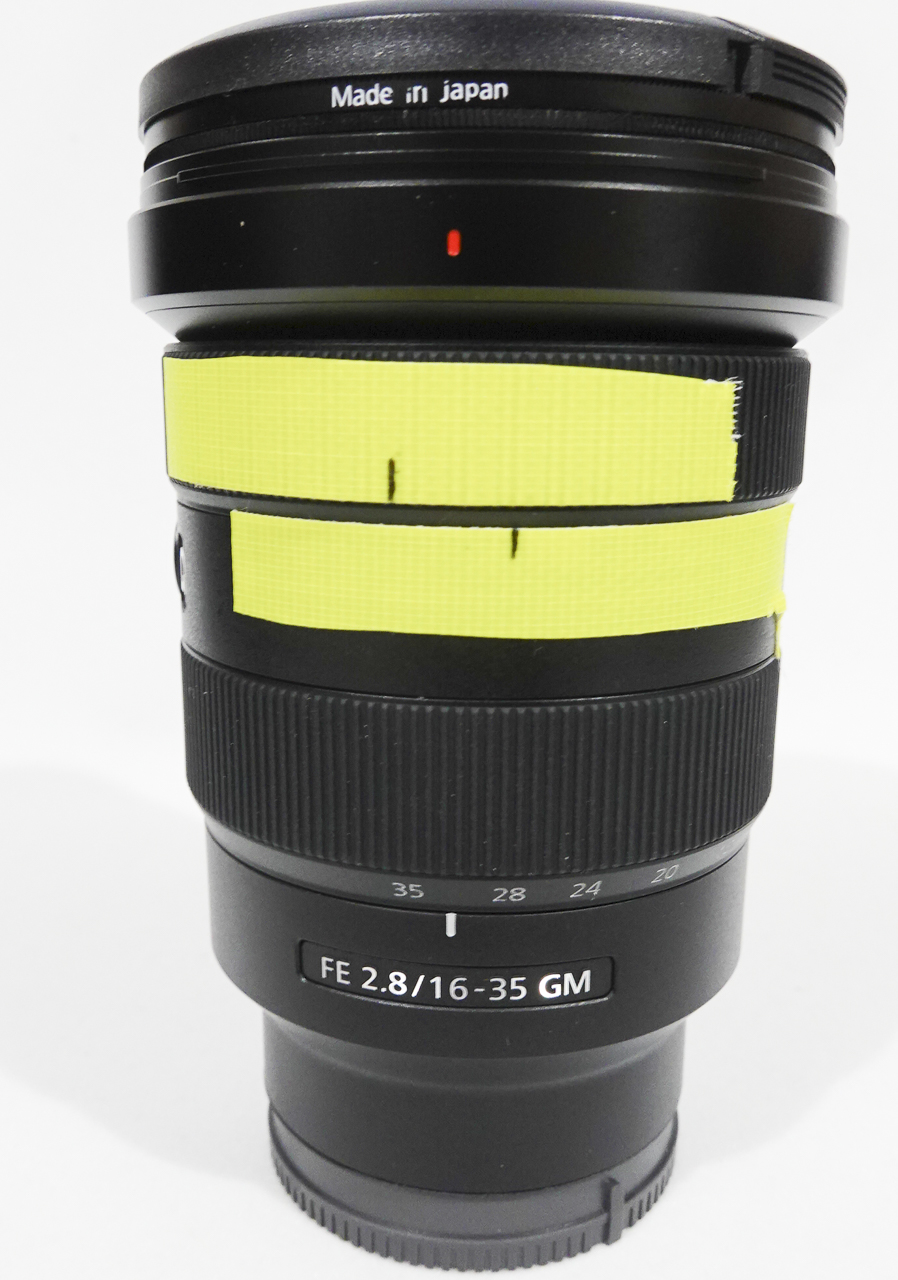
One is placed on the focusing ring, the other on the lens barrel. Focus on infinity. Then using a fine-point Sharpie, mark the spot on both strips of tape. Now, you can adjust focus for a foreground shot and easily return to infinity by realigning your marks. For additional assurance you can magnify your LED presentation for fine tune. This makes returning to infinity an easy task.
Other Photography Accessories
Do I need a Tripod?
A tripod of course is essential and night photography. This is another area I find beginner night photographers making a mistake. They purchase an inexpensive tripod that is incapable of keeping their camera steady, even in the most ideal conditions. You will be making long exposures, often as long as 30 seconds for Milky Way shots and without a sturdy tripod, Milk Way photos will b. Carbon fiber tripods are popular because of their strength and light weight. But they come with a hefty price. You can find aluminum tripods, good ones, for a fraction of the price of carbon fiber. Of key importance though is that your tripod must be sturdy enough to adequately do its job, even if conditions are a little breezy.
Can I live without a Cable Release?
An electronic cable release is highly desirable. A cable release allows you to activate the shutter without touching the camera and enables you to lock the shutter open for long bulb exposures. Sure, you can use a 2 second timer setting on your camera but that restricts your flexibility.
Going a step further I would suggest investing in an intervalometer. This allows control over exposure length, time between exposures and the total number of exposures. This could be useful when planning star trails with stacked Milky Way photos.
How do I see things in the Dark?
A headlamp with a red and white LED feature allows you to use the white light to hike to or from your location, while the red light can be used when needed during during Milky Way photo shoot, preserving your night vision. I even wear a small inexpensive Celestron night vision flashlight around my neck that comes in real handy while on location.
Night sky photography can be addicting!! But get out and give it a try. You will be hooked.
Do you have any questions about Milky Way or Night Photography? Feel free to ask in the comments below:
About Author Craig McCord
I am a fine art black and white landscape photographer born in 1951 in Jacksonville, Florida. My photographic interests began in the early 1970’s. Over the years, I emersed myself in black and white photography after build-ing my own darkroom in my home basement.
Selections of my work exist in private and corporate collections. In 2016 the National Park Service highlighted my work as part of their centennial celebration and now have several large prints of my work on display in a Missouri regional park headquarters. I recently received recognition in Black and White Magazine, Black Box Gallery, Monovision Photography Awards,


