How to bracket your photos for Landscape Photography
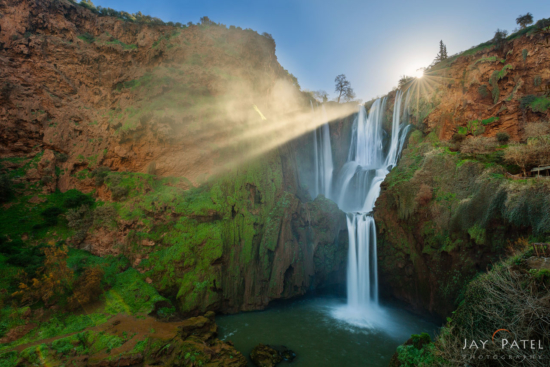
When you see a landscape photo like the one below, you feel like you can almost step right into the scene. You can imagine hearing the crashing waters and the sweet tropical smell in the air. One may almost squint with the beaming light as it shines over the silky white cascades. How can one create such a natural looking image of this spectacular landscape photography location? The secret is learning how to bracket photos for landscape photography.

Landscape photo captured with exposure bracketing from Ouzud, Morocco
As you may have guessed, images like these require more than a single shot. If you want to capture all those tropical details, you will have to learn how to bracket camera exposures. The idea of how o bracket seems pretty simple. Point your camera at the scene. Then, take an underexposed and overexposed shot. Afterwards, blend them together in post-processing. However, life is rarely that simple. When I pointed the camera at the waterfalls, this is what I saw:


Bracketed photo for highlights using under exposure of -1.67 F-Stop

Neutral exposure based on camera’s exposure meter at 0 F-Stop

Bracketed photo for shadows using over exposure of +1.67 F-stop


How to Bracket your Photos in the Field
If I had relied on my camera’s automatic exposure bracketing option and simply taken one overexposed and one underexposed shot, it would be a mistake. I would have to work a lot harder in Photoshop or Lightroom to bring out details in my shadow and highlights. If you have blown highlights or clipped shadows you may not be able to recover them in post processing making it impossible to create the high dynamic range (HDR) photo that you envision. In this case the darkest photo does offer some details in the highlights, however the area around the sun is still pretty severely blown out (more so than I would like).
So I decided to manually override my camera’s default exposure bracketing settings. I followed a simple exposure bracketing workflow to capture this landscape photo:
- First, I set my aperture and ISO setting to ensure that everything in the image was in sharp focus. Moreover, I was careful to capture the photo at the lowest possible ISO setting on my DSLR camera. This is to keep the noise level to a minimum.
- Next, I paid close attention to my histogram in camera using the LCD so that I could determine where and how to set my exposure bracketing range to capture all the details in the shadows and highlights.
Eventually, I decided to manually override my camera’s default bracketing settings and ended up taking these bracketed shots:

Bracketed photo for highlights using under exposure of -3.34 F-Stop
Bracketed photo for the center under exposure of -1.67 F-Stop
Bracketed photo for shadow using a neutral exposure of 0 F-Stop

In theory, exposure bracketing for landscape photography seems very simple. Take two or more photos with different camera exposures until you have captured all the required details needed to create the final photo. Although, as simple as this may sound, mistakes can render your exposure bracketing ineffective. Here are some of these possible mistakes that landscape photographers should avoid when using exposure bracketing to capture a high dynamic range (HDR) scene:
#1: Not knowing how much exposure bracketing is needed
Should I use 2-Stop Bracketing or 1-Stop Bracketing? How do you know if the exposure bracketing setting you are using is correct? I use a simple 4-Step workflow and histogram on the back of our camera to determine exactly how much exposure bracketing is needed for landscape photos. This simple technique ensures that I capture enough details in both shadows and highlight to create the final image without having to resort to extreme post-processing adjustments.
In the Ouzud how to bracket example above, if I used only 1-stop exposure bracketing (instead of using 1.67 Stops) there may not have be enough details in the shadow. Moreover, some of the highlight may even have be clipped and not recoverable in post-processing. So it is critical that you know exactly how much exposure bracketing is needed for landscape photography.
A histogram on your DSLR or mirrorless camera is the best way to evaluate your exposure for landscape photos you are trying to capture. Quickly changing ambient light in landscape photography makes it nearly impossible to properly evaluate your camera exposure using the LCD. This is why we rely on histograms in camera to determine proper exposure and bracketing range or our photos. Using your histogram on your DSLR or mirrorless camera’s LCD make sure that your darkest image has proper details in the highlight and your brightest images has proper details for the shadows.
#2: Not Using a Tripod
Moving the camera between exposure bracketing is one of the worst things a landscape photographer can do. The more camera motion there is between the bracketed photos, the more difficult it is to align these photos in Photoshop or Lightroom. This camera movement makes the blending of the bracketed shots a tedious task. You can always rely on Photoshop or Lightroom to do automatic alignment for you, but this is not always perfect and you lose sharpness when you attempt to distort the bracketed shots to align them together. The easiest way to get around this problem is to use a stable tripod for exposure bracketing.

High ISO Setting used to freeze the motion of the flowers for exposure bracketing.
#3: Not preventing camera shake
Even when you are using a tripod, it’s best to use a remote release. Why? Because you can accidentally move your DSLR or mirrorless camera when using the shutter release button. This problem is likely to happen if your tripod is not stable. This can easily occur if it is a lightweight tripod or you are standing on ground that is not firm. The simplest way to avoid the problem is to use a hands-free exposure bracketing mode (if your camera supports it) using a 2-sec timer. This is where the camera captures all the bracketed photos after a short delay. Another alternative is purchase and use a remote release. Having a remote release will allow you to capture all the bracketed photos without having to touch your camera.
#4: Not paying attention to subject motion
Subject motion can make your exposure bracketing ineffective by creating ghostly halos when you try to use a HDR in Lightroom or Photoshop to merge them together. Use of a tripod or remote release will not help to overcome subject motion in landscape photography. Avoiding subject motion may be easy to say, but it’s harder to achieve and sometimes even impossible. In landscape photography, the motion of plants and trees due to wind has a potential to ruin your bracketed photos.

Landscape photo captured using a single camera exposure to avoid ghosting problems with the mist.
If you are photographing near the ocean, wave motion poses a problem when you try to use the merge-to-HDR function in Lightroom. Here are few ways to get around the problem of subject motion during exposure bracketing for landscape photography:
- To avoid subject motion is to use a SINGLE RAW image to capture the entire dynamic range of your photo. However, this solution is not always possible.
- Use a graduated neutral density (GND) filter to reduce the dynamic range of the scene you are trying to capture so you do not need exposure bracketing. GND filters have their drawbacks and it is best that you understand these before trying to use them.
- Use a fast shutter speed to freeze the motion of your subject. This can be accomplished using a small aperture or high ISO setting on your camera. Make sure that you pay attention to your Depth of Field and noise in your landscape photos when using this technique.
- Try to eliminate ghosting in post processing when attempting to merge your bracketed photos into a HDR photo. Both Lightroom and Photoshop have automated algorithms that will help you eliminate ghosting but these algorithms are far from perfect.
We use histograms in photography to determine proper camera exposure. Oue exposure bracketing workflow using histograms on your DSLR and mirrorless camera helps us determine when we can get away without bracketing and your camera’s automatic exposure bracketing mode may not produce the results you are looking for.
If you’d like to learn how you can be confident when it comes to bracketing images, we have several landscape photography tutorials just for you. We will walk you through a simple, non-technical workflow to help you to determine the exact bracketing range needed to capture all the details in your image using your camera’s meter and histogram.
About Author Jay Patel
I could startoff like this – “Seeds of Jay Patel’s appreciation for beautiful places were planted early in his childhood….” but it would get boring really fast. I will just sum it up and say that I am a Landscape and Wilderness Photographer who loves to capture dramatic light. My photographs have been published in various magazines, calendars and advertising materials throughout the world.
Patience is a virtue...unless you are chasing your dreams


