Landscape Photography Tips to capture High Dynamic Range Photos
Zack Schnepf is a full-time professional landscape photographer who (as you may have guessed) specializes in fine art landscape photography and Photoshop processing. Zack has been teaching Photoshop for over 15 years, photography for over 11 years, and comes from a strong artistic background. He was kind enough to share with InFocus Magazine his ideas on how to photograph high dynamic range images.
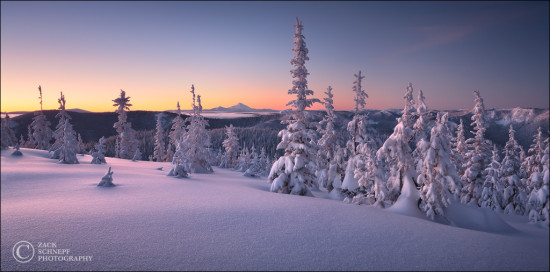
I think most photographers like to capture their landscape images in one exposure whenever possible and I do as well… when I can. But some of my most compelling images are captured in high contrast light. Capturing high dynamic range (HDR) images has become a specialty of mine. It involves a fair amount of advanced post-processing, but it also requires good field technique. Even if you’re not ready to process multiple exposure images, you may want to down the road as your skills grow.
It’s a good idea to at least try to capture some bracketed exposures of high dynamic range scenes. Even if you’re not combining multiple exposures, it’s nice to have a few exposure options to choose from later. Here are five tips for bracketing exposures and capturing HDR scenes.
1. Use a good tripod.
A good solid tripod is one of most useful tools in landscape photography, but even more so when shooting multiple exposures. Regardless of what post-processing software you use, you’ll want all of your exposures to line up correctly. There are auto alignment functions in Photoshop and other post processing software, but it doesn’t always work well. A solid tripod ensures your camera equipment holds perfectly still between exposures.
2. Shoot in aperture priority mode or manual mode using shutter speed as your variable function.
I almost always use shutter speed as my variable function when bracketing. Normally I want a continuous aperture throughout my exposures. This ensures I have the required depth of field to retain sharpness throughout the frame. For this reason, it makes sense to use either aperture priority or manual mode when capturing multiple exposures. I recommend trying manual mode once you feel comfortable in aperture priority. Shooting in manual mode affords opportunities that are not available in aperture priority. I’ll explain more in tip #4.

3. Try to capture the full dynamic range in as few shots as possible and use your histogram to make sure you captured enough detail in your shadows and highlights.
When blending multiple exposures in Photoshop, I like to make it as easy as possible. Working with as few exposures as possible helps to simplify the process. A histogram is the best way to evaluate your exposure in the field. The changing ambient light makes it impossible to properly judge exposure on your camera’s LCD. Thankfully, all DSLR cameras have the ability to display a histogram when reviewing your images. Here is what I look for when capturing multiple exposures in the field:


I want my darkest exposure have some space on the right side of the histogram. This indicates that I’ve captured plenty of information in my highlight tones.
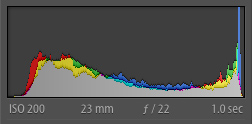

I want my lightest exposure have some space on the left side of the histogram. This indicates that I’ve captured plenty of information in my shadow tones.
4. You can use the auto bracket function on your camera, but you have more control over each individual exposure if you shoot in manual.
When students are just starting out with bracketing, I advise using their camera’s auto bracket function because this is the simplest way to capture bracketed exposures. Your camera captures a series of exposures at regular intervals. For example, one stop between each exposure. Once comfortable with auto bracketing, I urge students to attempt photographing in manual mode which gives them more control of each individual exposure. Sometimes it’s advantageous to be able to bracket exposures manually at irregular intervals. Maybe two exposures one stop apart and a third exposure two stops darker. Tip #5 is a good example of when manual bracketing is preferable.
5. If you have a moving subject, capture it in one frame if possible.
Moving subjects are one of the biggest challenges when capturing bracketed exposures. When I’m photographing a scene with moving clouds or rolling waves, I try to capture the clouds or waves in a single exposure. Otherwise, it’s extremely hard to get the moving things to line up. This is a great example when manual bracketing has a huge advantage.
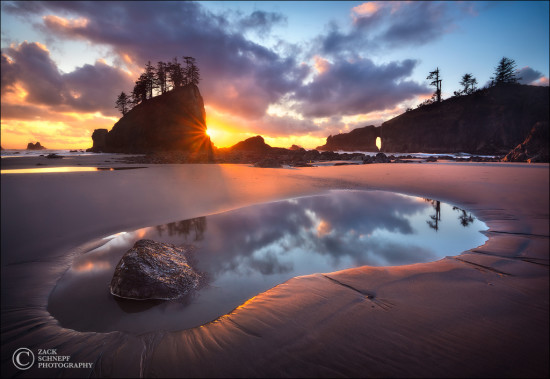
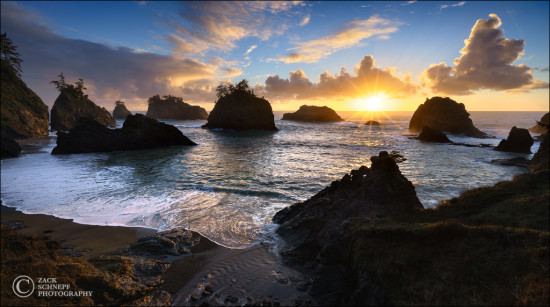
If you are auto bracketing for a scene such as the coastal scene below, the chances of capturing the ocean in a single exposure are pretty low. On the other hand, if you are manually bracketing, you can make individual exposure adjustments for each exposure in the bracket. That’s exactly what I did when capturing this scene. It was much easier to blend the exposures together because the ocean came from a single exposure. The sky also came from a single exposure as the clouds were moving pretty quickly.
I hope you enjoyed these five tips. I have a produced a series of instructional videos detailing my post-processing workflow. To learn more about me or my instructional videos, please visit my website.
About Author Zack Schnepf
I love photographing the landscape. I seek out these type of locations to experience true wilderness, away from crowds, cities, and the stress of everyday life. Visiting these wild areas is a form of meditations for me, where I get to completely relax and appreciate the incredible beauty of nature. I try to convey the emotion I feel and the sense of wonder I have when I see such beauty in nature. That expression through my images, is what photography and art in general is all about for me.


