How to Select Correct Depth of Field in Nature Photography
Depth of field (DOF) is the area in your frame where the photo is acceptably sharp. Getting the right amount of sharpness in nature photography can be challenging, especially for beginner photographers.
In this nature photography depth of field guide, we’ll explore how to select the correct depth of field by balancing aperture, focus distance, focal length, and sensor size. Whether you’re shooting sweeping landscapes or intimate macro scenes, understanding how to control depth of field in nature photography is essential for creating compelling images.”
Basic Concept
Let’s start with the basics. The aperture setting (measured in f-stops) is the most direct way to control DOF. So, we will start there. The technical explanation for adjusting aperture settings is fairly simple:
- Wide aperture (e.g., f/2.8, f/3.5) → Shallow depth of field (blurry background)
- Narrow aperture (e.g., f/11, f/16) → Deep depth of field (more in focus)
I’ll give you a practical example of DOF out in the field. During one of my trips to Oregon, I shot two photographs in a lovely, open field. One flower in particular called attention to its tiny self with a remarkable burst of color. For the first shot below, I used an aperture of 3.5 (f/3.5). Notice how soft the background appears. Only the flower itself and a few blades of grass are in focus.


Narrow depth of field with f3.5 aperture

Wide depth of field with f16 aperture


Now look at the second photo (above). I took this shot at f/16. With a much narrower aperture, the result is obvious. The depth of field is much wider. In this image, you can far more leaves and grass in the background as well as a bit of brown. For me, all of these details are distractions that draw your eyes away from my tiny subject – the flower.
You may also notice that I’ve lost some of the sharp details of the flower itself. This is part of the trade-off when you are working with a narrow depth of field. I love the effect – but you may wish to choose an aperture between f/3.5 and f/16 to get a little more sharpness on your flower and a little less softness in your background. This is an artistic choice that every nature photographer must make.
In this case, I prefer a wider aperture and the resulting narrow depth of field. The soft background leaves the image feeling soft and dreamy. It also serves to eliminate a lot of distracting elements.
Of course, the discussion of aperture and depth of field is far broader than this, but these two photographs make a great jumping-off point for a detailed discussion of the basic concepts.
What Variables Impact Depth of Field
Before you can select a correct depth of field, you must master how to manipulate depth of field. Effectively manipulating DOF depends upon four variables: aperture, focus distance, focal length, and sensor size.
1. Aperture
Aperture is one of the most powerful tools for choosing depth of field in nature photography.
- Selecting a narrow aperture like f/11 or f/16 helps achieve deep depth of field in landscape photography, keeping both foreground and distant mountains sharp.
- Using a wide aperture such as f/2.8 creates shallow depth of field, ideal for isolating flowers or wildlife against soft, blurred backgrounds.
By learning how to choose the correct aperture for landscape depth of field or macro close-ups, photographers can add both technical precision and creative expression to their work.
Some cameras allow you to preview depth of field on the LCD. Others have a depth of field preview button which allows you to see the actual depth of field on the screen.
2. Focus Distance
Your chosen focus distance dramatically influences depth of field. In macro nature photography, getting close to your subject naturally produces shallow depth of field, which can highlight textures and details. In contrast, focusing farther away while using a smaller aperture helps maximize sharpness across the entire frame, perfect for sweeping landscapes. For many nature photographers, understanding how to balance aperture with focus distance is the key to consistently selecting the correct depth of field for each scene.

Shallow depth of field created by getting close to the subject at Sunset Beach, Mana Island, Fiji
3. Focal Length
Focal length also shapes how depth of field appears in your images. A wide-angle lens naturally provides greater depth of field, making it a favorite for landscape photo depth of field selection. Meanwhile, telephoto lenses compress the background and reduce depth of field, which can be used creatively to isolate subjects in wildlife or forest scenes. Knowing how to use focal length in nature photography gives you more control when deciding how much of your image should appear sharp.
4. Sensor Size
Sensor size plays a subtle but important role in depth of field. A full-frame sensor typically produces shallower depth of field compared to a crop-sensor camera when using the same aperture and focal length. This difference can work in your favor: crop sensors are often useful when you want more of your scene sharp, while full-frame cameras give you greater flexibility for shallow depth of field effects in nature portraits or macro photography. Understanding how sensor size impacts depth of field in nature photography helps you choose the right camera system for your style.
Among the four depth of field variables, aperture offers the most practical control for nature photographers. While adjusting focus distance and focal length can also affect depth of field, these options are often limited by your shooting position and subject. Since sensor size is determined by your camera body, unless you have access to different camera bodies, aperture remains the most likely and practical method for changing your depth of field.
Let’s look at a real-life example of how I use these variables to get the correct depth of field.
Shallow Depth of Field Workflow
I love aspens. Who doesn’t? But if you’ve tried to photograph trees, maybe you know that getting a shot you really like isn’t as easy as one may think. You pull out your camera in front of all that golden glory, and the resulting image just doesn’t do the scene justice.
So, how do you go about getting the shot you want in a nature or landscape photography situation?
What Do You Want to Capture?
The first step is to consider the most important element in your image. What are you trying to show? Is it the sweeping landscape? The beautiful mountainside? Or is the most important element of the image the colors themselves?
In my case with the aspen trees, I really wanted to show off the details on the trunks of the trees. But I also wanted to ensure that the colors were an important part of the photo. And, for anyone who has seen a lot of my photography, you may know that I am almost always looking for a minimalist nature photography composition. So, of course, that was part of my planning as well.
Finding the Right Nature Photography Composition
To satisfy my goal with the aspens, I needed a high vantage point with trees growing below me. Standing on the forest floor would put me too low – I’d end up with ground in the photo if I pointed my camera downward or even straight ahead. In addition, I’d end up with sky in the photo – as well as distortion – if I angled my wide angle lens upward. No good.

When we drove past this glen, I knew we were in the right place. The road was high enough as were the bases of the trees. And behind my scene was a vast mountain that blocked the brightness of the sky. Perfect.

The next step was to find the right tree for my “point of interest”. I walked up and down the road searching for the best one. But each time, there was something distracting behind the potential tree. A trunk that tilted at an odd angle – calling attention to itself. A broken branch. Too much white trunk behind and not enough golden color. Oftentimes, trees were simply too close to let just one stand out on its own.

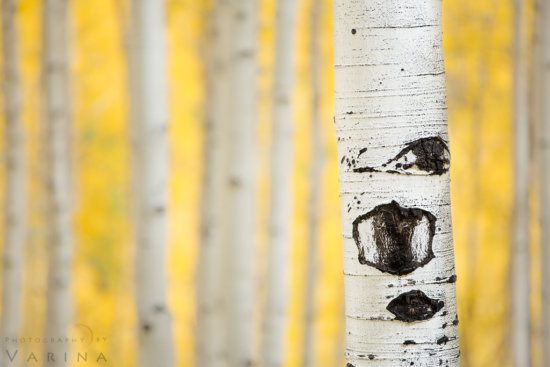
This tree I settled on what just right – but only if I stood in the right place and used the correct focal length. There’s actually a dead trunk just behind this one, but I chose an angle that hides it. I then used a 200mm focal length to create a perfect composition that eliminated all distracting elements.
Select the Desired Depth of Field
When I finally found my photography composition, I took a few shots to decide how much depth of field I wanted. I chose an aperture (f/4) that would allow me to smooth the details in the background as much as possible – while keeping the tree in the foreground nice and sharp.
We were in this spot for about 20 minutes, and I have just one image to show for it. But it’s exactly the photo I wanted. As you can see, nature photography composition sometimes leaves aperture as the only element available to manipulate the depth of field in a photo.
Final Thoughts on Depth of Field
Selecting the correct depth of field in nature photography isn’t just a technical decision—it’s a creative one. By learning how to choose aperture for landscape depth of field, adjusting focus distance, experimenting with focal length, and understanding sensor size, you can bring more intention to every image. And when traditional methods aren’t enough, techniques like focus stacking and hyperfocal distance provide powerful solutions. Mastering these tools gives you complete control over depth of field, helping you tell stronger visual stories through your nature photography.
Now grab your camera, head outdoors, and start creating stunning, intentional compositions with the depth of field you envision. Happy shooting!
About Author Varina Patel
There is nothing more remarkable to me than the power of nature. It is both cataclysmic and subtle. Slow and continuous erosion by water and wind can create landscapes every bit as astonishing as those shaped by catastrophic events – and minuscule details can be as breathtaking as grand vistas that stretch from one horizon to the other. Nature is incredibly diverse. Burning desert sands and mossy riverbanks… Brilliant sunbeams and fading alpenglow… Silent snowfall and raging summer storms… Each offers a unique opportunity. I am irresistibly drawn to the challenge of finding my next photograph, and mastering the skills required to capture it effectively.


