A Beginners Guide to Aperture in Landscape Photography
For beginners, mastering a few basic camera settings can offer giant steps towards improvement. Aperture is one of the best and arguably the most critical camera settings to understand in landscape photography, right ahead of shutter speed and ISO. Simply put, it is the hole inside the camera’s lens. That hole opens to allow light to enter and travel to the camera’s sensor. The size of the hole changes in diameter to let it more or less light. Controlling the amount of light has a direct impact on the photo’s depth of field (DOF). The depth of field is the distance around the focus point that is sharp and in focus. This is the entire reason that aperture plays such a critical role in composition and creating an image. It is a major control mechanism to determine what will or will not be in focus in a photograph.

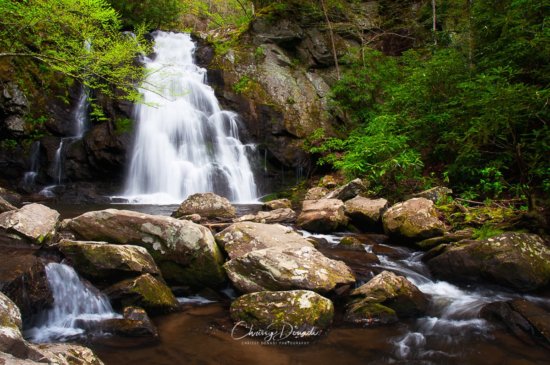
Taking the photograph at f/14 allowed the depth of field to be sufficient for the entire scene to be in focus. A Neutral Density filter was used to slow the shutter speed to elegantly capture the water in the scene.
Aperture Overview
As a quick aperture overview, the size aperture’s opening is known as a f-number. The f-number is the ratio of the focal length to the effective aperture diameter. A camera lens typically has a set of marked “f-stops” where the photographer can choose the f-number. Thus, it is quite common for photographers to use f-number and f-stop interchangeably. These f-numbers are the mathematical results of doubling light or reducing light by half. Every change between the standardized f-numbers represents a change of one stop of light. Since the calculations are using square roots and powers, the f-numbers are counter intuitive to the size of the opening in the camera’s lens.
For instance, the opening becomes smaller when moving from f/4 to f/5.6. It is reducing the light entering the camera by half. Similarly, the opening becomes larger when moving from f/8 to f/5.6. It is increasing the light entering the camera by doubling it. If that is difficult to remember, a trick is to replace the f with the number one and review the fractions. By using fractions, it is easier to see which aperture opening is smaller. In comparing f/4 and f/18, 1/4 is larger than 1/18. Therefore f/4 is a larger opening and lets in more light than f/18.

Taking the photograph at f/8 allowed the depth of field to be sufficient for the entire scene to be in focus. A Neutral Density filter was used to slow the shutter speed to elegantly capture the water in the scene.
Opening-Up Versus Stopping-Down
A low f-number (e.g f/2.8) means a big aperture or wide opening. When the aperture is wide, then the depth of field is shallow. There is not much around the actual plane of focus which will be in focus. Photographers use the terminology of “shooting wide” or “opening-up” to mean using a smaller f-number. Opening-up will let more light enter the camera.
On the other hand, a high f-number (e.g. f/22) means a small aperture or small opening. Photographers will use “closing-down” or “stopping-down” to signify using a small aperture. When the aperture is small, meaning closed-down with a larger f-number, then the depth of field is long. This means that a lot of the distance around the focus point is sharp or much of the photograph is in focus. Stopping-down will let in less light.
Advice on Aperture Settings
While it might be tempting to use the smallest aperture possible, such as f/22, to get the largest depth of field that isn’t often advisable. The same is true for using the largest aperture to minimize the depth of field. Camera lenses, even top of the line, professional grade lenses do not produce their best results when used at their maximum and minimum apertures limits. In other words, the images will not be as sharp as they could be in the area in focus.
Every lens has a sweet spot so it might be f/4 for one lens and f/11 for another. The common thread among all lenses is that they tend perform better in terms of sharpness if you avoid the extremes of the aperture options. To be clear, I have shot at f/2.8 and f/22. However, I only do so when conditions require me to do so. Even moving away from the extremes by one stop can make a large difference in the photo’s sharpness.

With everything in the composition being so far away, f/11 was a good aperture choice to keep everything in focus and use the sweet spot of the lens.
Getting Started with Setting the Camera’s Aperture
To recap, the size of the aperture has a huge impact on the photograph as it helps determine how much or how little of the image will be in focus. To start experimenting with different aperture settings, set your camera to aperture priority mode as well as single point focus mode.
Aperture priority mode, often labeled as A or AV, is a semi-automatic shooting mode which enables you to choose the desired aperture and the camera will set the shutter speed for a proper exposure. In addition, ensure that auto-ISO is turned off for experimentation, or in general. Having the ISO remain stable will help gain a better understanding about the change in light entering the lens as well as the change in the depth of field under different aperture settings.
In addition to the camera mode, ensure the autofocus mode is set to single point focus. Single point focus allows you to select the point of the image to focus. This will ensure that the focus point will be exactly as you desire while you play with different aperture settings in landscape photography.
From vast grandiose landscapes to intimate shots of nature’s details, having control over the aperture setting will grant the creative freedom to capture truly unique images. To build upon the foundation of aperture and depth of focus, look to Visual Wilderness’ In-Sharp Focus Video Course to guide you through best practices and various in-camera focusing tips and techniques. May the light be on your side and happy shooting!


 Jaclyn Tanemura


